What you'll learn
- The four most common Grant Types from OAuth.
- Create and manage applications in Okta.
- Securing an existing API using Anypoint Platform.
- Create a Mule App in Anypoint Studio to retrieve tokens implementing the four Grant Types flows.
- Test the application and interact with the API using an access token.
What you'll need
- Anypoint Platform account
- Anypoint Studio (last version available)
- Okta Developer account
- Postman (or another API Testing app)
In this Codelab we are going to learn the four most common grant types from OAuth and how to implement each flow using Anypoint Studio and the OAuth connector. These grant types are:
- Client Credentials
- Authorization Code
- Resource Owner Password
- Implicit
The important thing to remember is that both client credentials and resource owner password flows are non-interactive. Meaning that the final user (a.k.a. resource owner) doesn't have to interact once the token request is sent. These Grant Types are mainly used for service-to-service integrations where there is no human intervention.
On the other hand, authorization code and implicit flows are interactive. At some point, the resource owner will be asked to login to Okta and identify who they are. These Grant Types are used on interactive applications, like web or mobile, to get a token securing the resource owner credentials (they never go though the Client App).
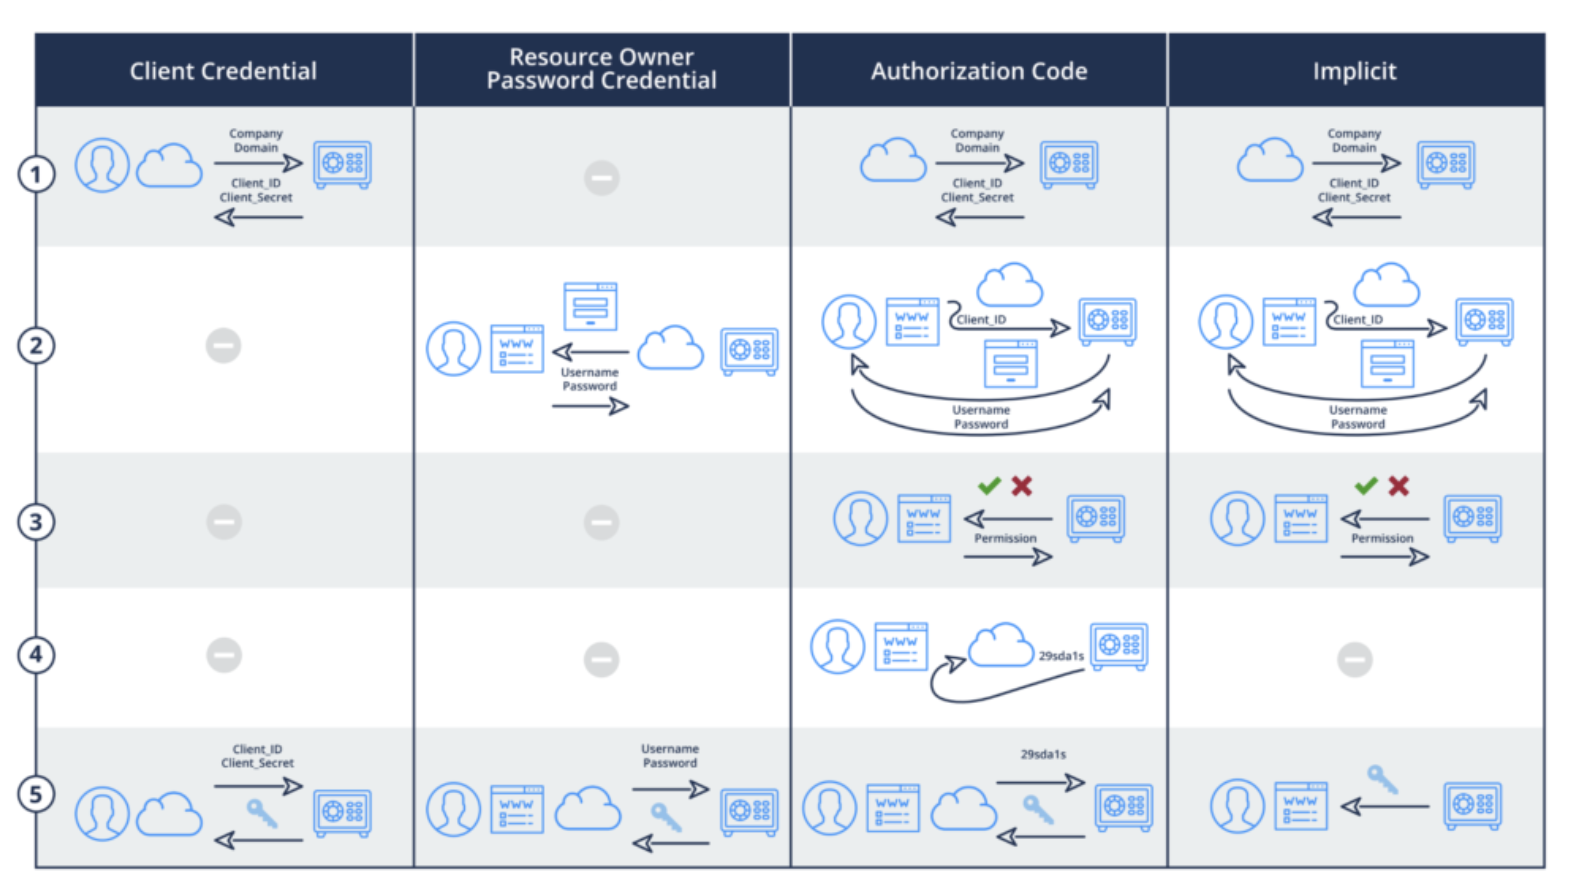
Differences Between OAuth2 Grant Type Flow Diagrams
In principle, the Get Access Token flow has 5 steps (as shown in the diagram below):
- Pre-register Client (App) with OAuth Server to get Client ID/Client Secret
- OAuth Server authenticates users presenting a login page. Sometimes it also receives the App's Client ID.
- OAuth Server solicits user permission (consent) to allow the App to perform something on her behalf
- OAuth Server sends secret Code (a.k.a. Authorization Code) to App
- App acquires Key/Access Token from OAuth Server by presenting secret Code and Client Secret
If you want to learn more about these diagrams and Grant Types in OAuth visit this link:
https://blog.oauth.io/introduction-oauth2-flow-diagrams/
However, later on, we will have a deeper look and see how each grant type works in detail.
In this Step, we are going to create two Apps in Okta (a Web and a Native app) to later interact with them from a Mule App we are going to create. The type of the app will enable specific Grant Types that make sense for each scenario.
We will configure each app with their callbacks, Grant Types allowed, scopes, etc.
1. First of all, you will need to create an Okta developer account. Later on, we will create and manage applications from Okta.
Get the trial account here:
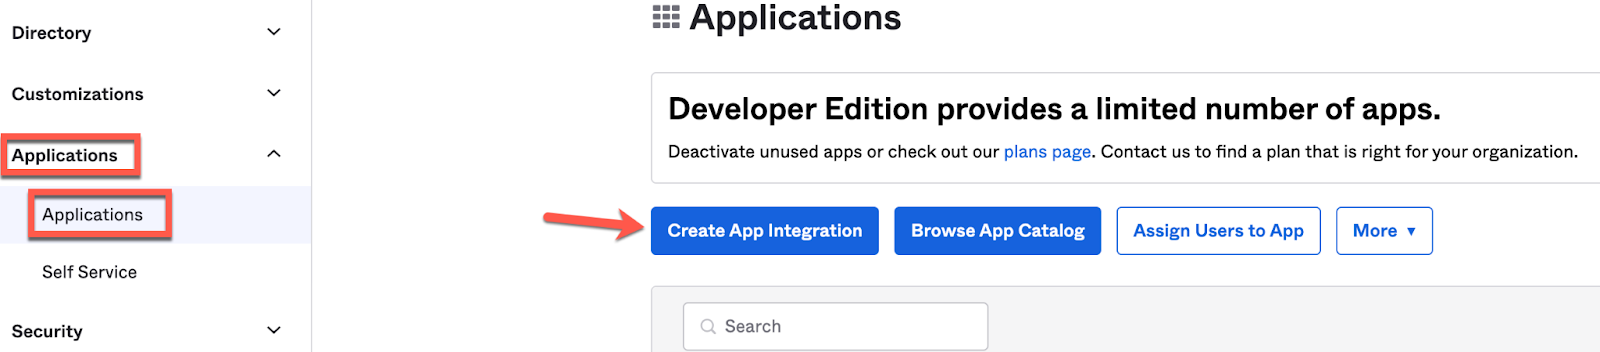
2. Create a Web App in Okta. We will name it Web App.
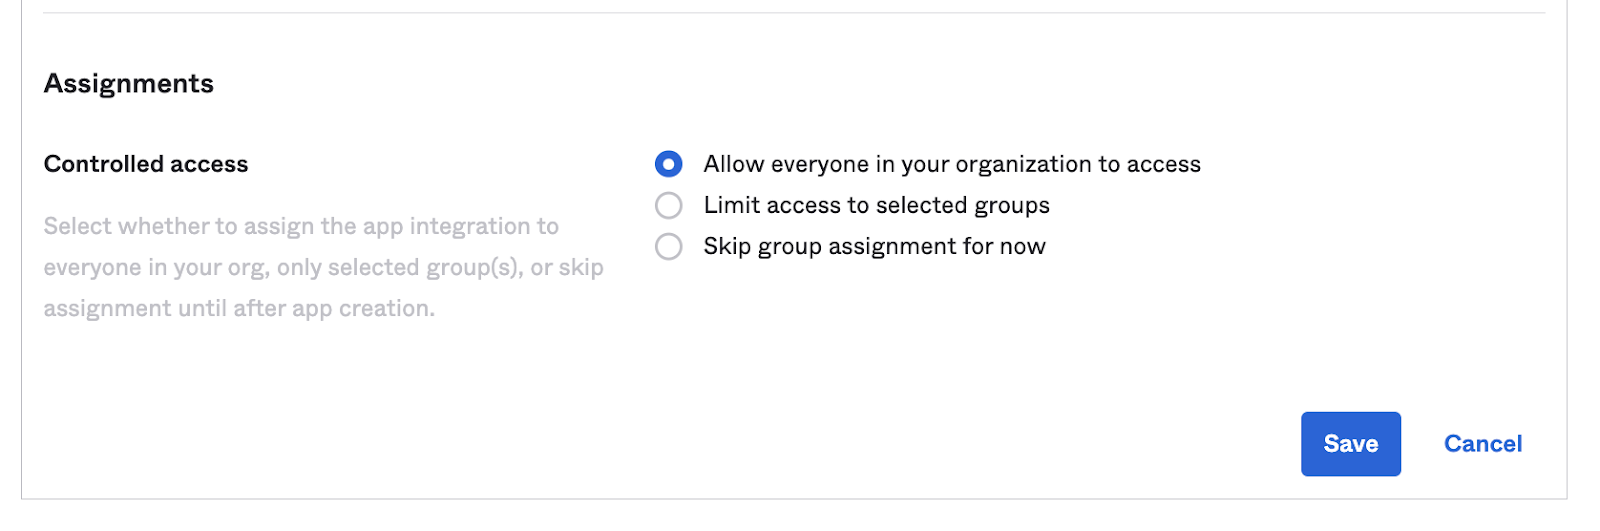
Go to Applications → Applications → Create App Integration and setup a Web Application with the details as below:

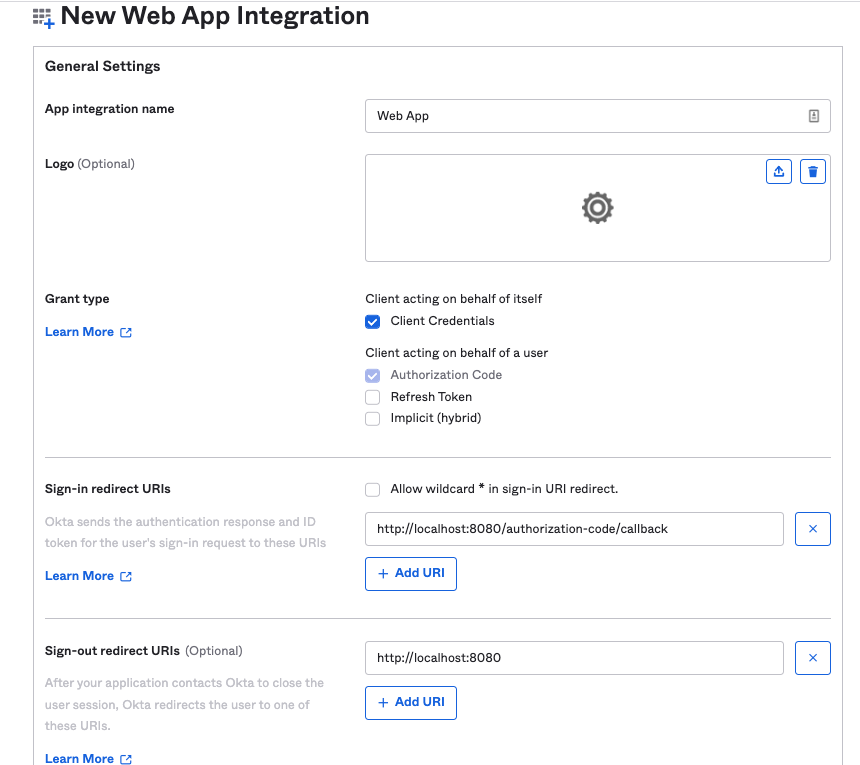
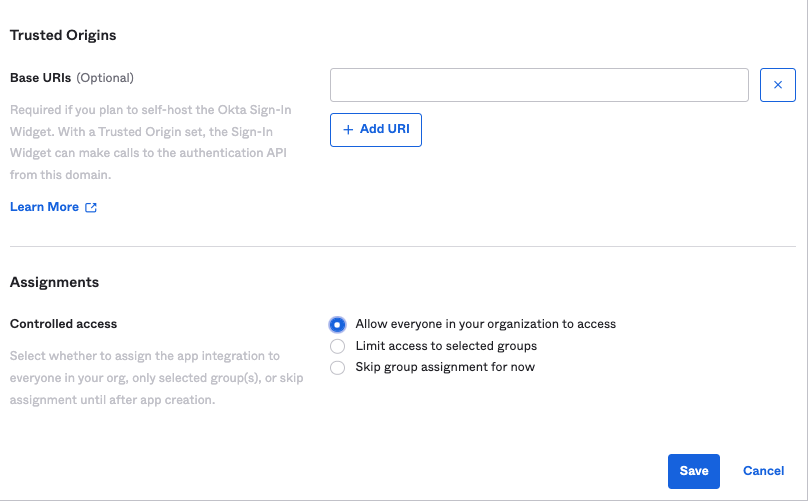
Click Save when finished.
As you can see from the screenshot above, we have set this client application for both Client Credentials as well as for Authorization Code OAuth 2.0 grants and have assigned this app to ‘Everyone'.
For this app, we are only going to implement the Client Credentials grant type.
3. You will land in the General tab of your application. From here, take a note of the Client ID and Client Secret generated. We will use them later.

4. Add a Custom Scope for the Web App.
Go to Security → API → Authorization Servers → Click on Default → Scopes
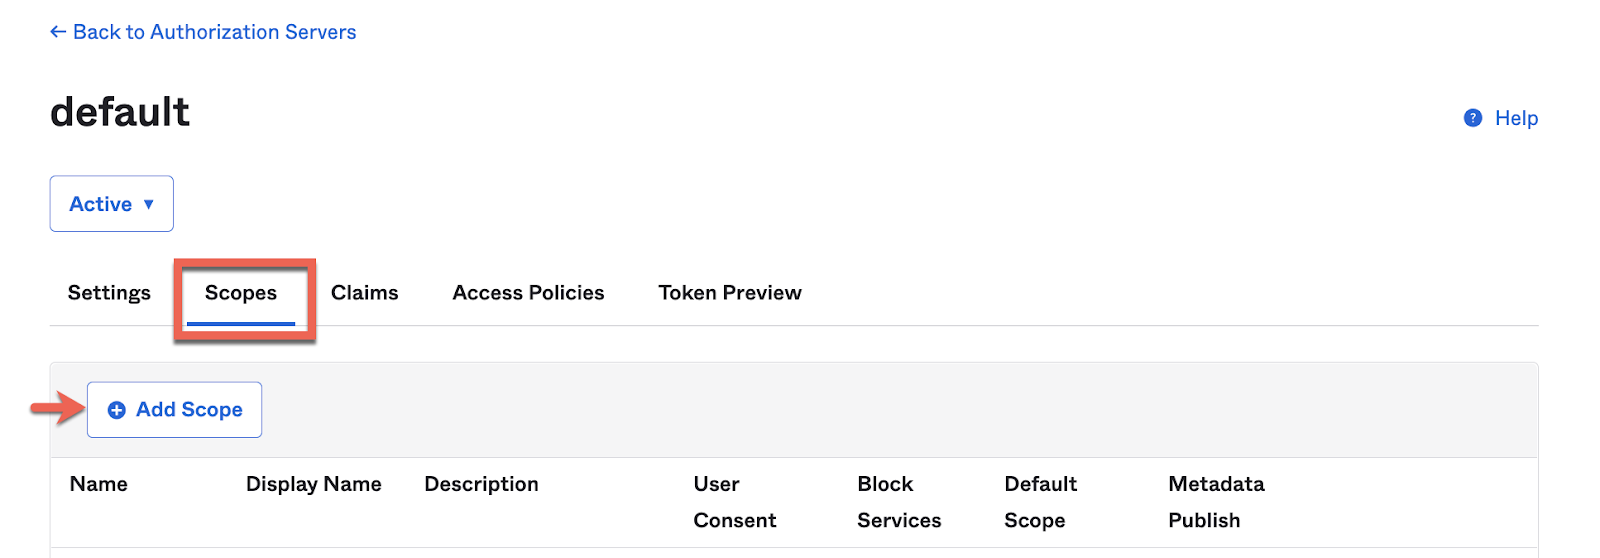

We'll need to use this custom_scope later on this exercise to properly retrieve an access token.
5. Now, similarly as with the Web App, we'll create a Native App in Okta. We'll name it Native App.
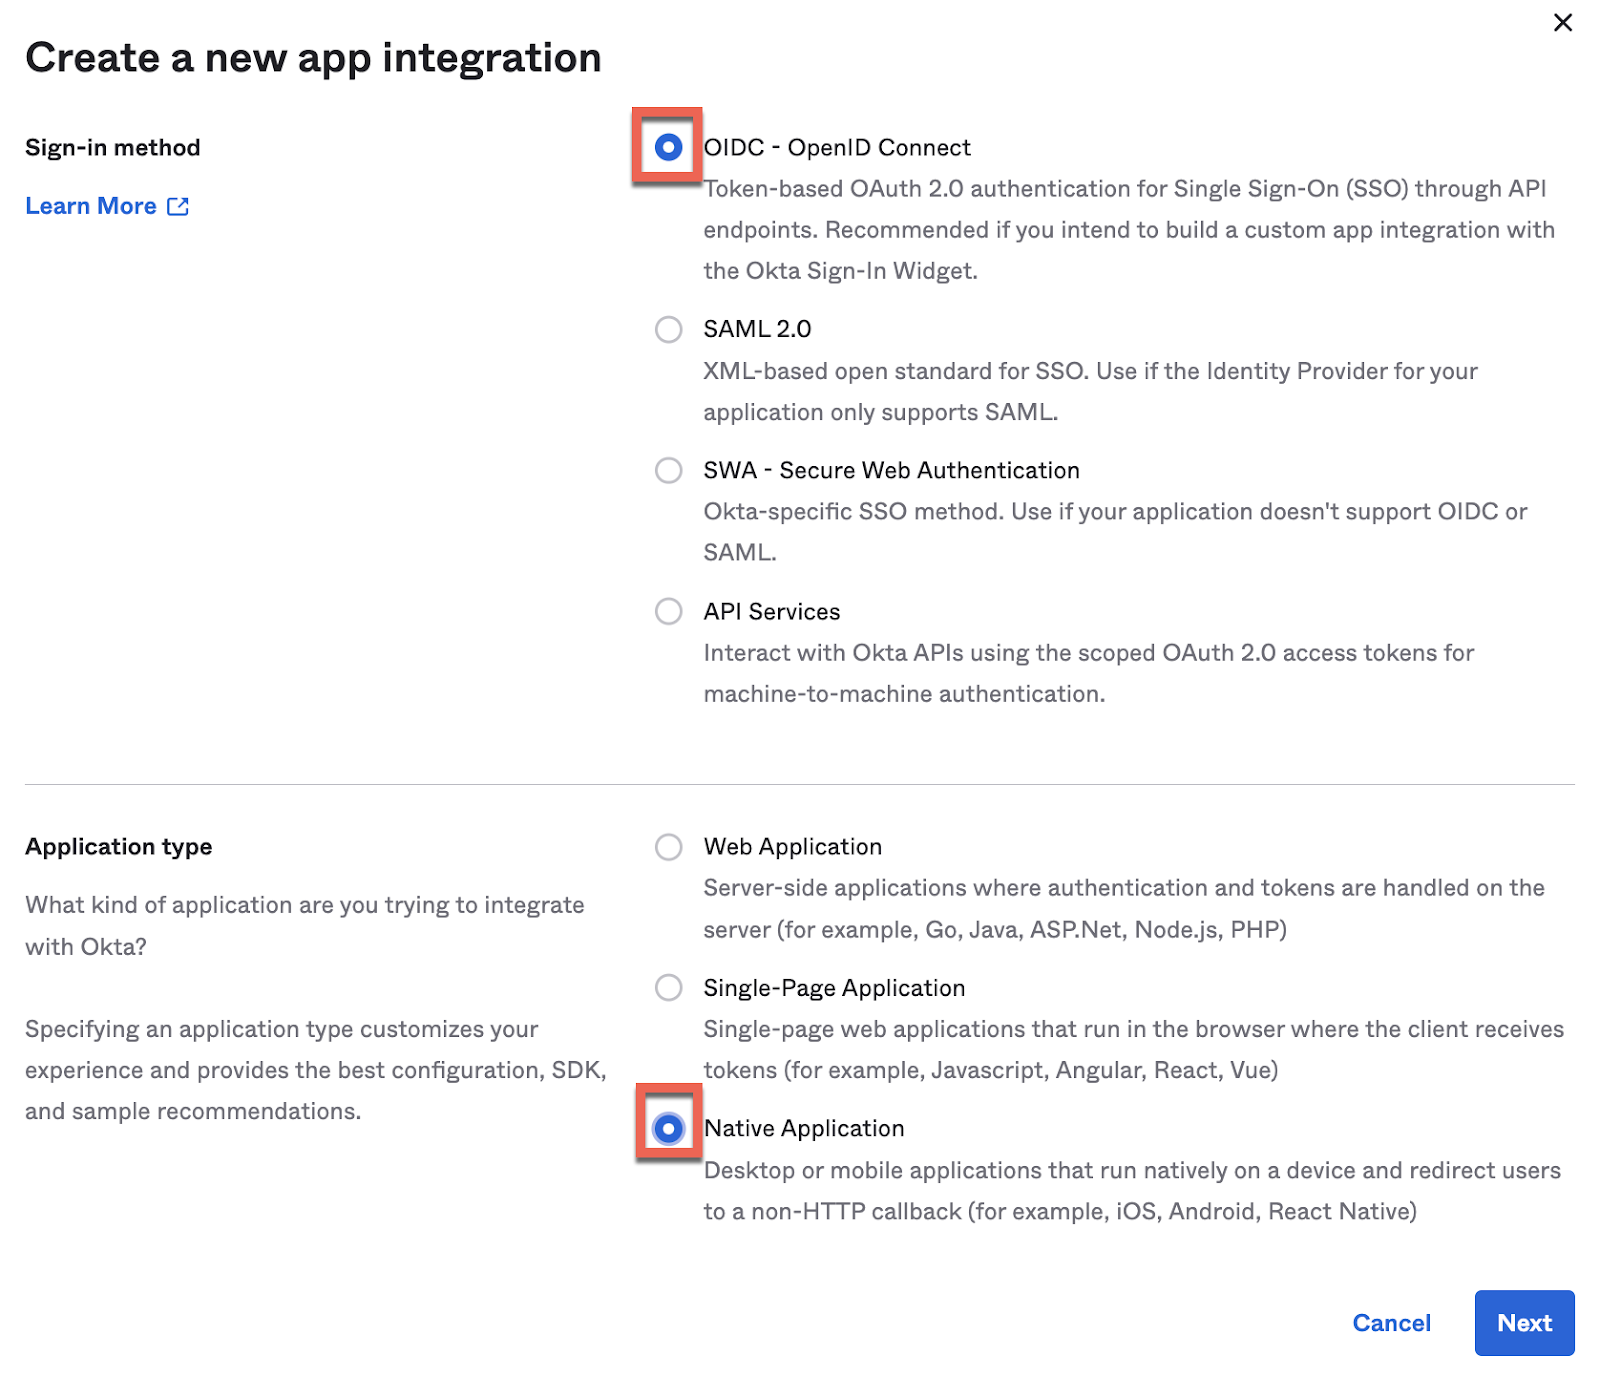
And select all the grant types (just in case we need them in the future).
Click Save when finished. For this app, we are going to implement the other three grant types: Authorization Code, Resource Owner Password and Implicit.
Take a note of the Client ID and Client Secret from this app, we'll need them later.
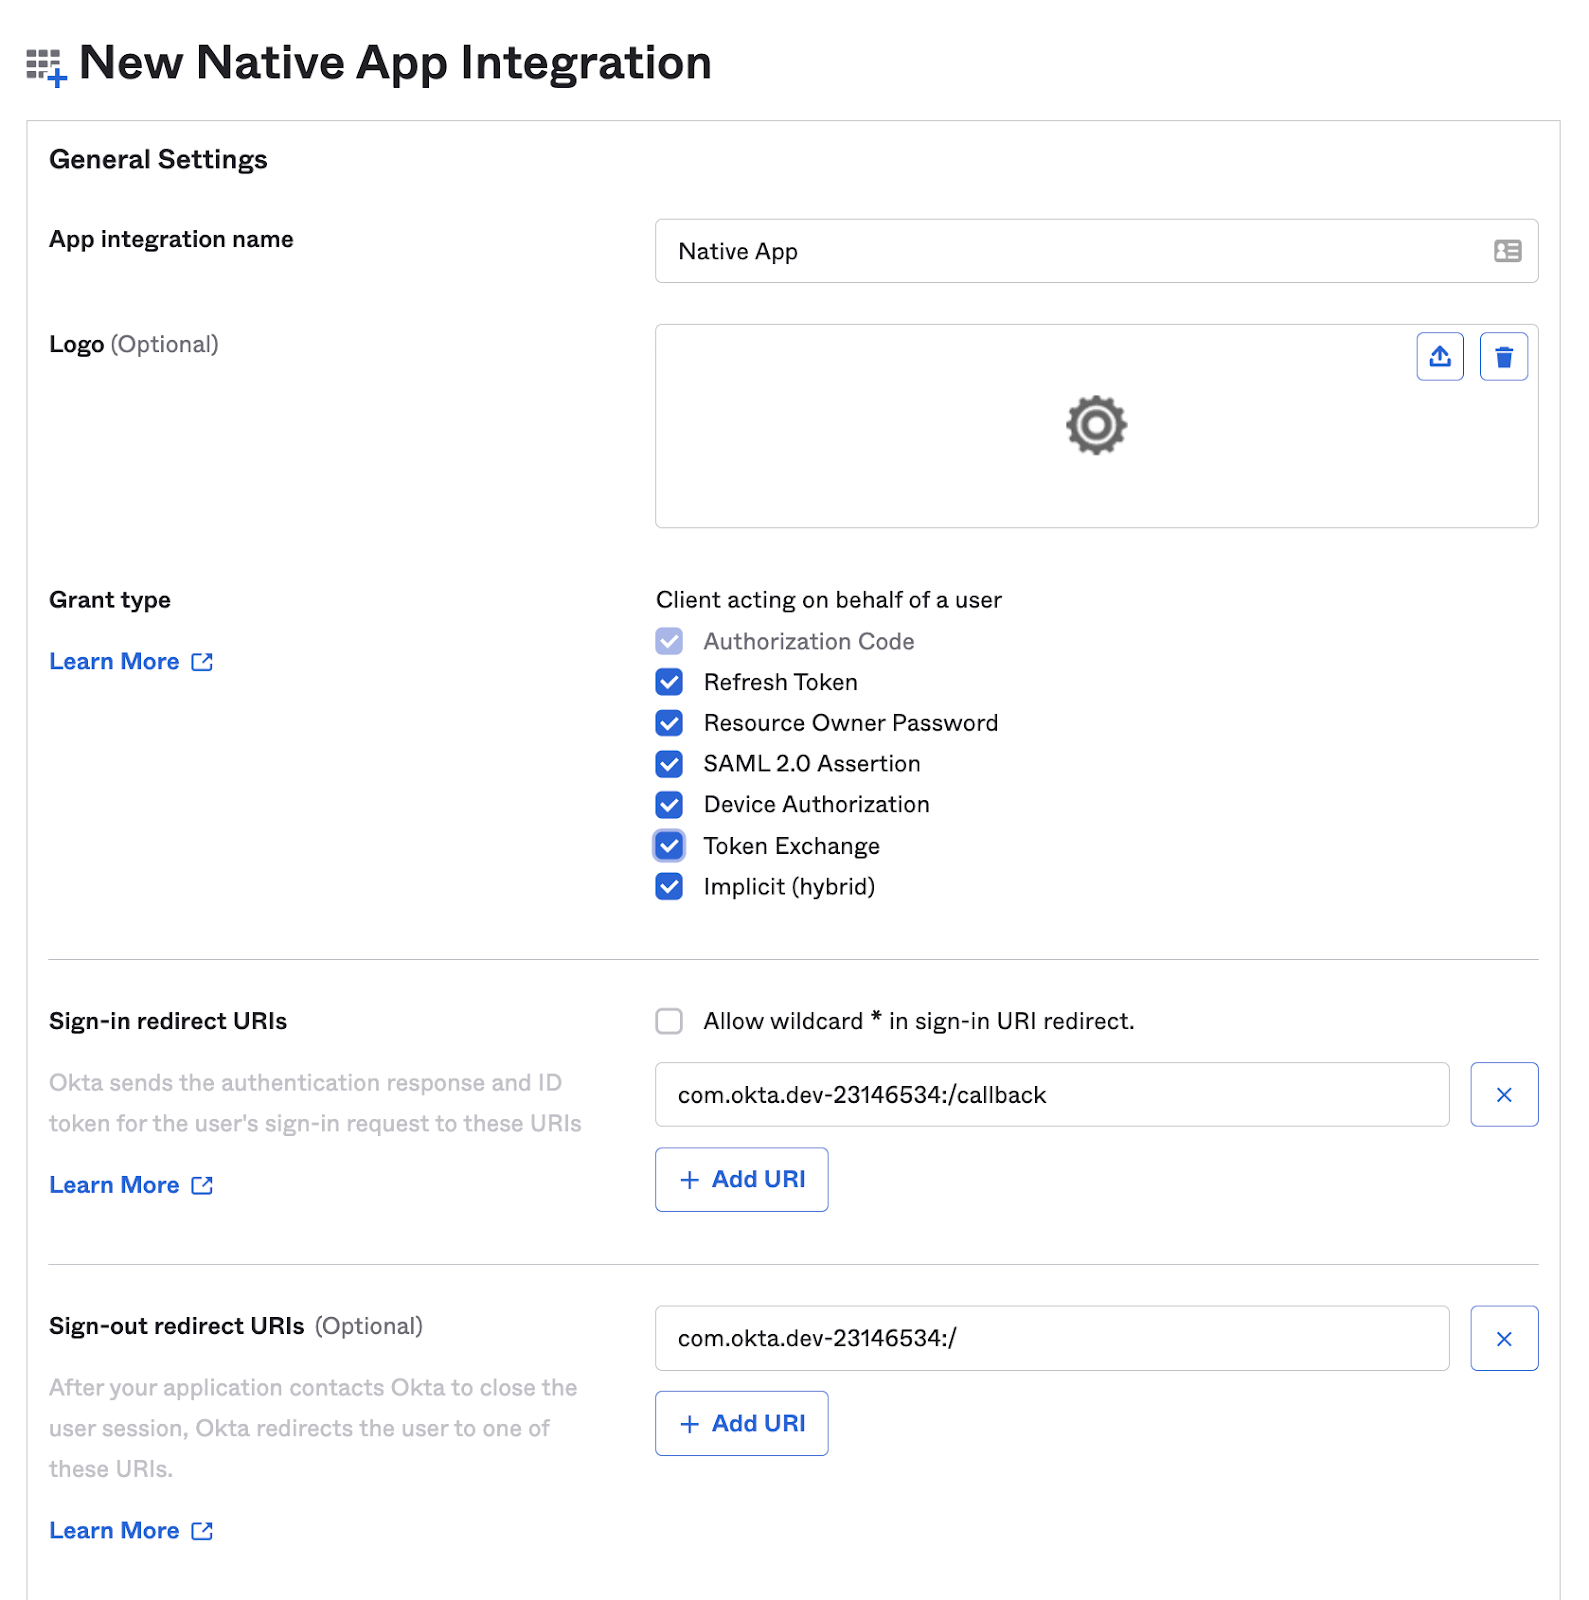
6. Add a Callback URI for the Native App.
Go to the General Settings of the Native App and from there Edit them.
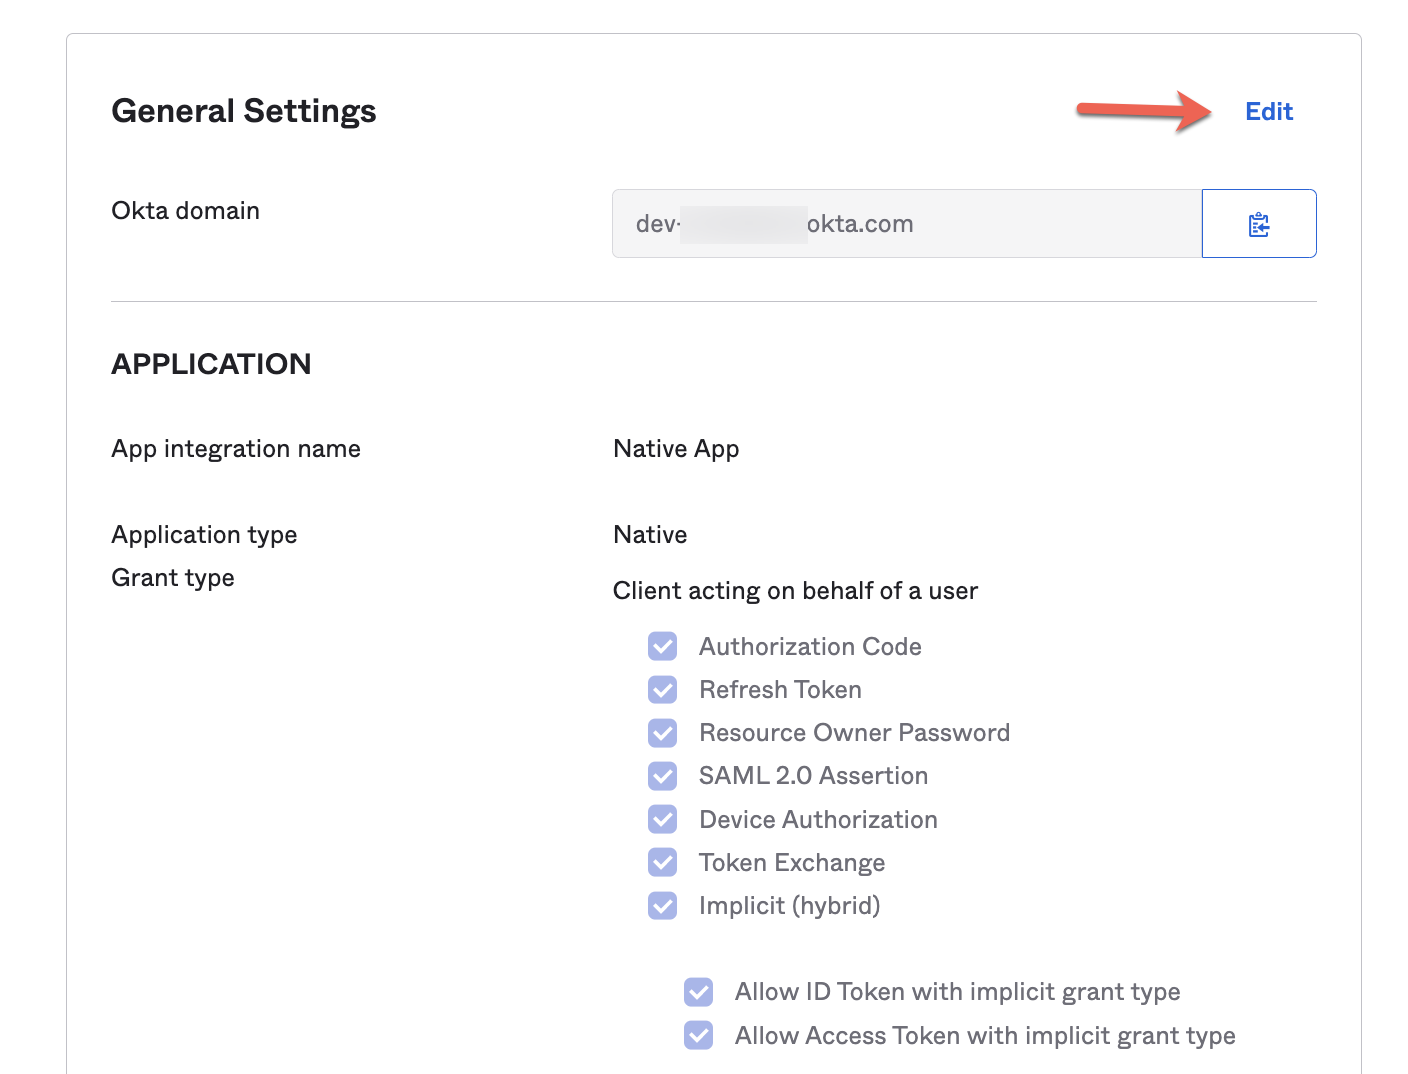
Scroll down up to LOGIN and add a new callback URI:
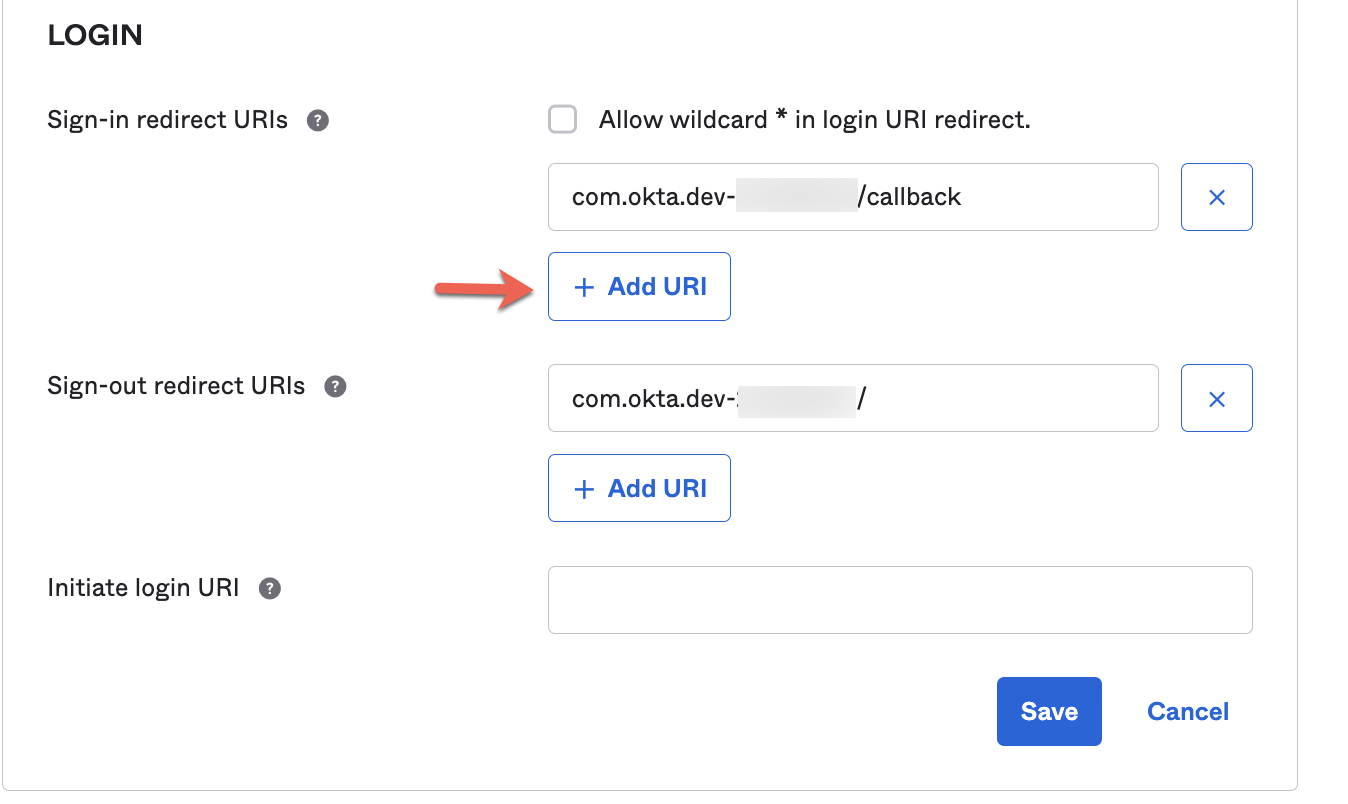
Add: http://localhost:8081/login/callback
Now, we're all set and ready to move on to the next step!
In this step, we are going to use a public API and then secure it by creating a proxy with Anypoint Platform. This will enforce the client to send a valid token to access the API.
We'll use this API to test the scenarios we develop later.
The API we'll be using is Random User API.
1. Check that the API is working properly from your browser:
https://randomuser.me/api/It returns information about a random fake user, including gender, name, email, address, etc.

The important thing here is securing the API, not the API itself. So, let's secure it.
2. First, we are going to manage the Random User API from Access Management.
Go to Anypoint Platform → Access Management → Manage API.
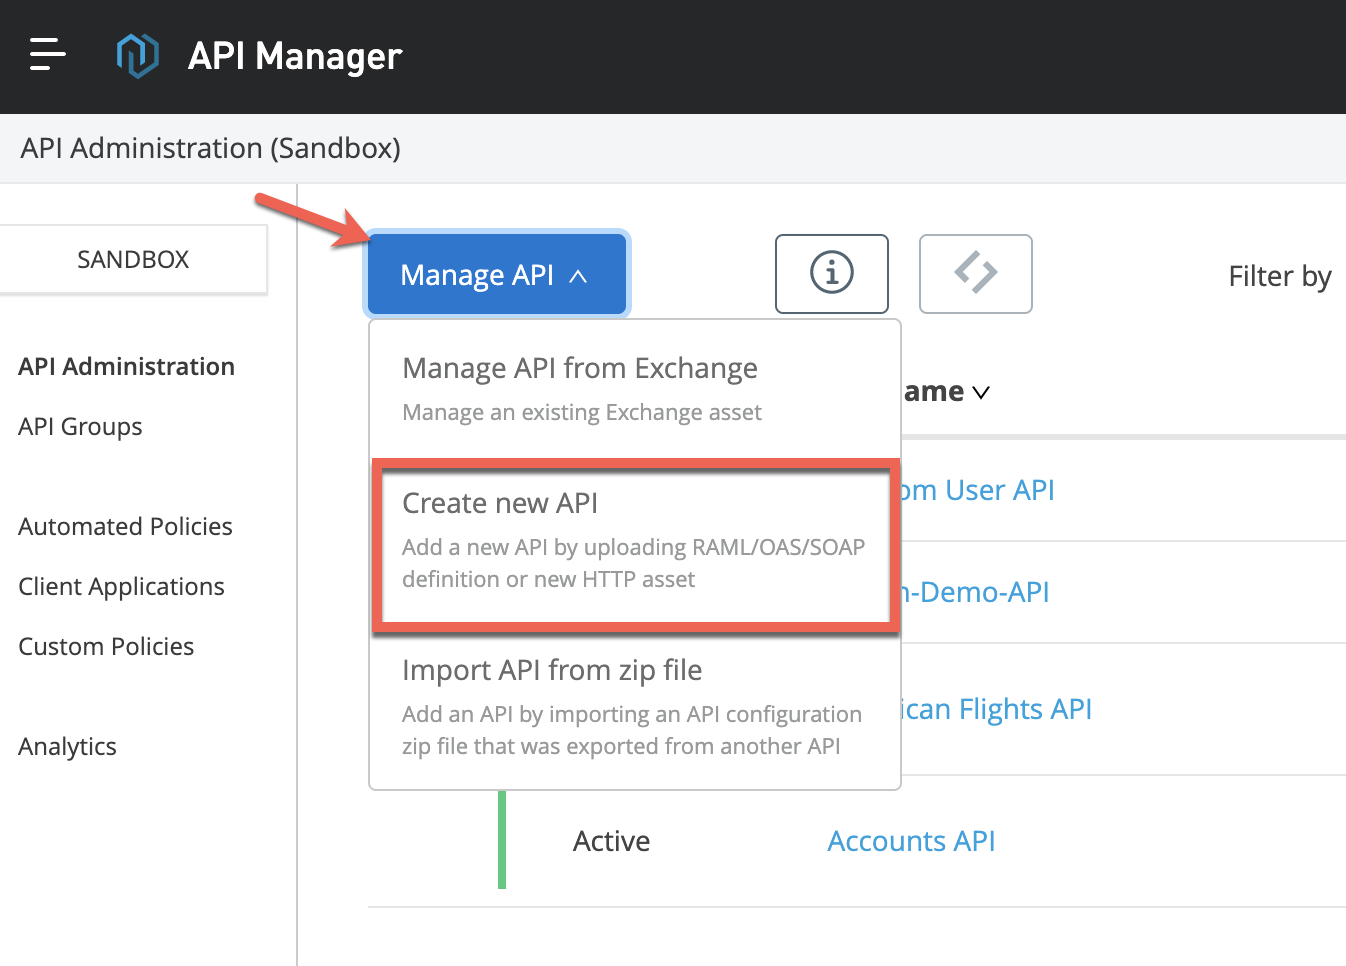

Select Endpoint with Proxy, paste the API URL and select a provider.
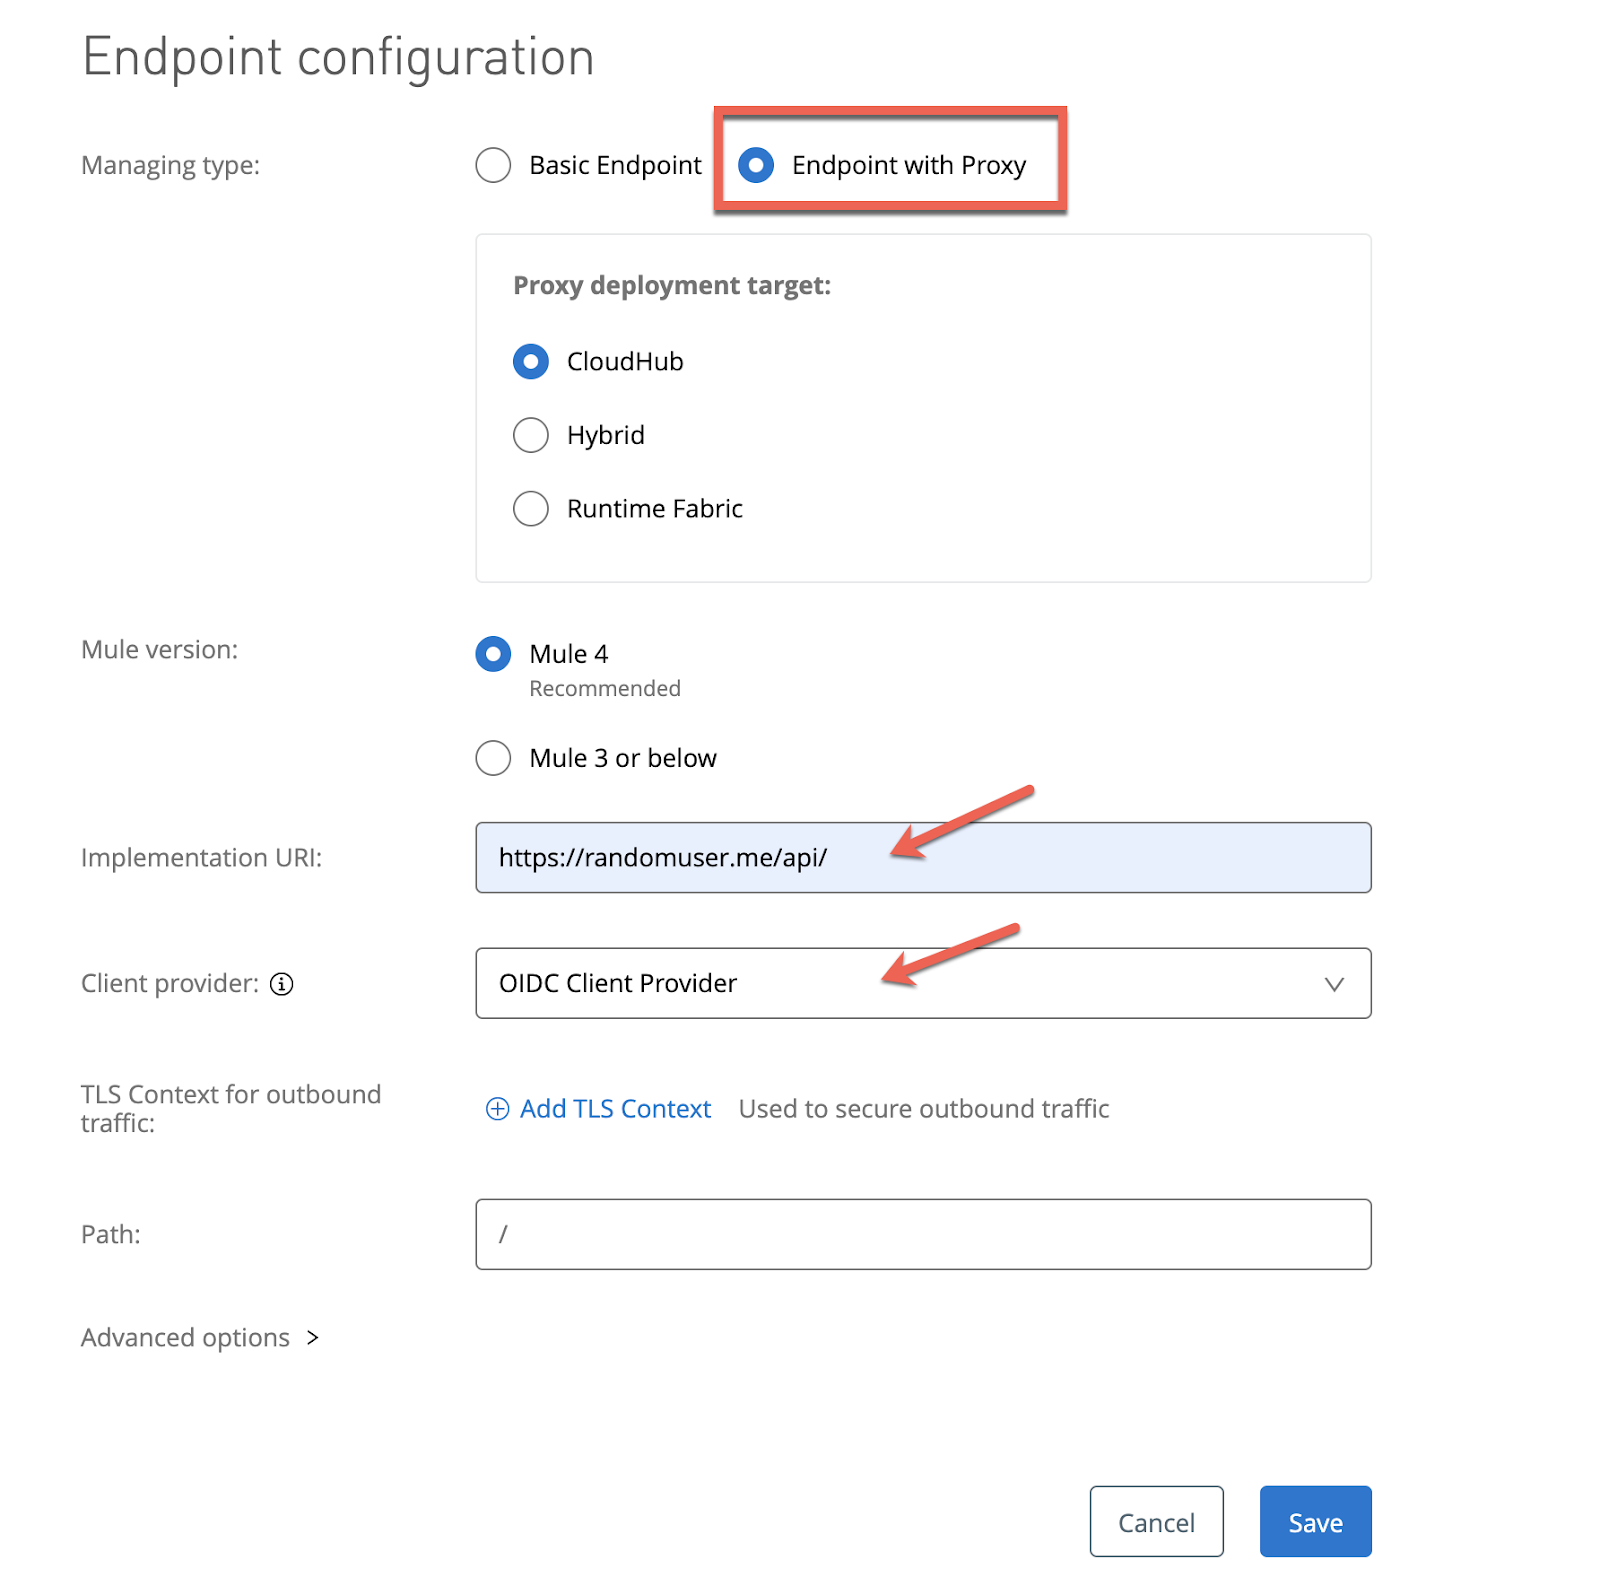
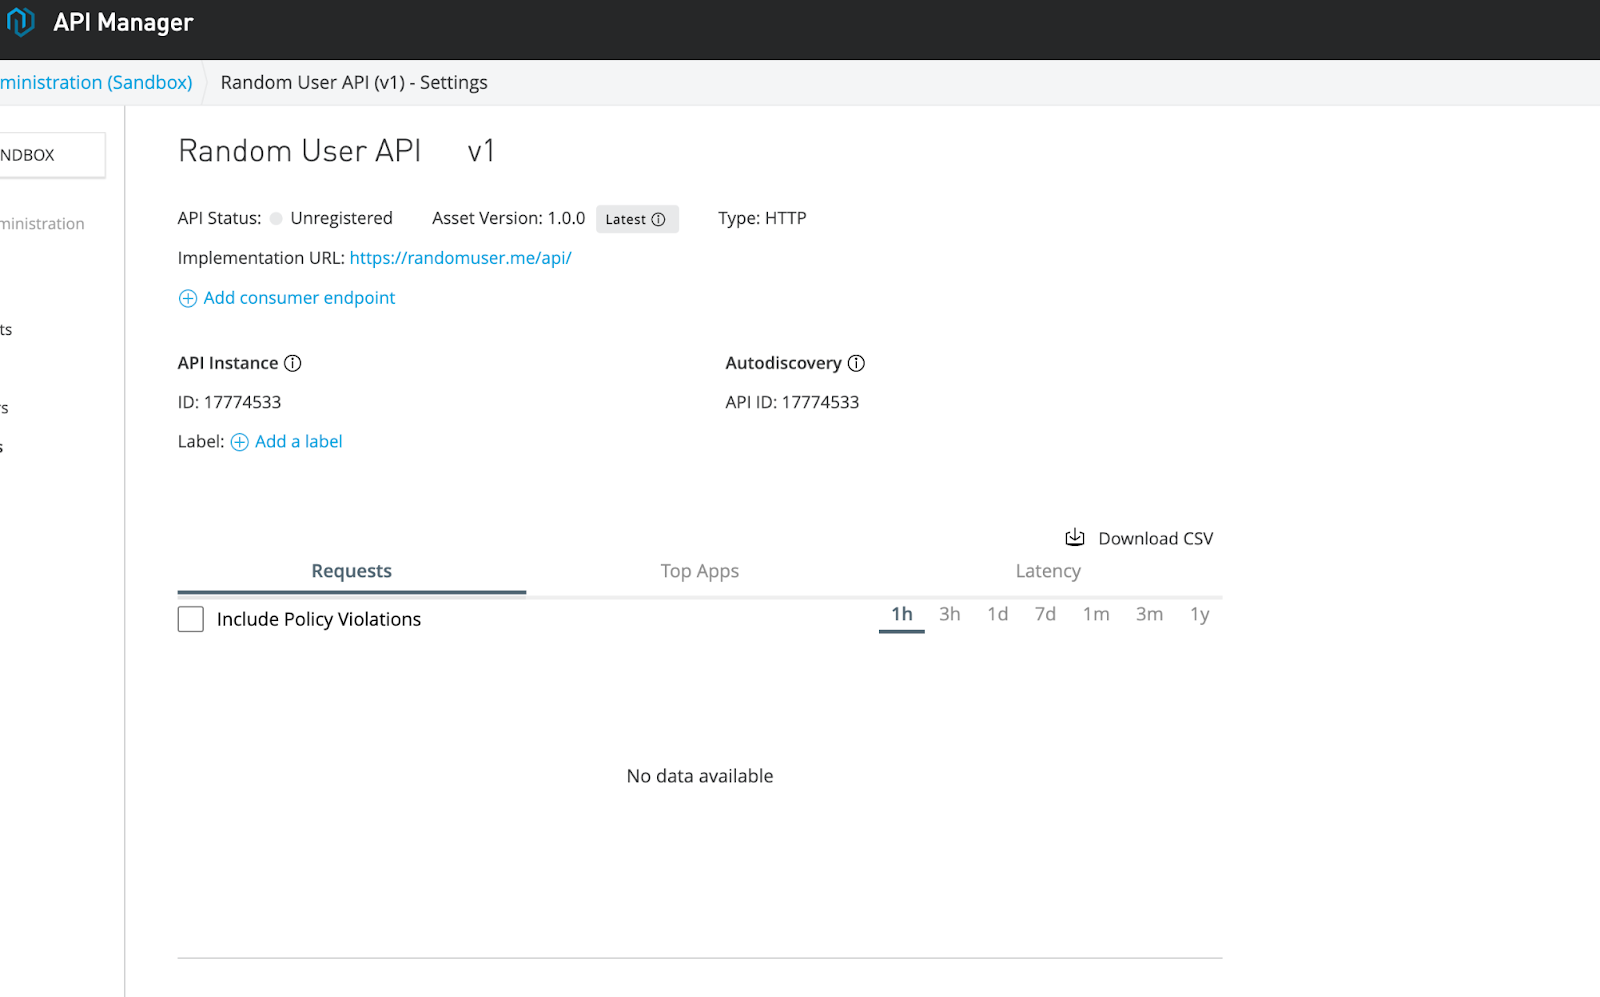
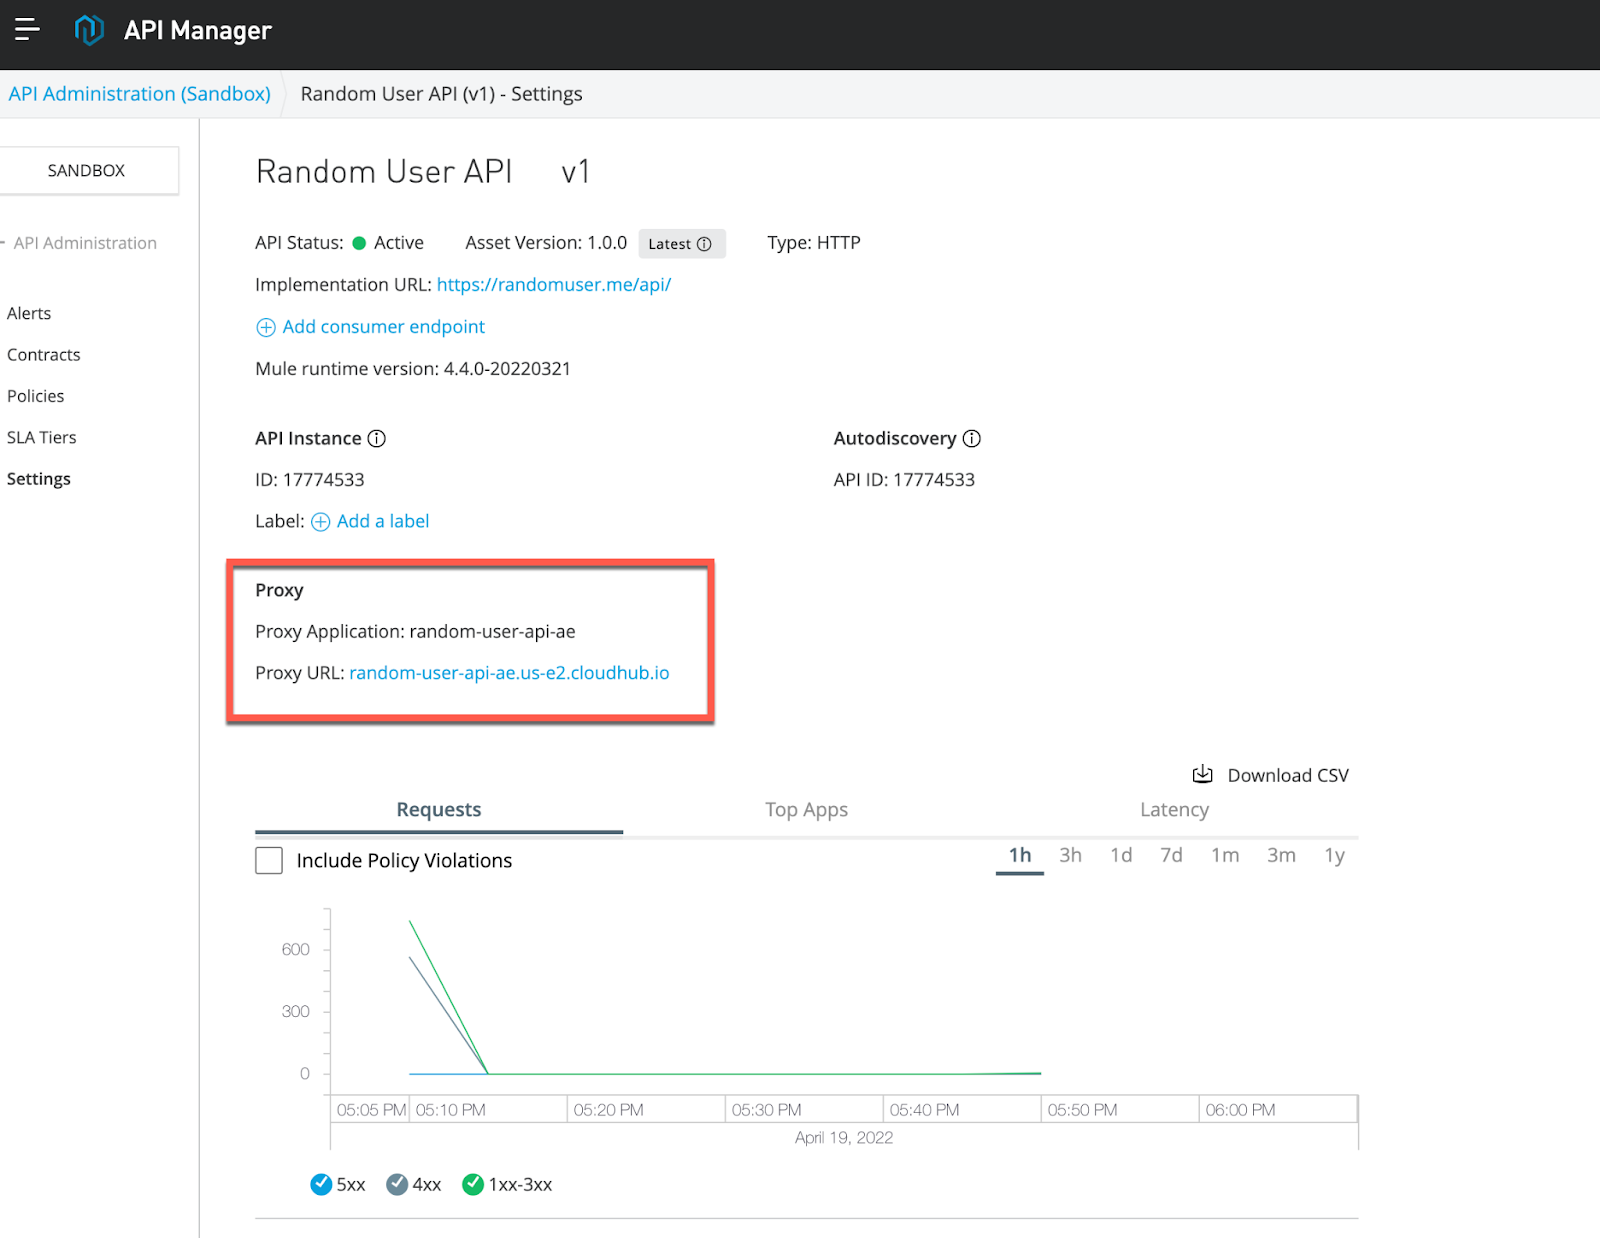
Click Save and you'll land in this page:
Finally deploy the Proxy. Select a runtime version and a name (I always name the APIs or Proxys that I create with my initials at the end):
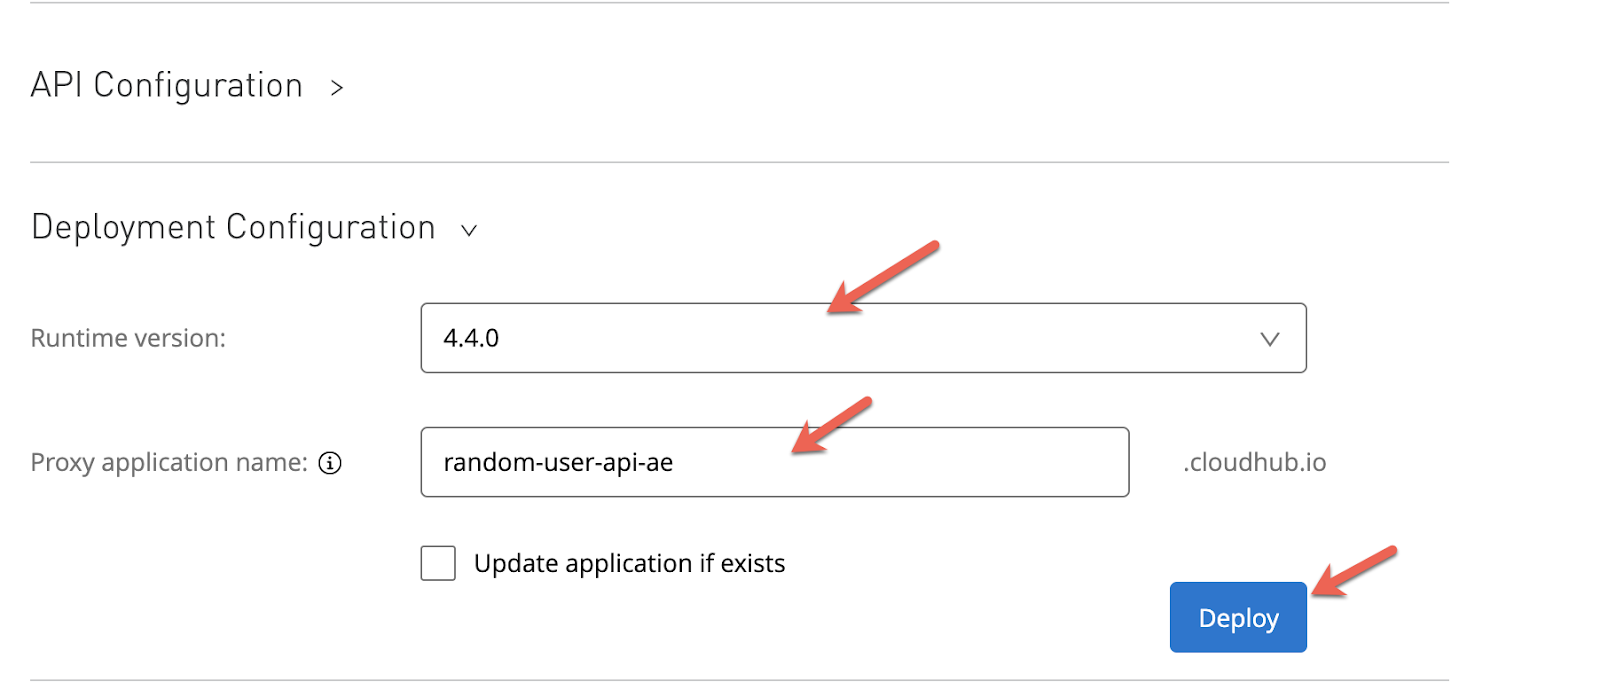
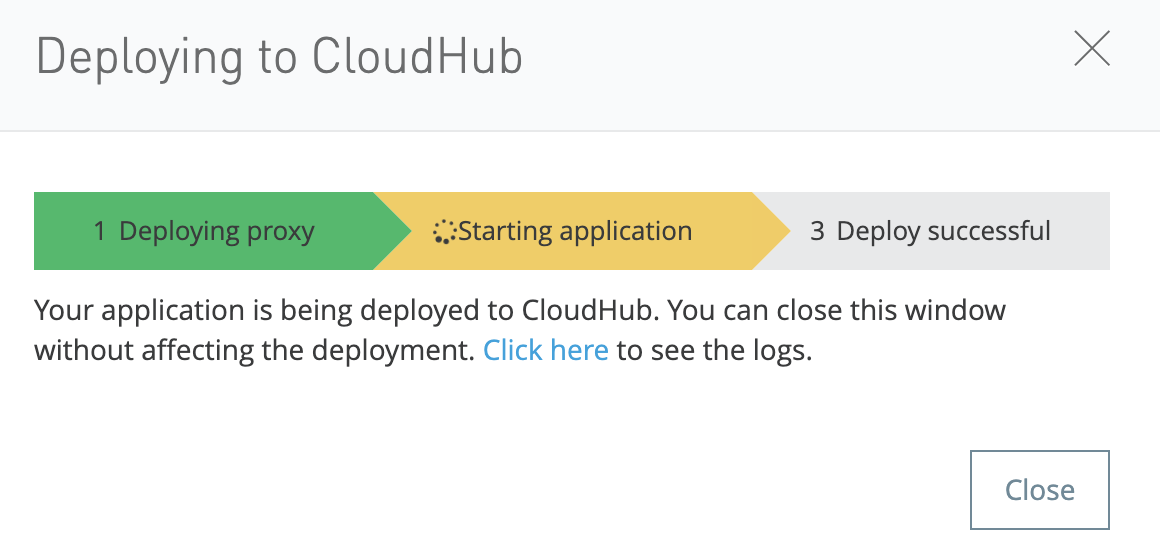
Wait until the deployment is successful.
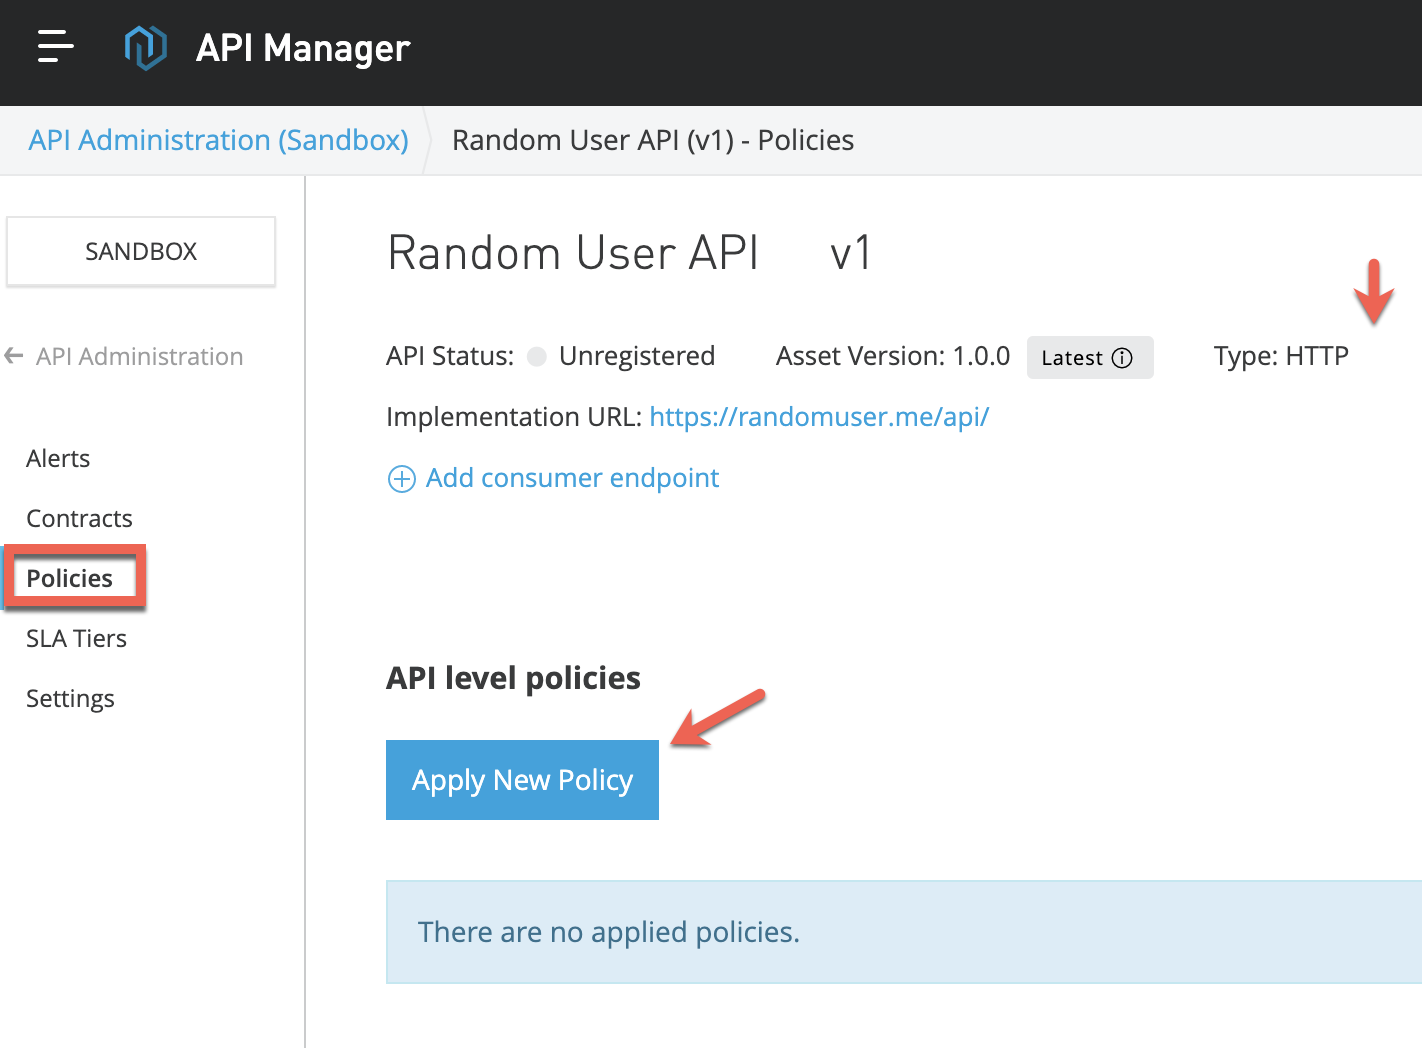
3. Now that our Proxy has been successfully deployed to CloudHub, it's time to apply some policy.
Go to Policies → Apply New Policy
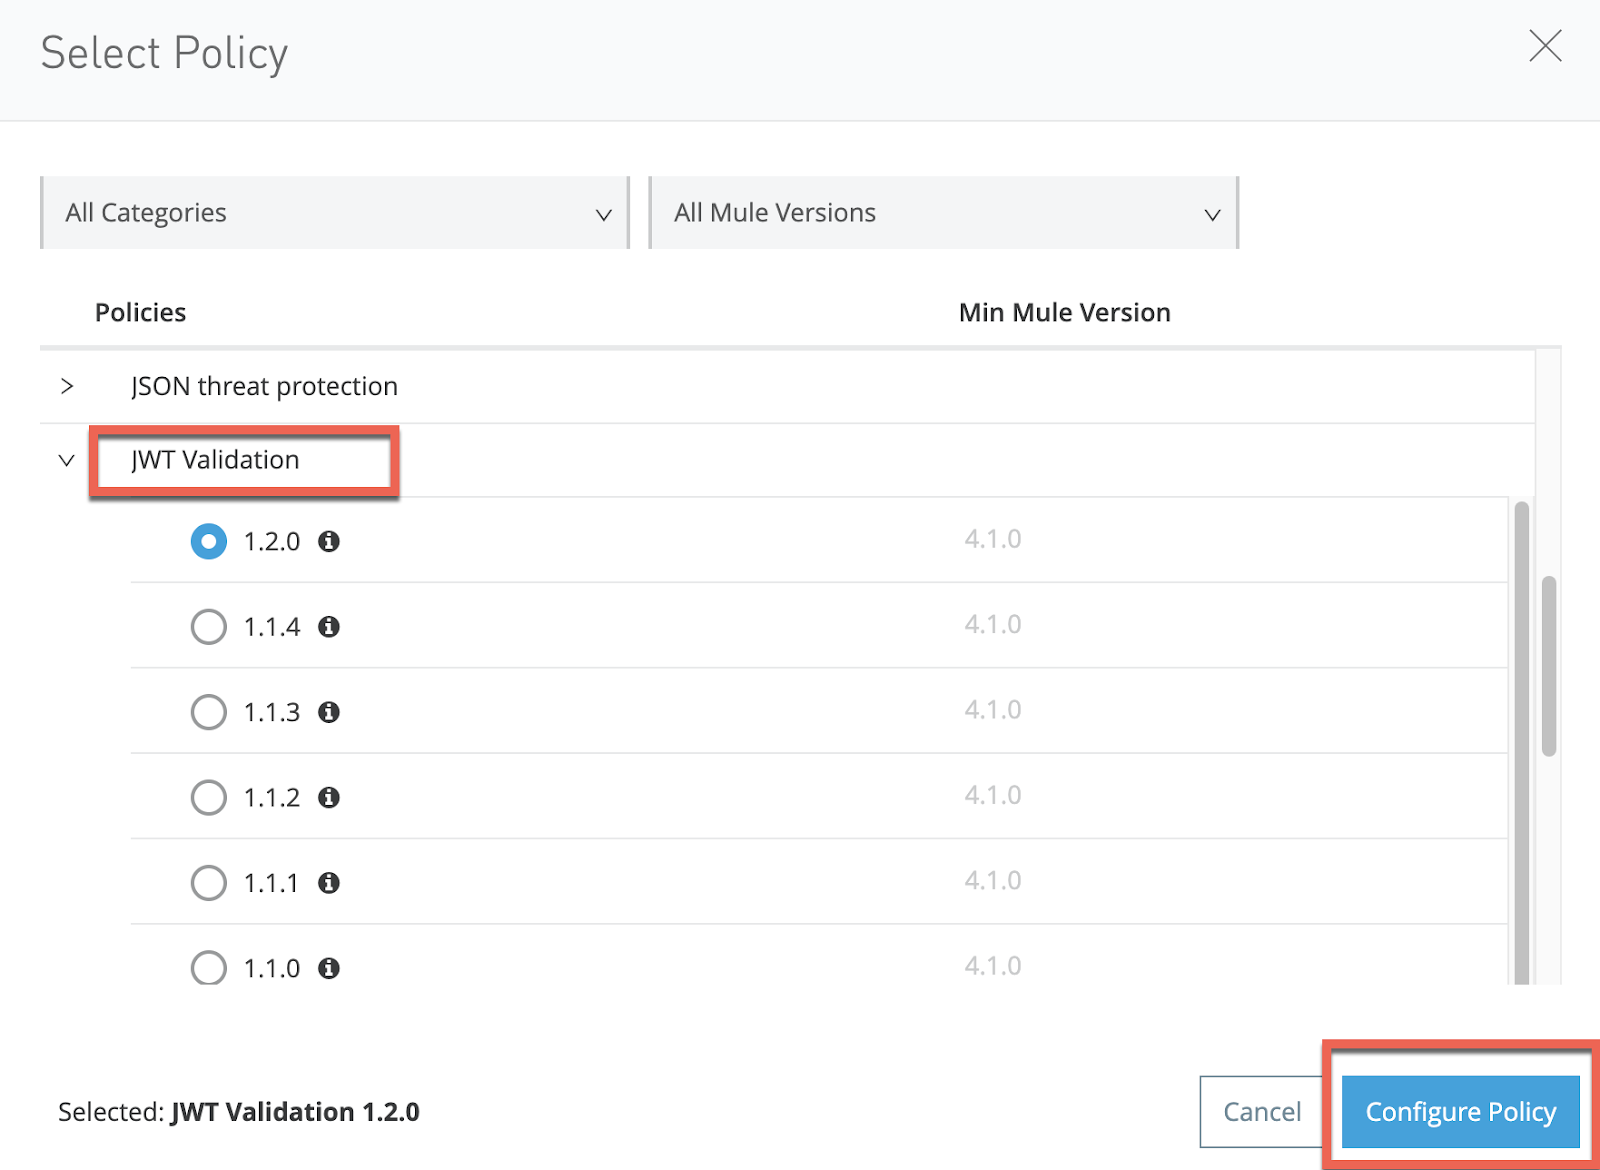
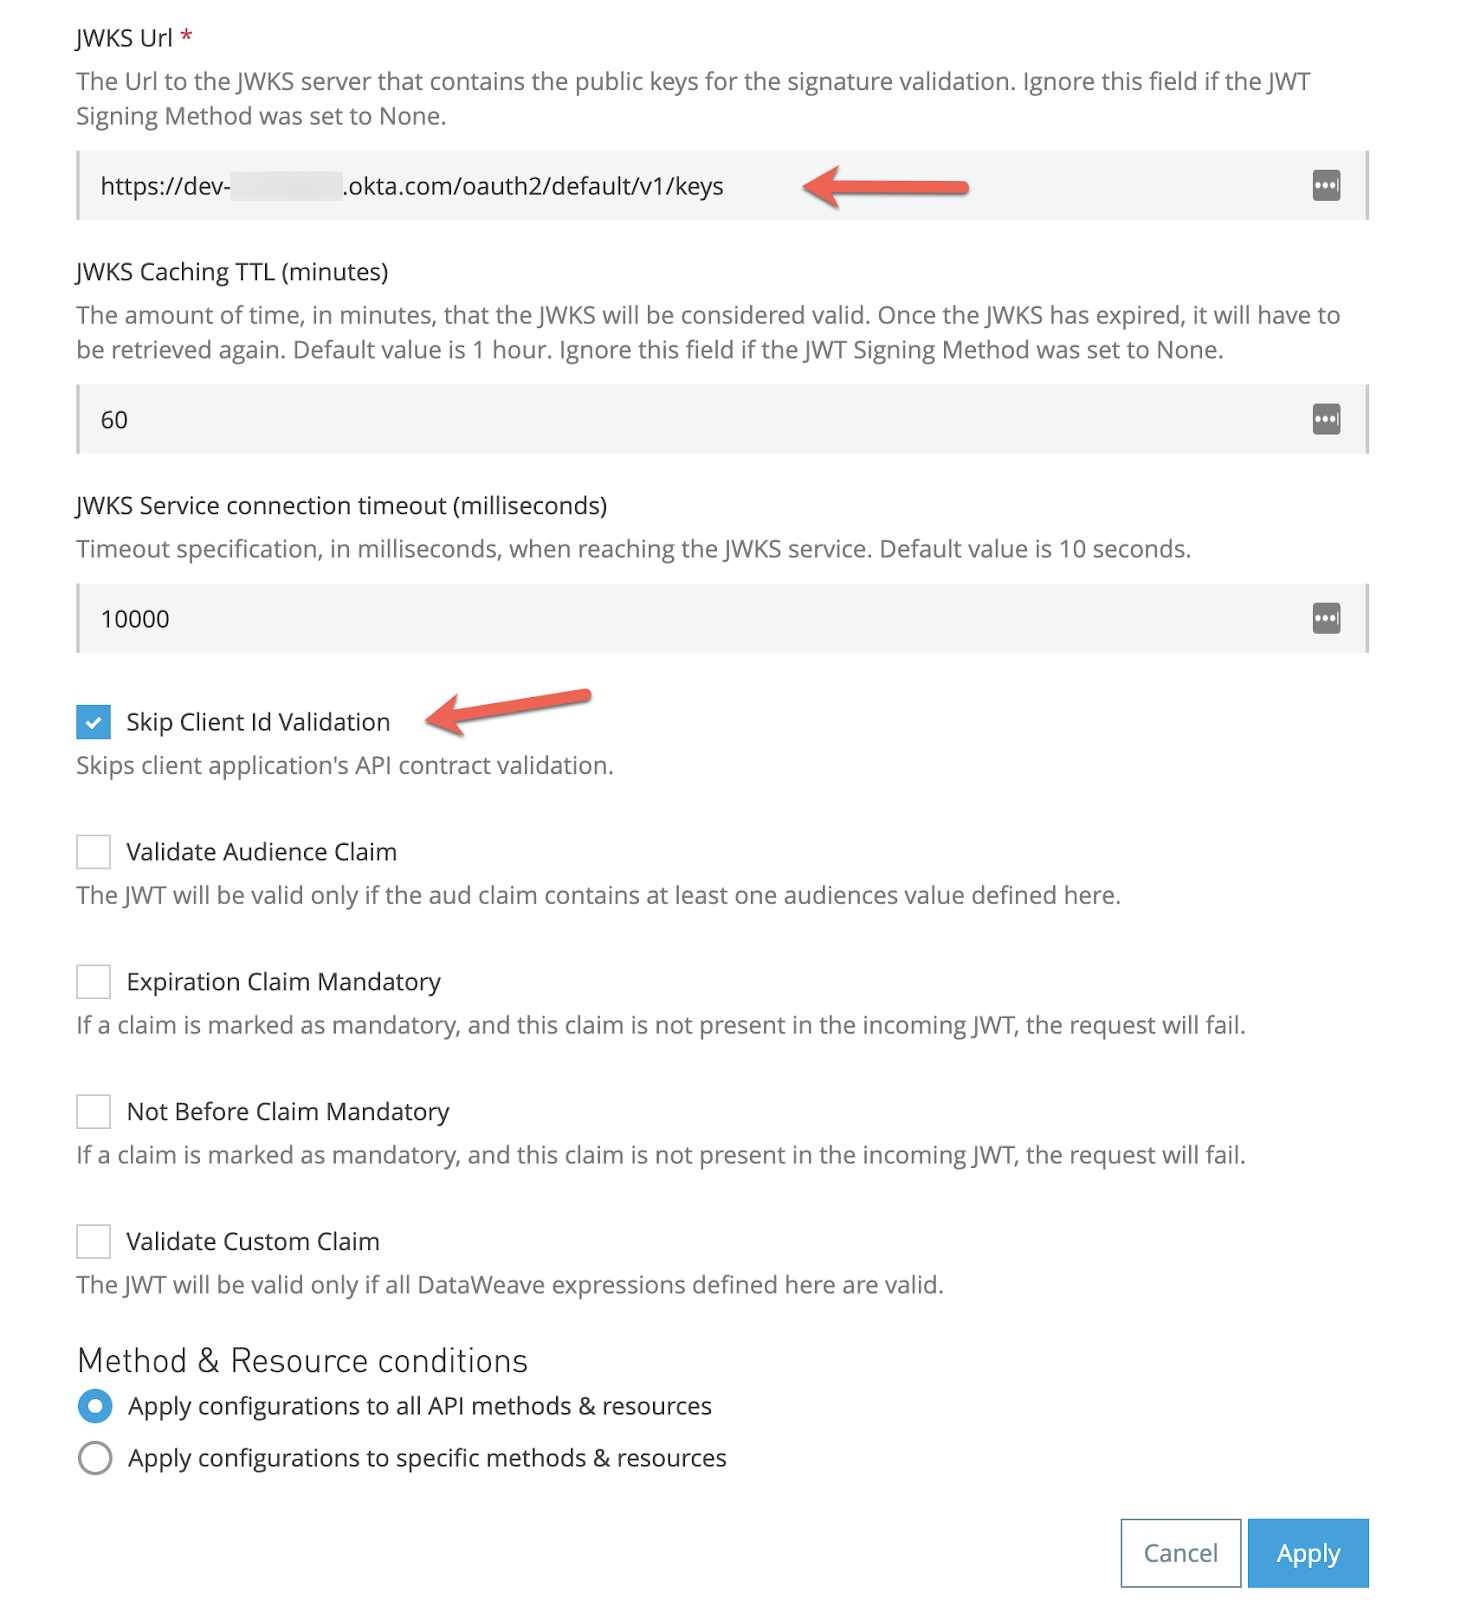
Scroll down to JWT Validation and select the latest version.
From the default configuration, first change the JWT Key origin to JWKS
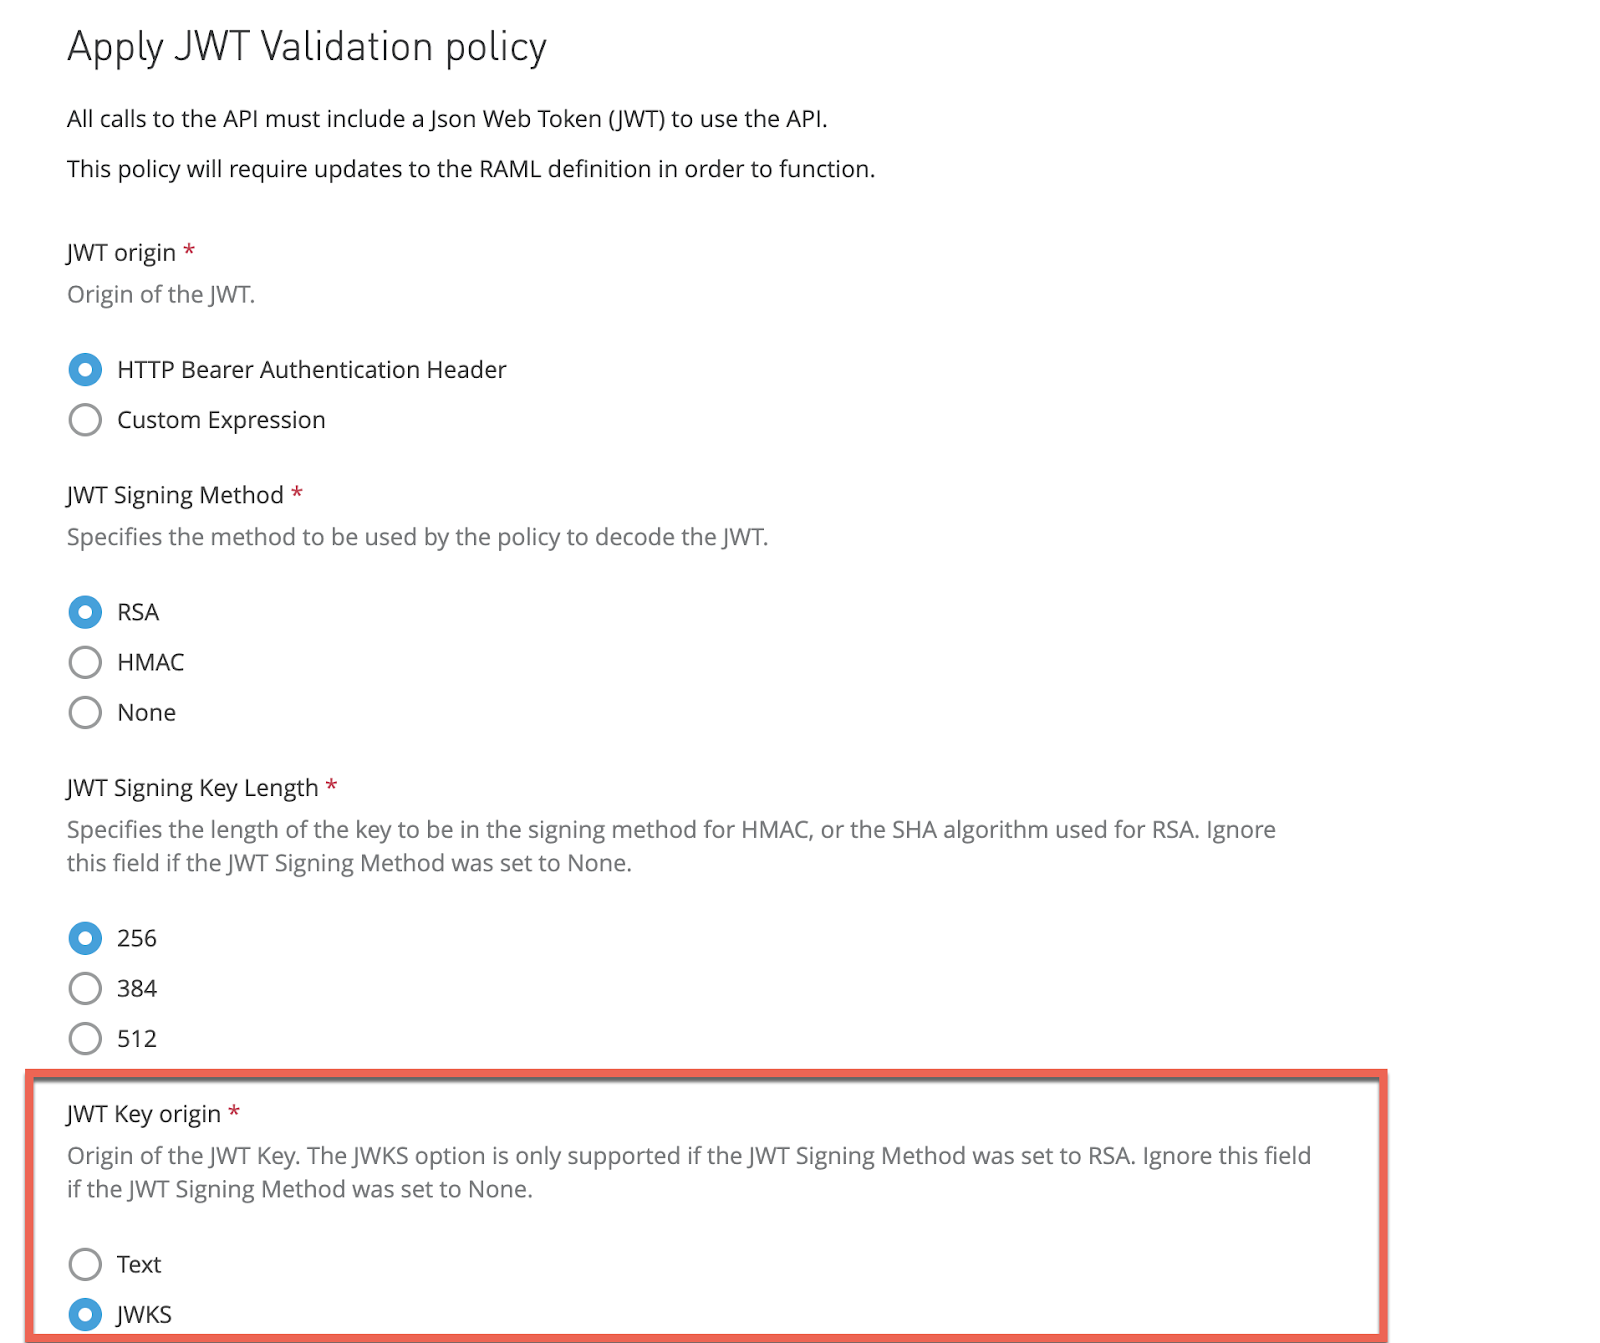
Then, in the JWKS Url add yours:
https://dev-********.okta.com/oauth2/default/v1/keysAlso, select Skip Client ID Validation.
The other default values leave them as they are and select Apply.
The policy configuration is ready.

4. Now, from your browser or Postman you can try to call the API and you'll see that the Token Enforcement Policy is already working.
The Proxy URL in my case is:
http://random-user-api-ae.us-e2.cloudhub.io/You should use the one with the Proxy Application Name you chose.
Use your URL and see what happens:
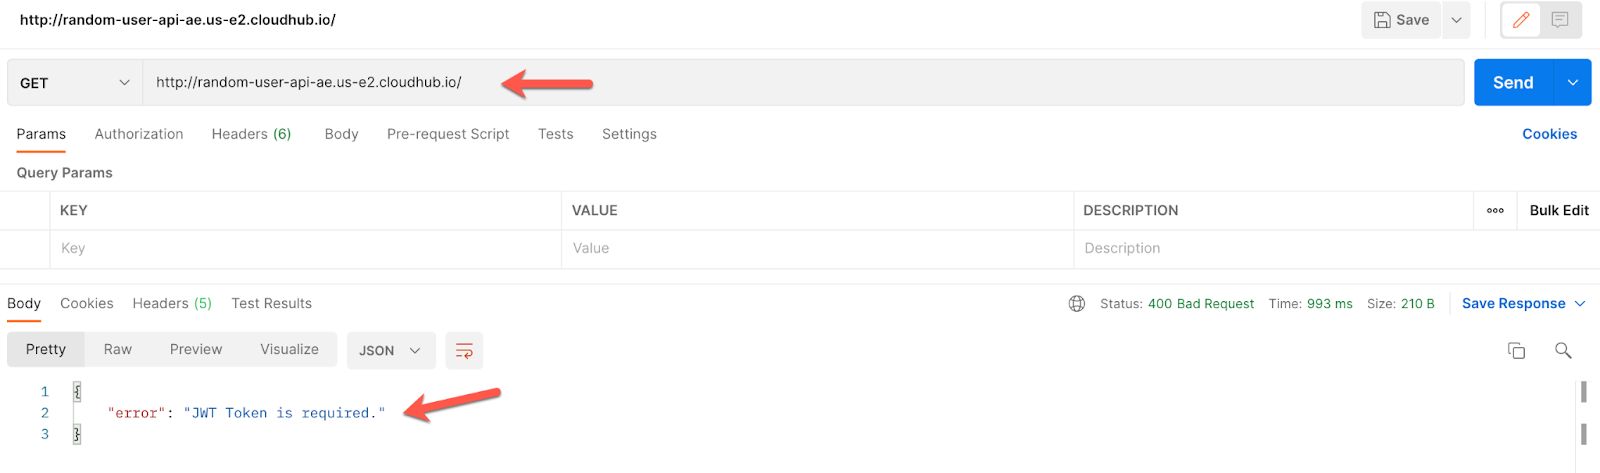
Our API is effectively secured!
Now, we are able to pass to the next step that is getting a token to access this Random User API.
First of all, in this step, we are going to prepare everything in Studio. Building the skeleton of the project, adding some modules from Exchange, adding some dependencies, etc. Mostly paving the way before implementing the different Grant Types.
If you want to skip this step you can download the .jar from the repository in GitHub where this Codelab is fully implemented.
Go to the folder docs and download the jar "oauth-template" and move on to Step 6 to start implementing.
https://github.com/mulesoft-consulting/oauth-grant-types-examples
If you want to learn how to prepare Studio, just follow these steps!
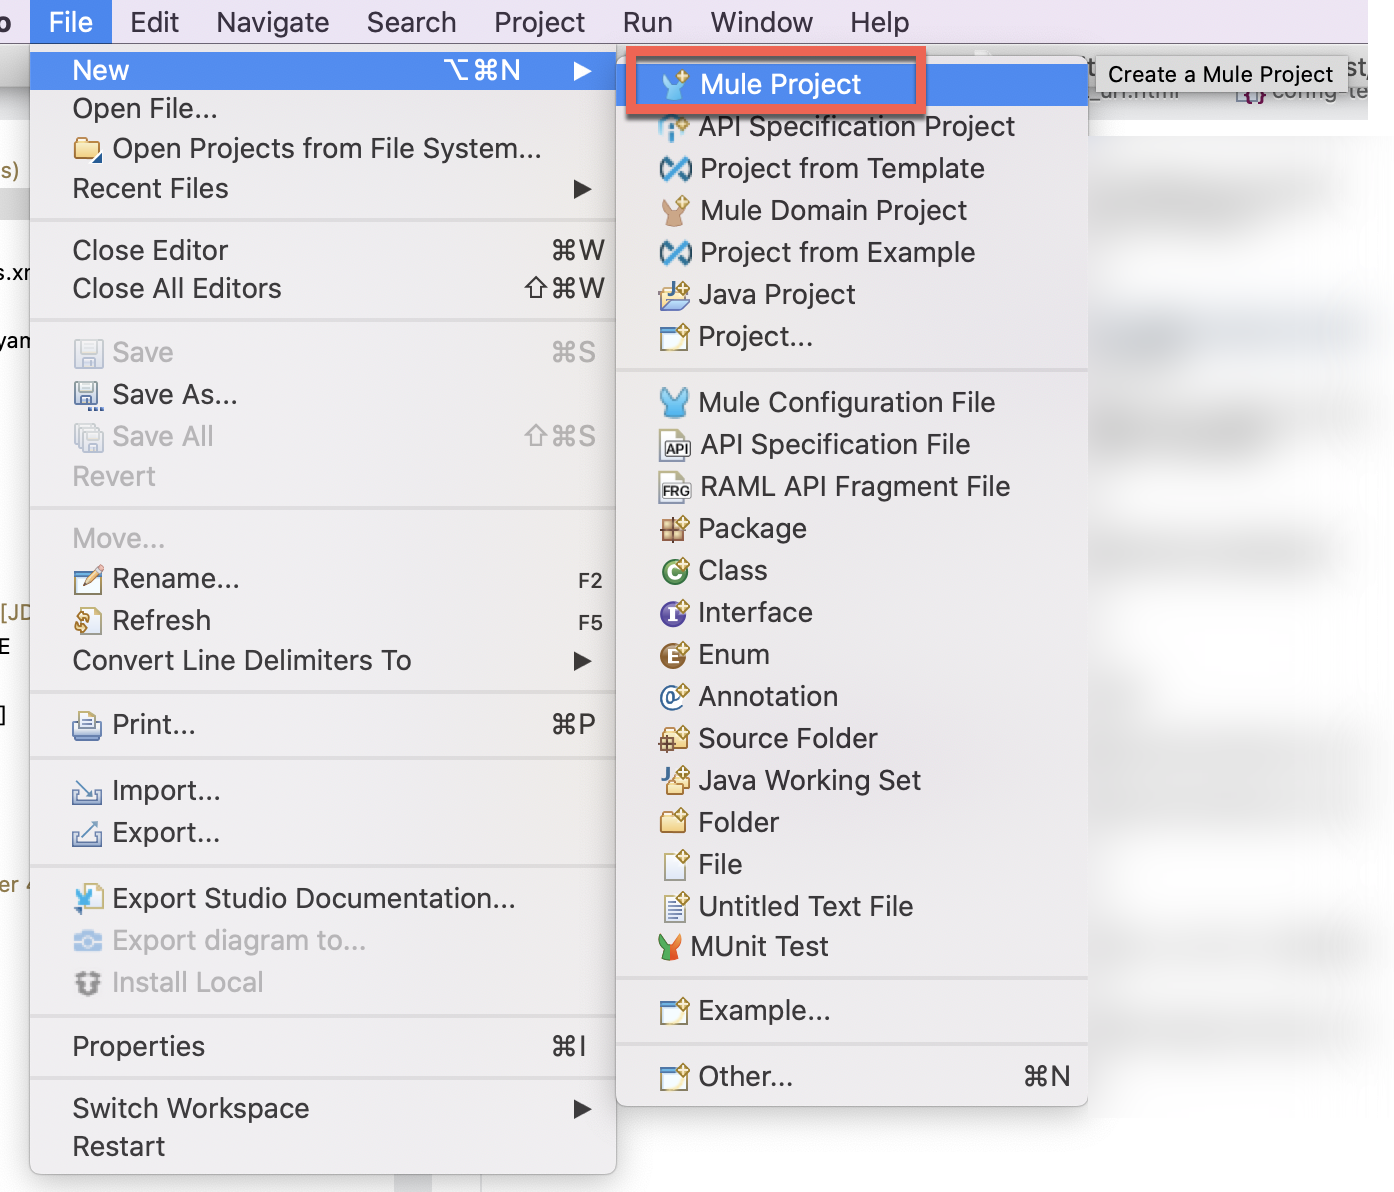
1. Open Anypoint Studio and create a new Mule Project.

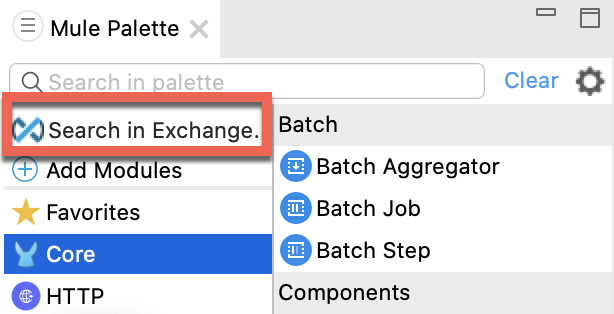
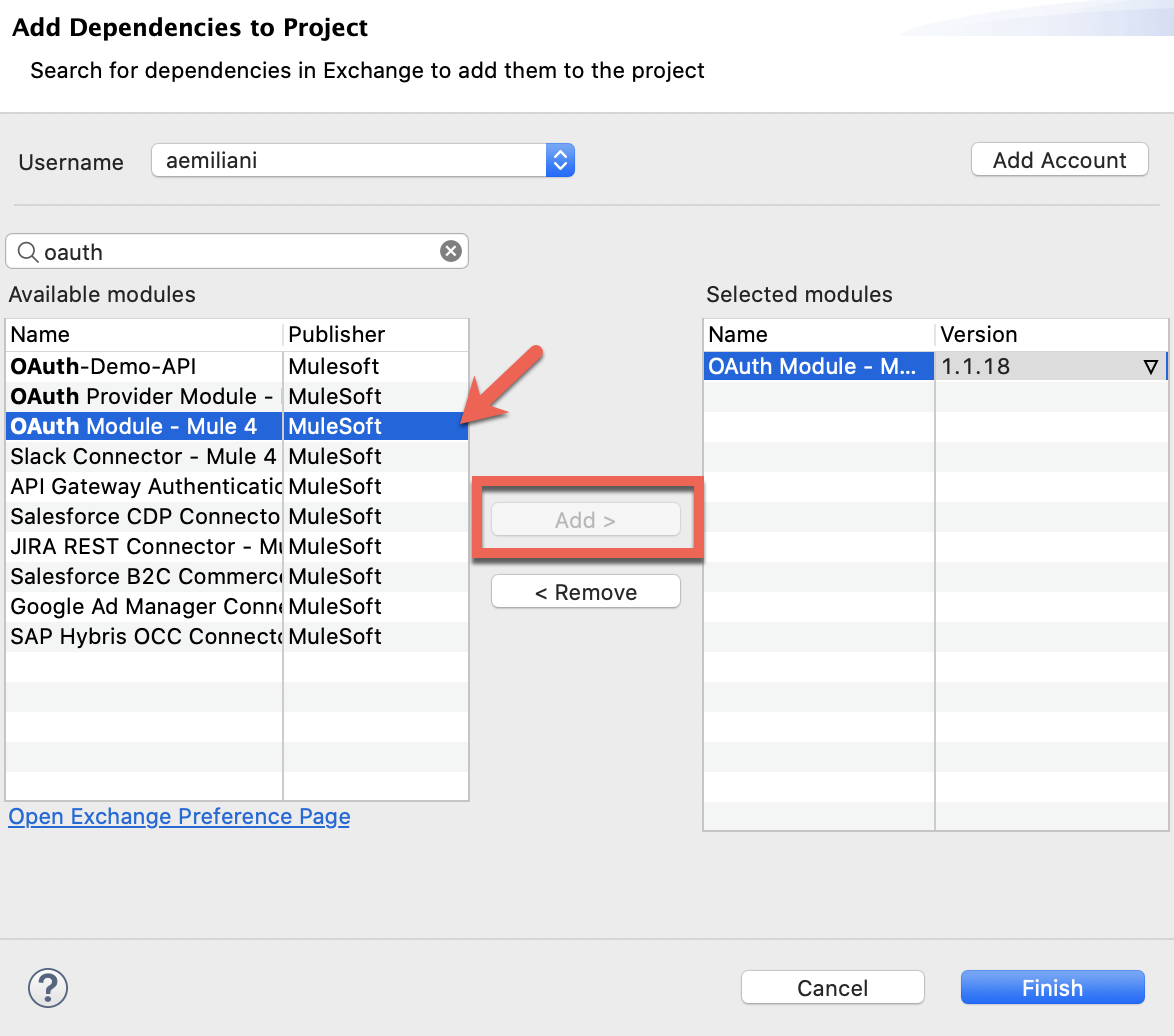
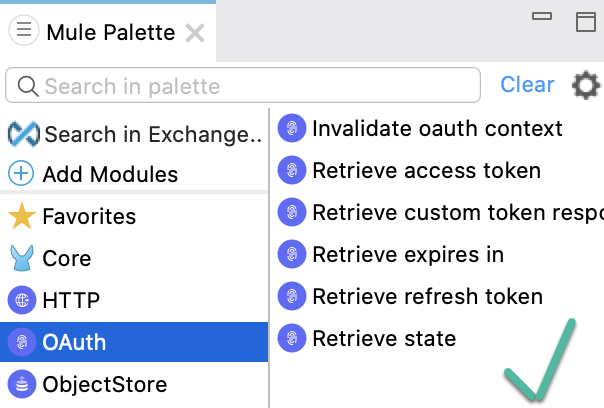
2. Import the OAuth Module:
3. Create a config.yaml file in the src/main/resources folder:
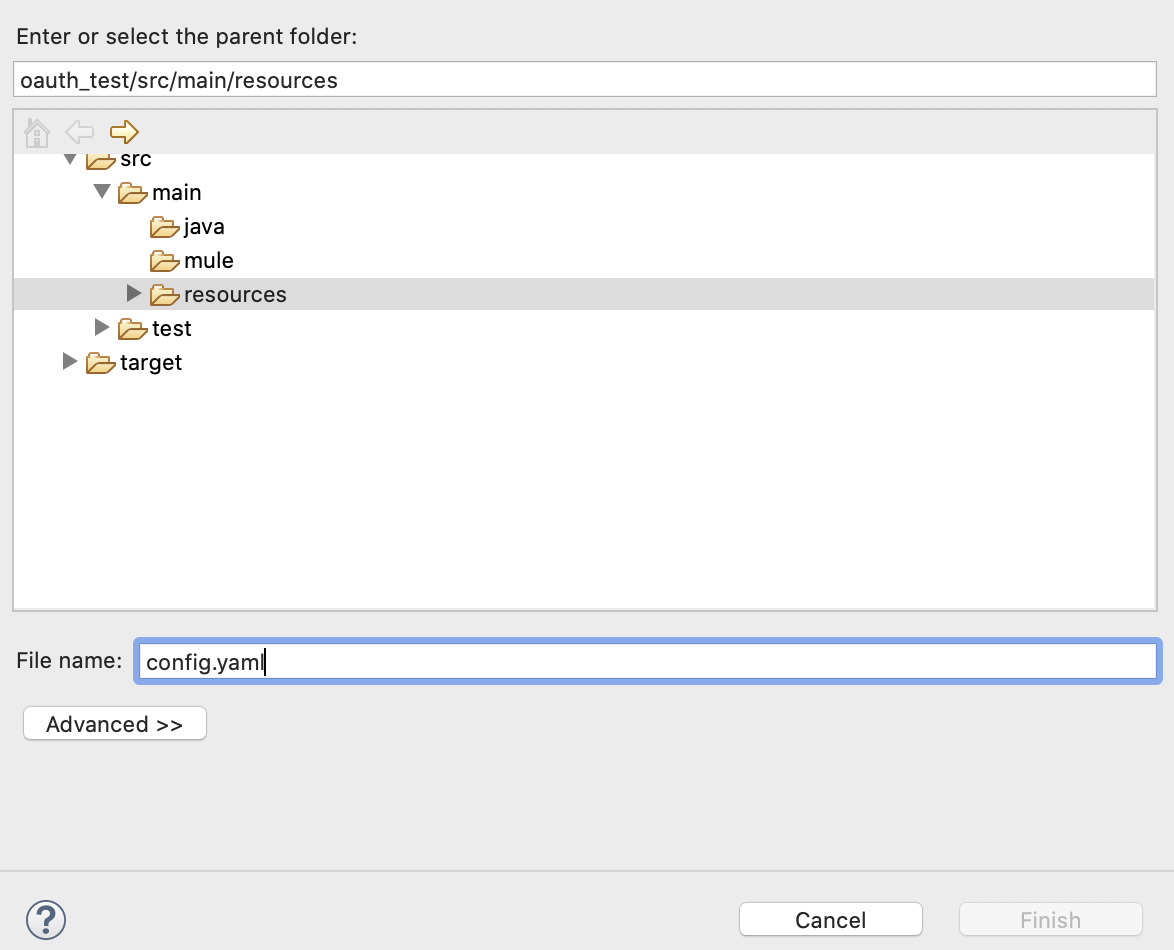
In this file copy this template:
native_app:
  client_id: ""
  client_secret: ""
  redirect_uri: ""
  scope: ""
  auth_code:
    login_callback_path: ""
    external_callback_url: ""
    local_auth_url: ""
  implicit:
    redirect_uri: ""
    state: ""

web_app:
  client_id: ""
  client_secret: ""
  client_credentials:
    scope: ""

okta:
  username: ""
  password: ""
  token_url: ""
  token_path: ""
  auth_url: ""
  domain: ""
  port: ""

api:
  url: ""

static_resource:
  path: ""
4. For getting the info to fill out the template, we need to go back to Okta.
Go to Security → API → Authorization Servers and click on the default auth server.
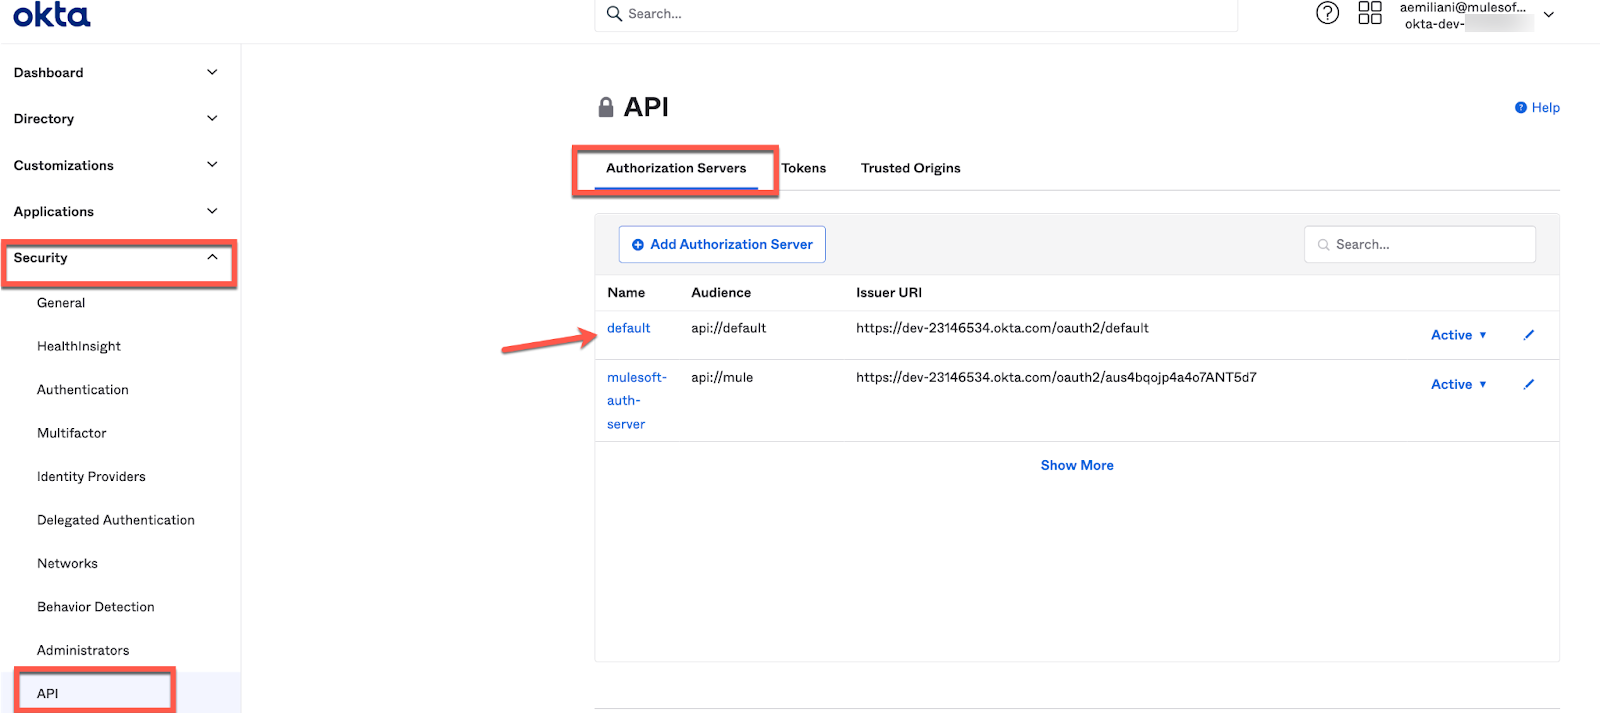
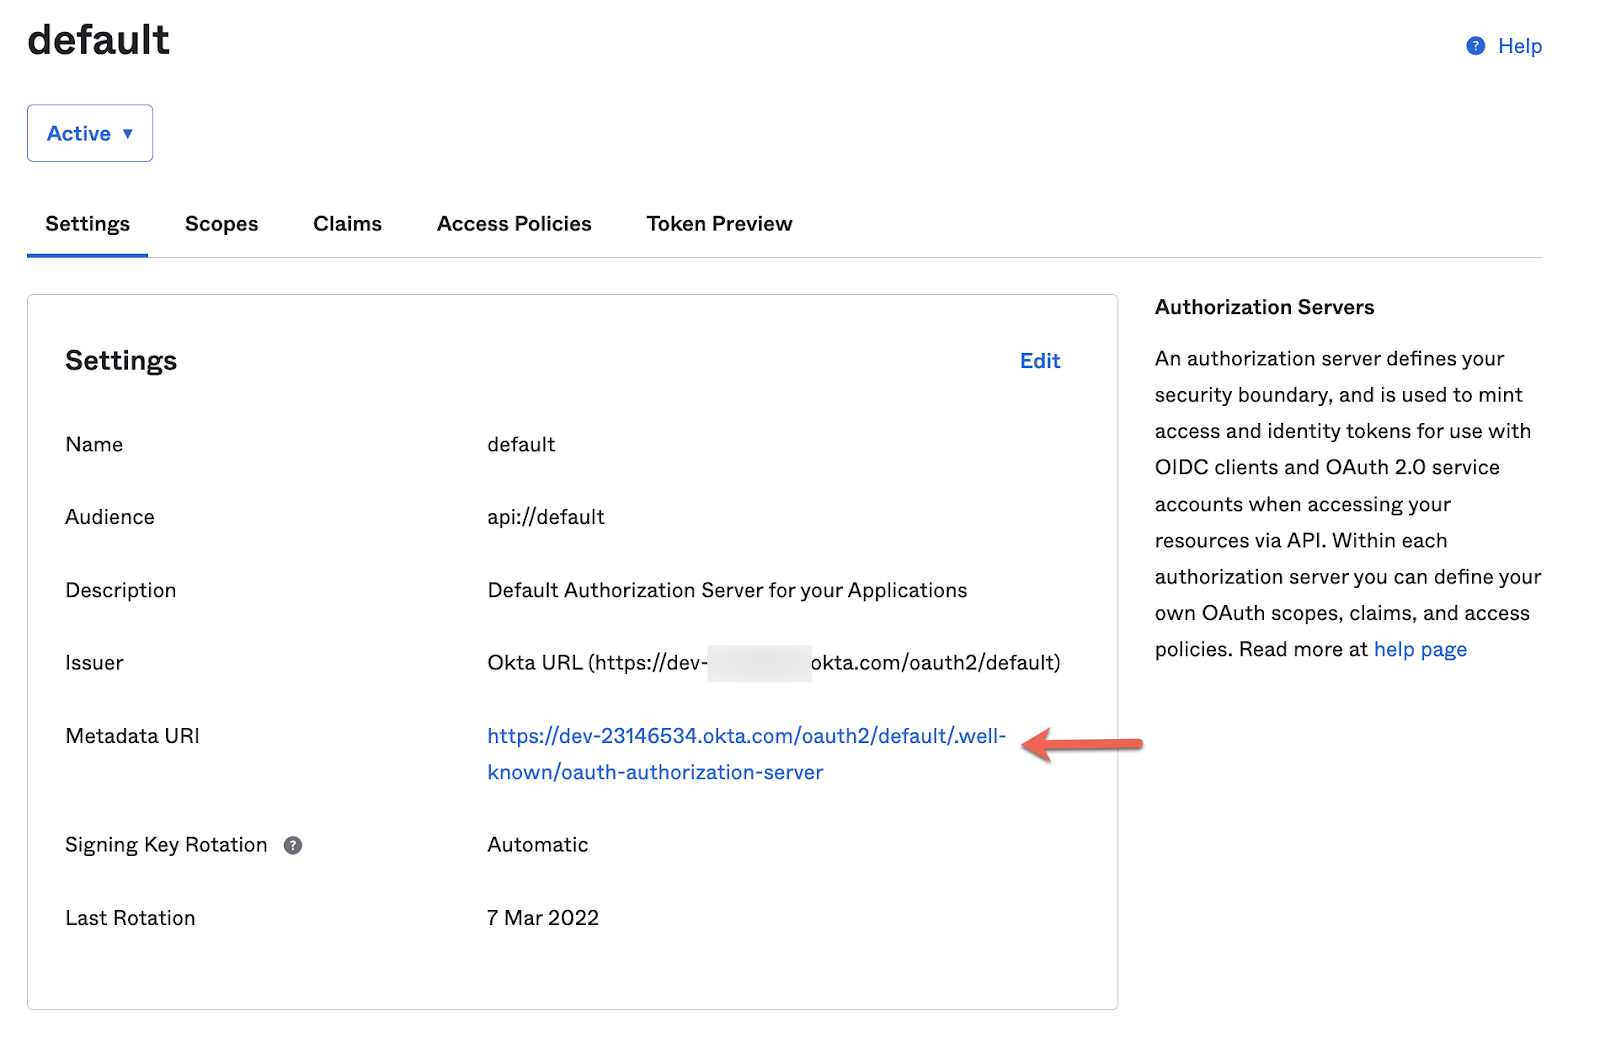
The link with the Metadata URL contains all the URLs you need. Click on it and take a note of the ones we need:
- Authorization URL
- Token URL
5. Fill it out with all the info requested that we'll use later in this exercise. It should look something like this:
native_app:
client_id: "0oa433g3taIv6K8sq5d7"
client_secret: "****************"
redirect_uri: "http://localhost:8081/login/callback"
scope: "openid offline_access"
auth_code:
login_callback_path: "/login/callback"
external_callback_url: "http://localhost:8081/login/callback"
local_auth_url: "http://localhost:8081/login"
implicit:
redirect_uri: "http://localhost:8081/implicit-login/callback"
state: "state-296bc9a0-a2a2-4a57-be1a-d0e2fd9bb601"
web_app:
client_id: "0oa433d1ff5soQ1VH5d7"
client_secret: "************"
client_credentials:
scope: "custom_scope"
okta:
username: "(your okta username)"
password: "************"
token_url: "https://dev-********.okta.com/oauth2/default/v1/token"
token_path: "oauth2/default/v1/token"
auth_url: "https://dev-********.okta.com/oauth2/default/v1/authorize"
domain: "dev-********.okta.com"
port: "443"
api:
url: "http://random-user-api-**.us-e2.cloudhub.io/"
static_resource:
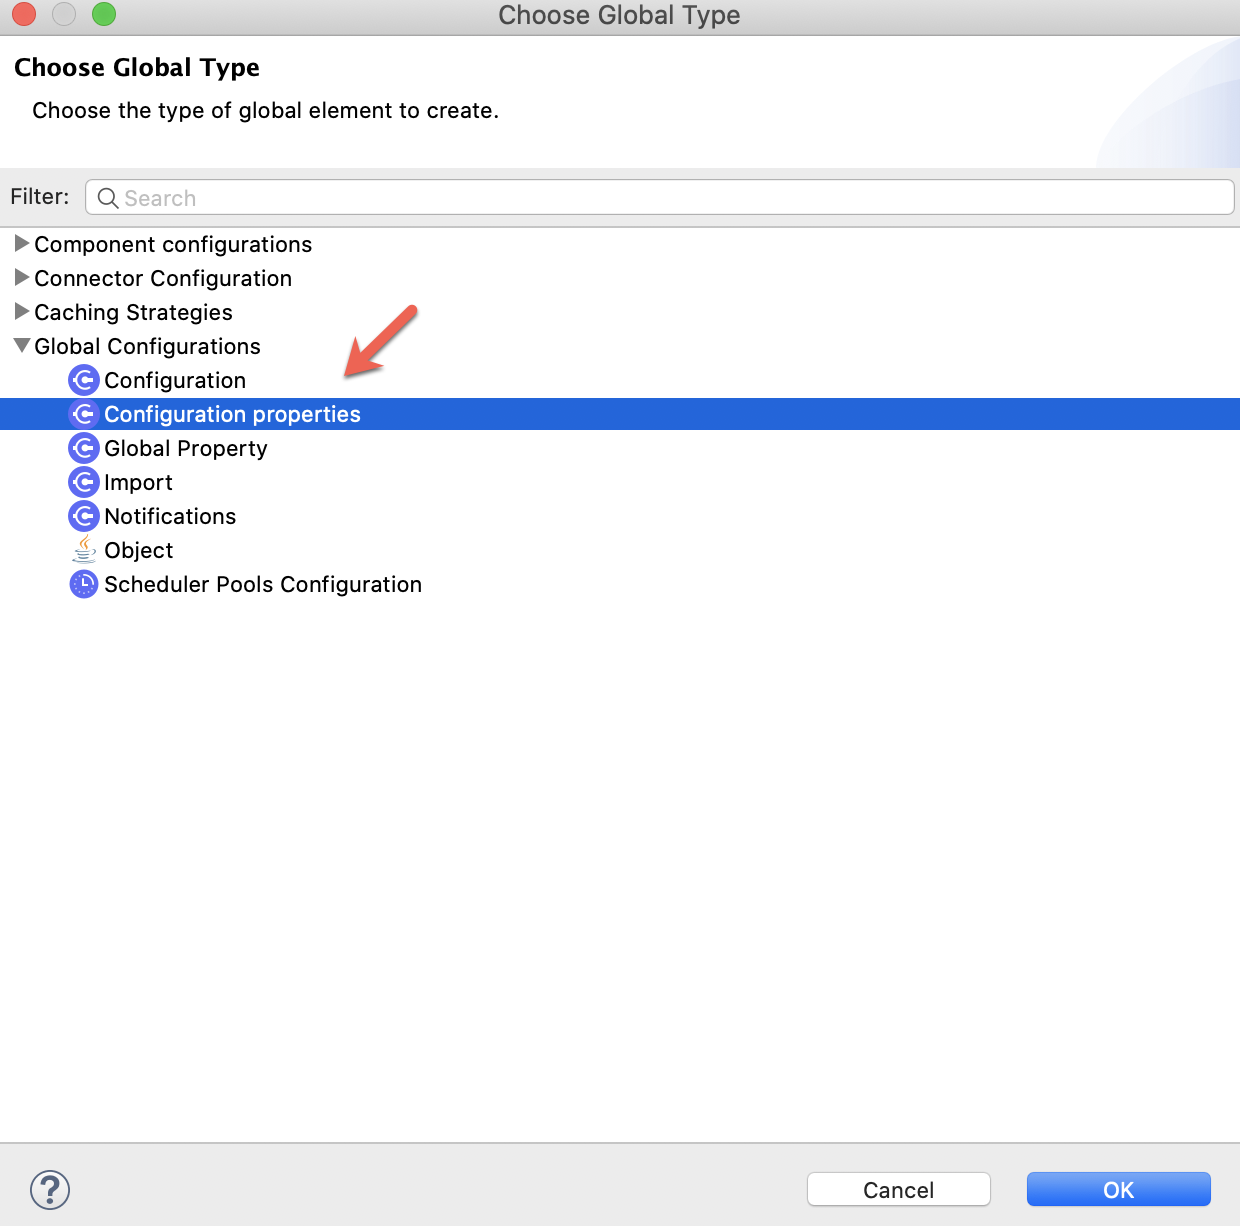
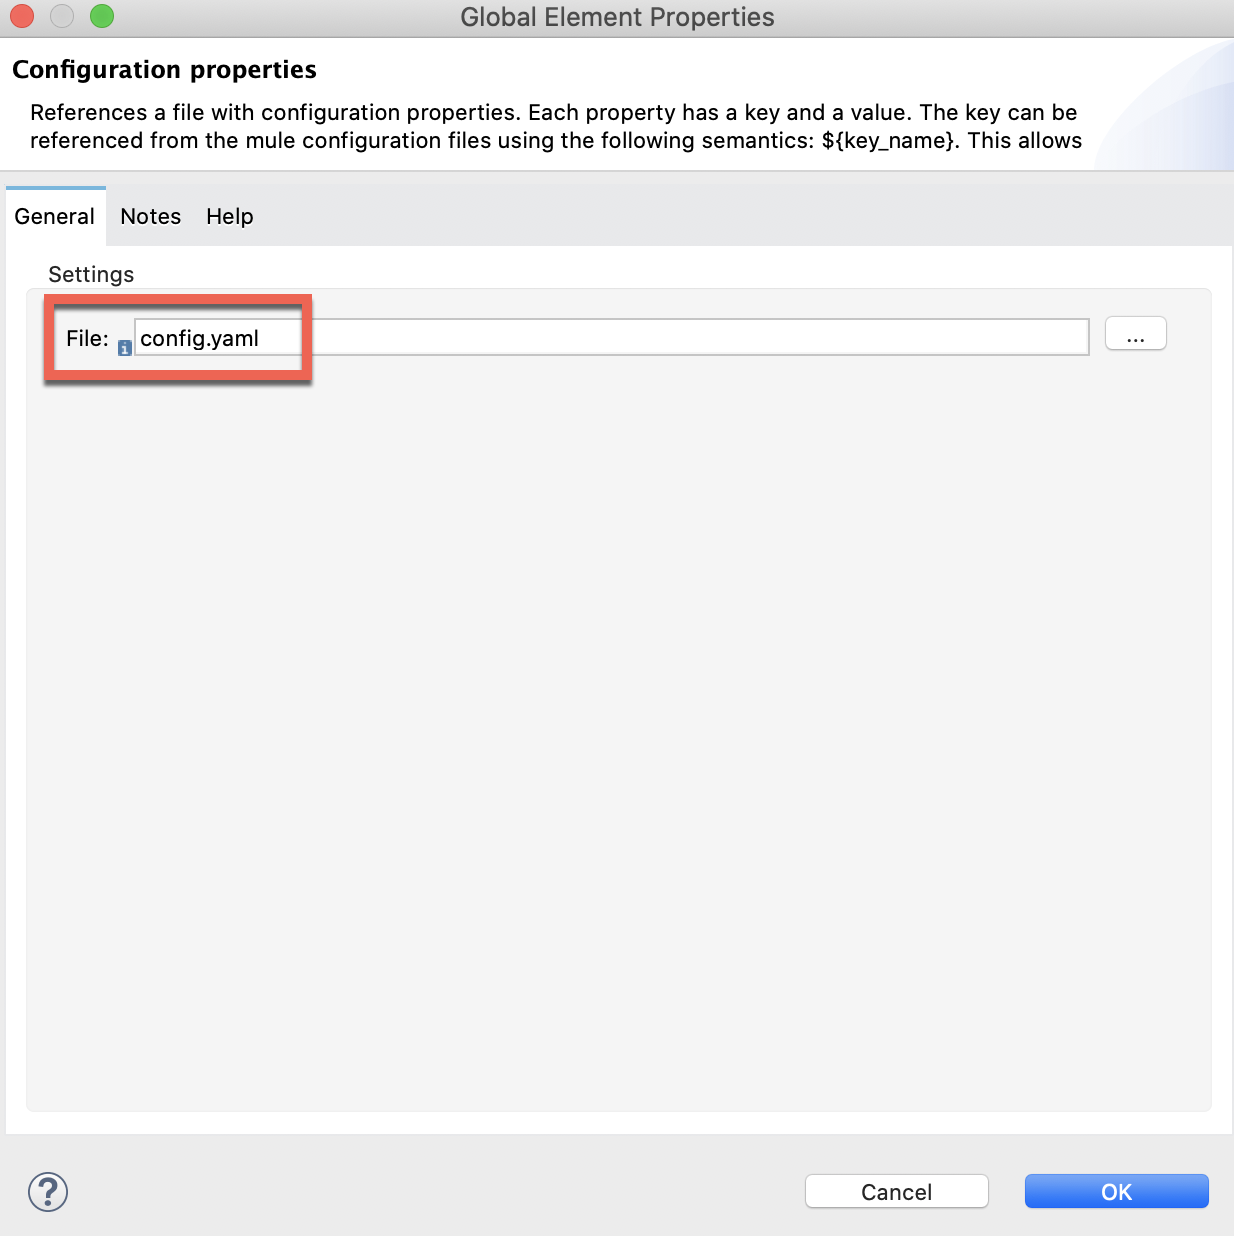
path: "(to do later)"6. Add a Global Configuration Element for the config.yaml.
From the oauth_test.xml go to Global Elements and Create a new one:
7. Now, we are going to create an Object Store to keep record of the Tokens we will be obtaining.
This is how the flow will look like:
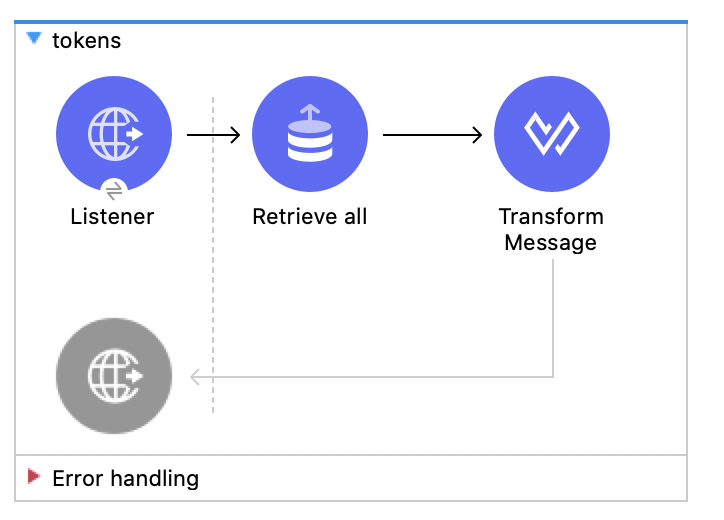
The Listener is configured with the default global configuration (HTTP_Listener_config) and the path will be /tokens.
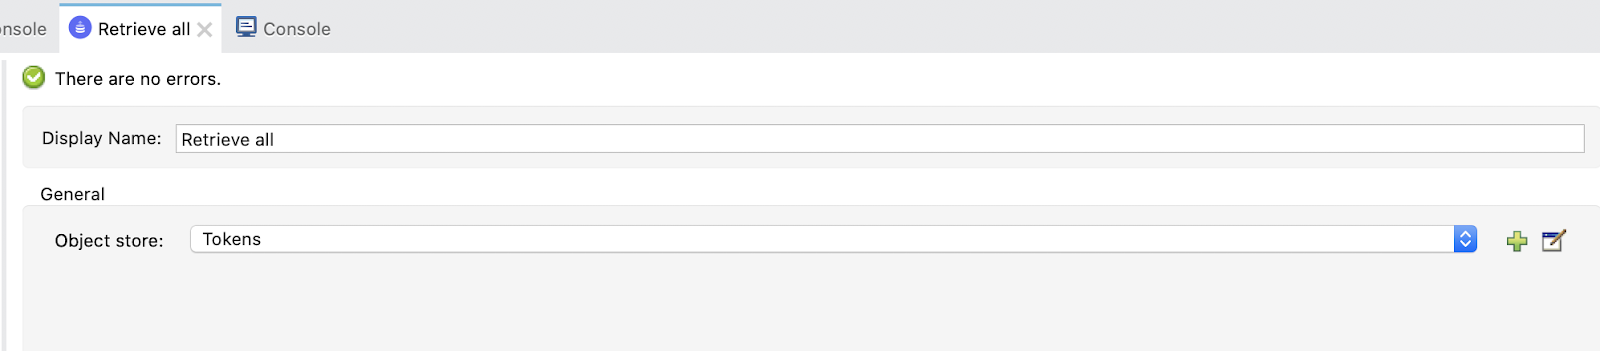
For the Retrieve all operation we need to import the ObjectStore connector from Exchange:

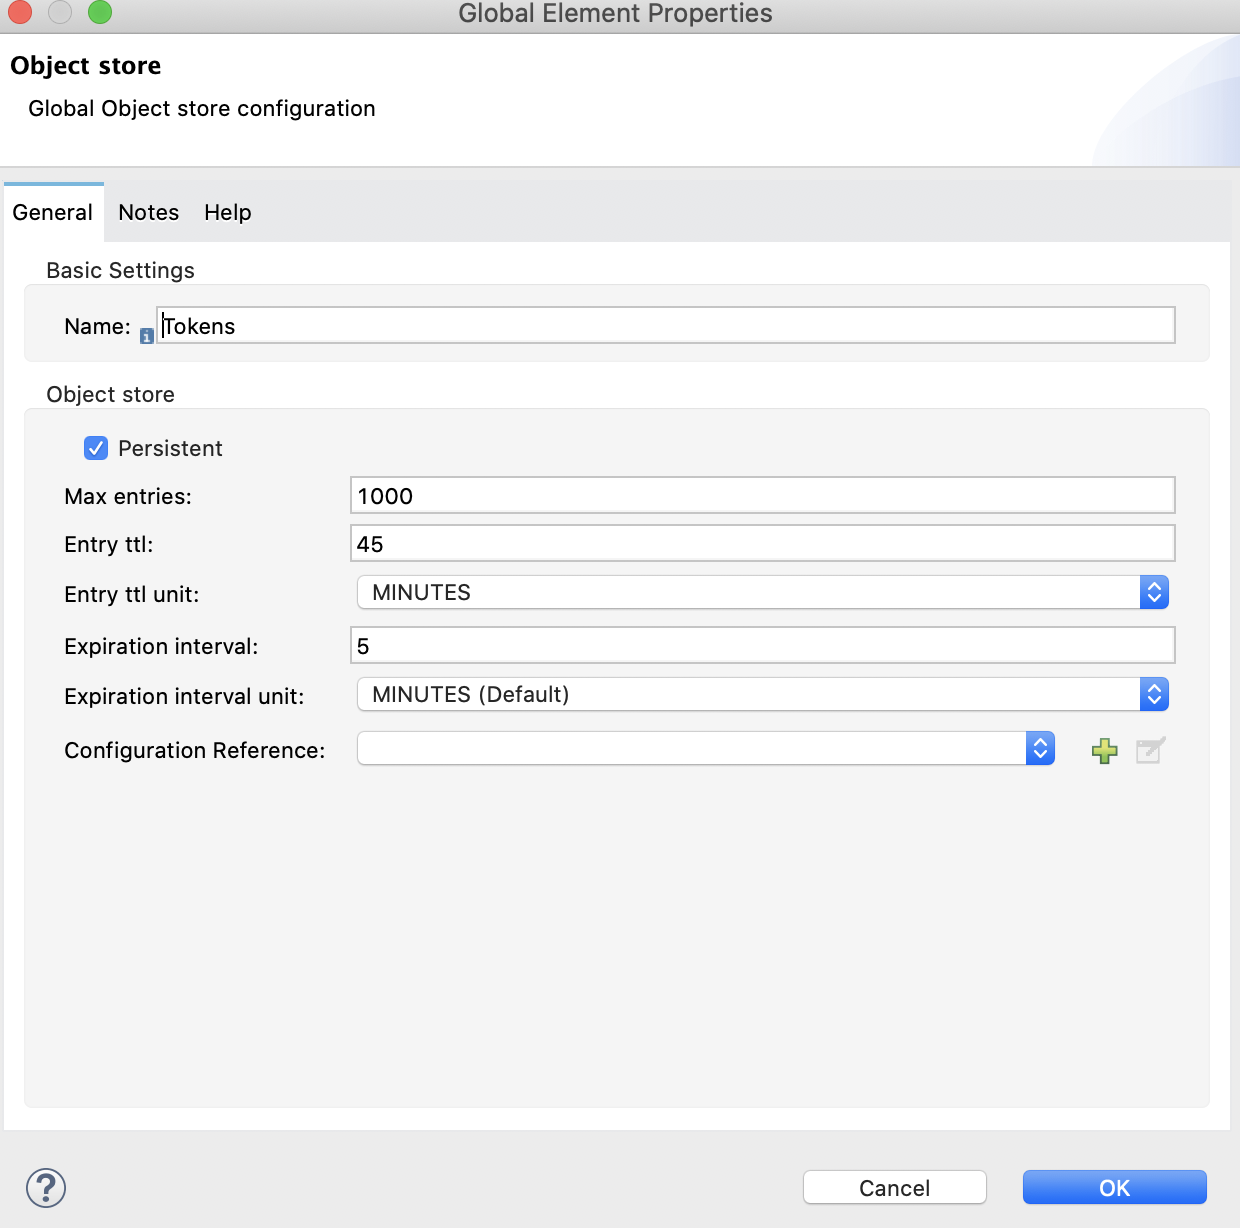
And, in the Retrieve all operation, configure the Object Store by creating a new Token Manager (to save and manage all tokens) called Tokens:
Finally, Transform data into JSON:
%dw 2.0
output application/json
---
payload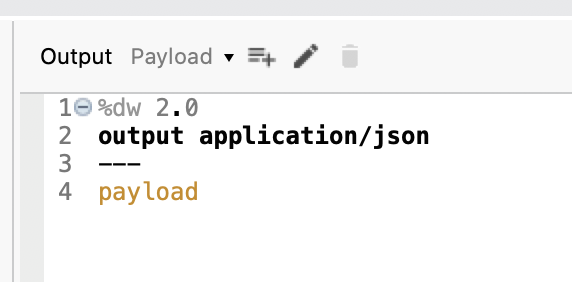
8. Finally, we are going to create a flow to invalidate the stored tokens. To later on, show properly how each Grant Type works, without skipping the part of getting an access token.
Let's create a flow and name it invalidate:
It would look like this:
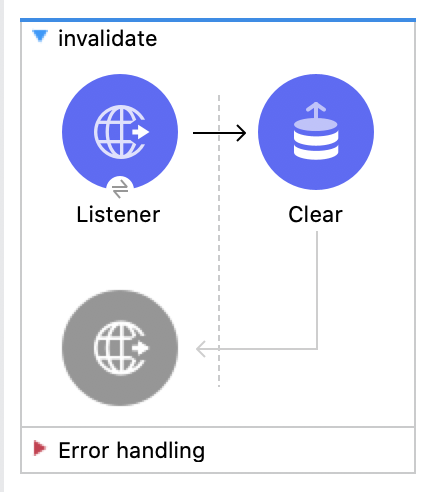
The Listener would have the global HTTP_Listener_config and the path will be /invalidate.
The Clear operation will have an Object Store Tokens:

Studio is all set right now. We are ready to implement the different flows for the four Grant Types we are learning!
The first grant type we are going to implement is Client Credentials. We are using the Web App and our Random User API.
1. Create a new flow and name it client_credentials.
This will be the final flow:
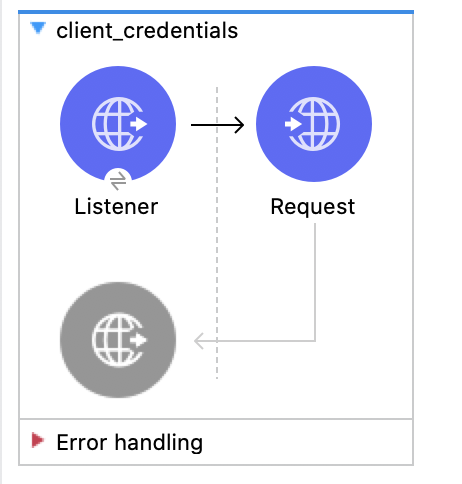
2. So, first drag a Listener and select the default global configuration (HTTP_Listener_config) and set the path to /client_credentials. Just like this:

3. Drag a Request and configure it.
Configure the global configuration for the HTTP Request:
(these are the values you'll have to copy and paste)
Name: HTTP_Request_configuration-Client_Credentials
Client id: ${web_app.client_id}
Client secret: ${web_app.client_secret}
Scopes: ${web_app.client_credentials.scope}
Token url: ${okta.token_url}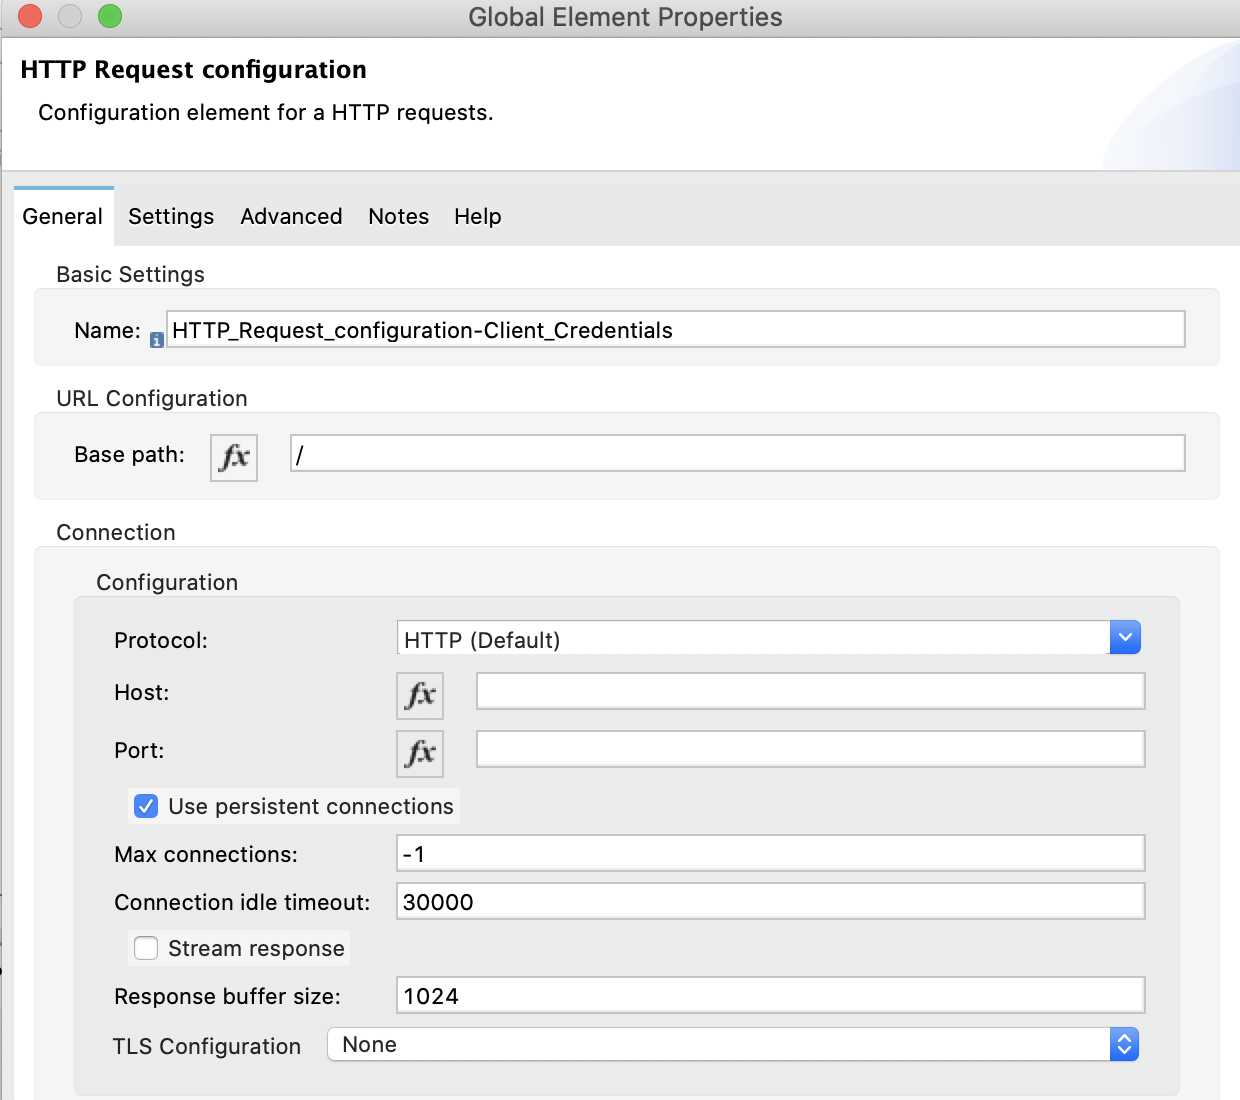
Select Tokens for the Object Store configuration:
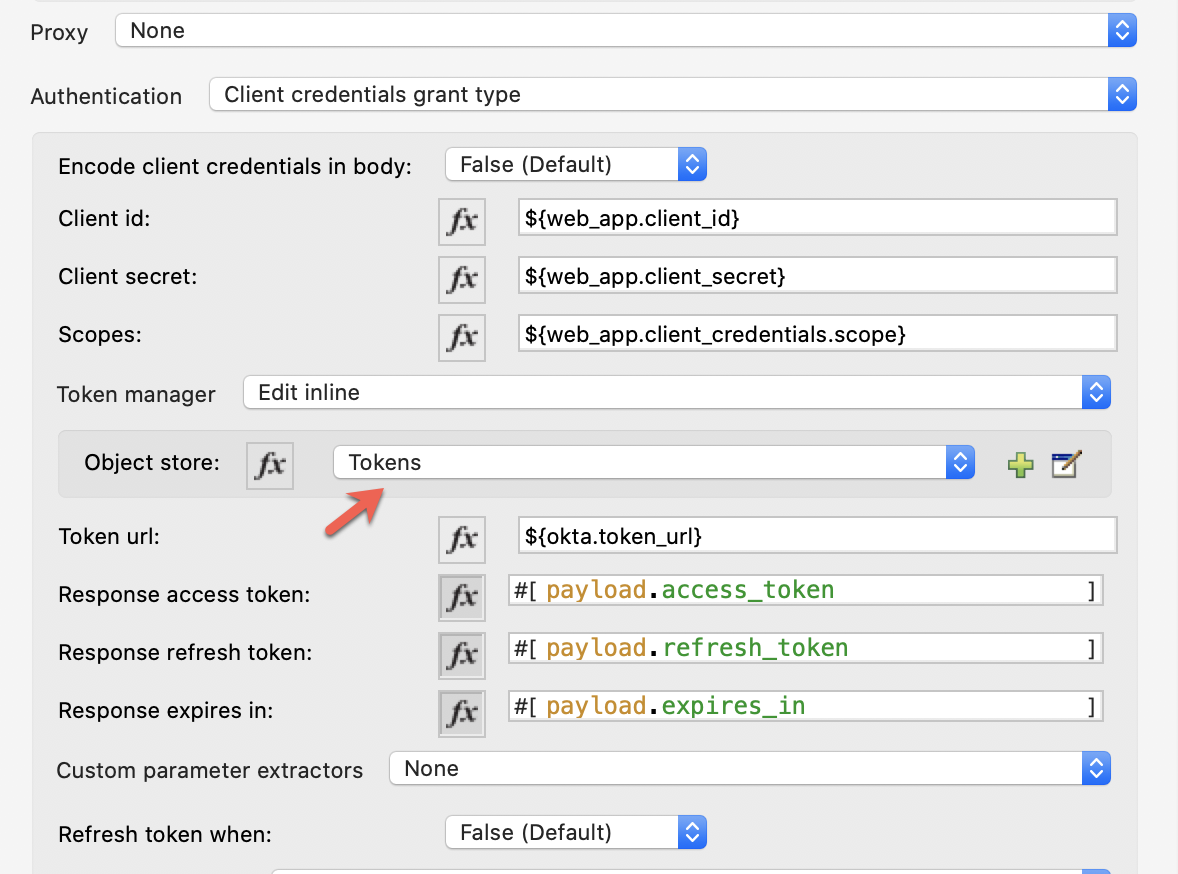
And finish the Request configuration:
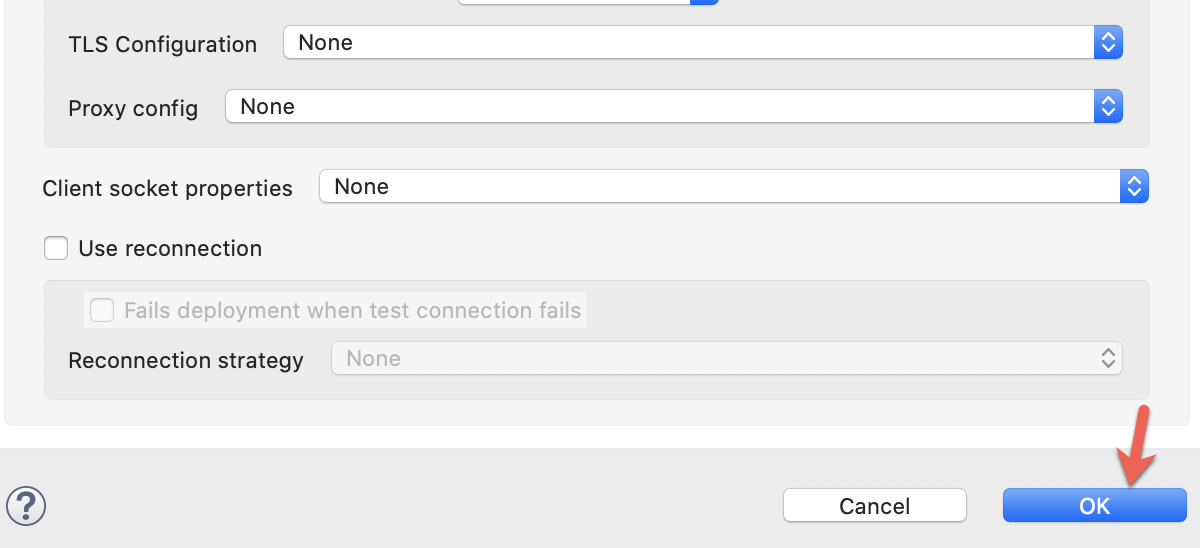
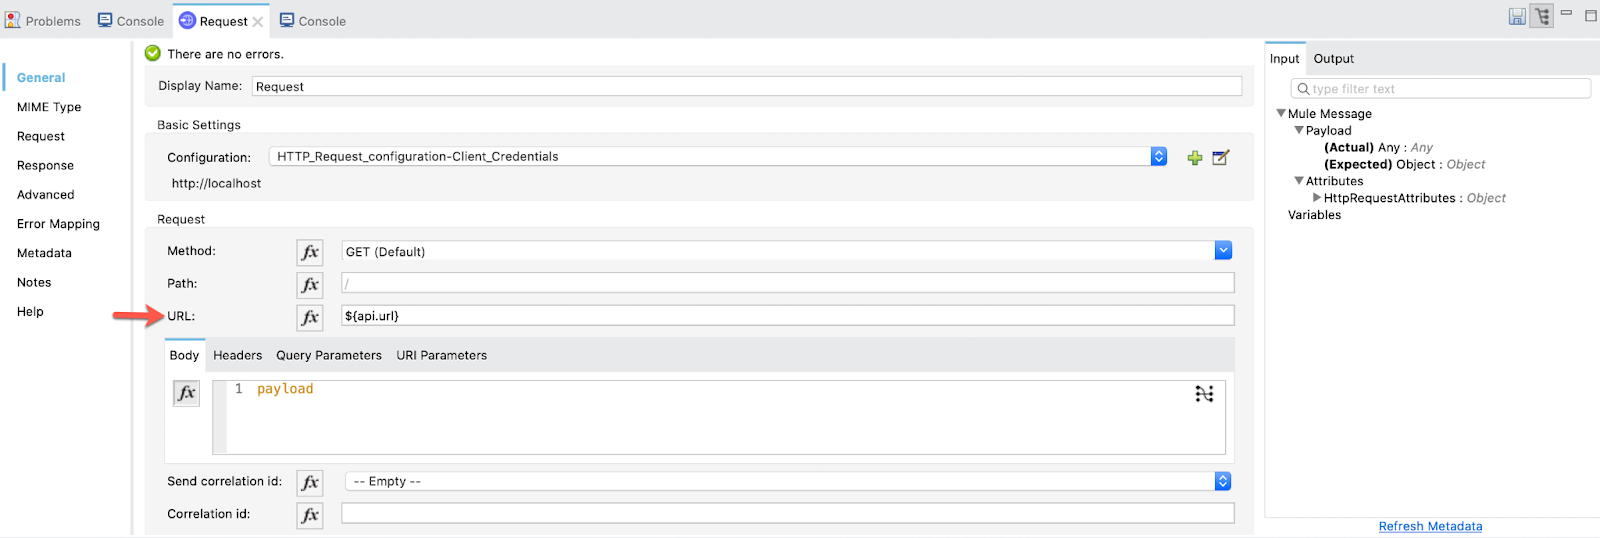
4. The other part of the Request configuration will be the following:
URL: ${api.url}
5. Now, we are able to test this first flow and see what happens...
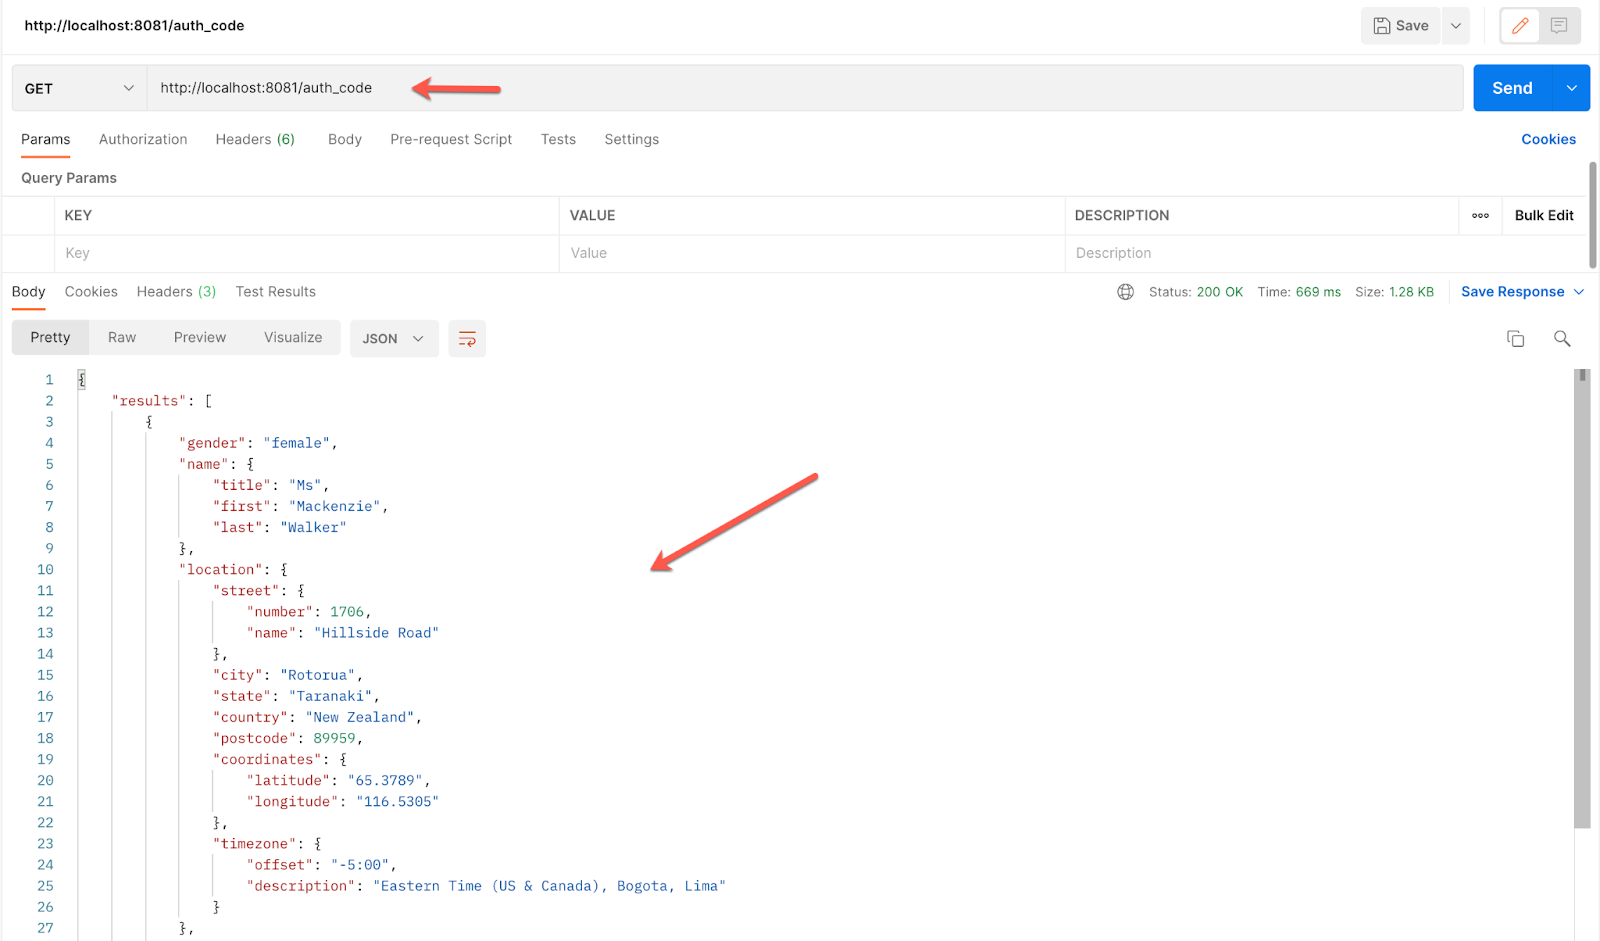
Go to Postman (or any other application that allows the testing of web APIs, like ARC) and make a GET request:
http://localhost:8081/client_credentials
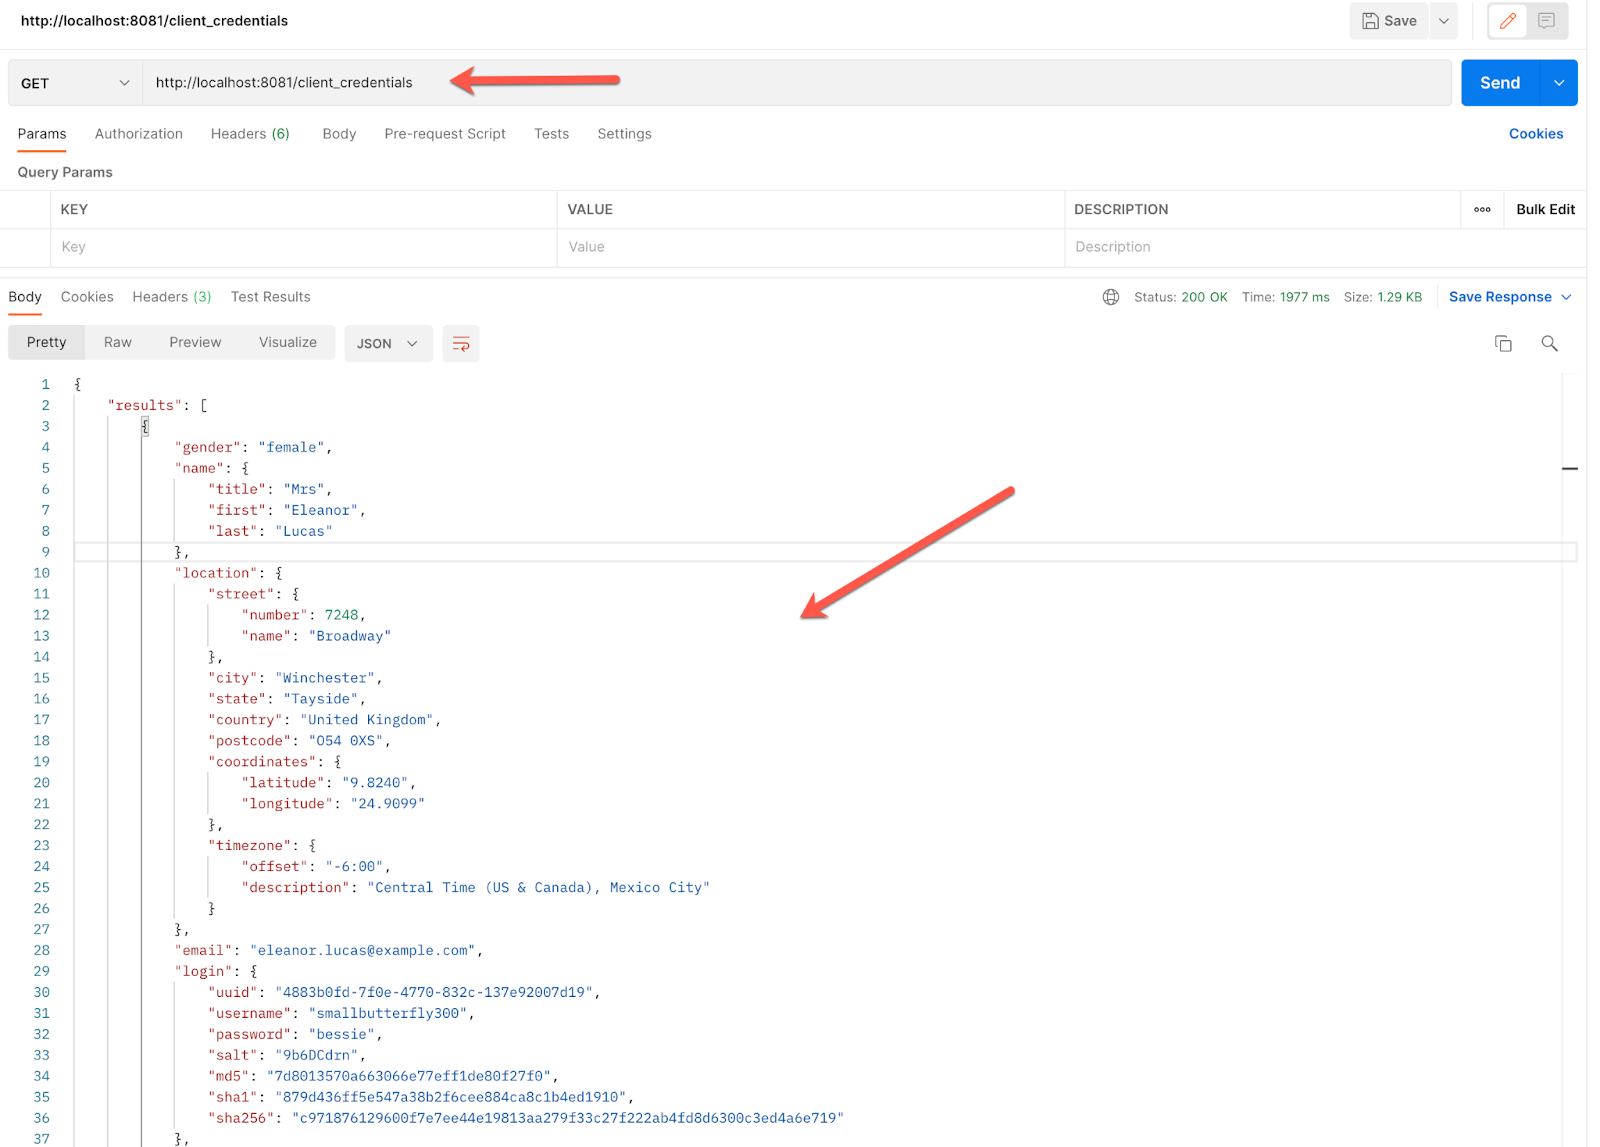
The response is right there!
So far so good. Let's move on to the next Grant Type: Authorization Code!
For this Grant Type we are going to use the Native App created in Okta.
1. Create a new flow and name it auth_code:
At the end it will look like this:
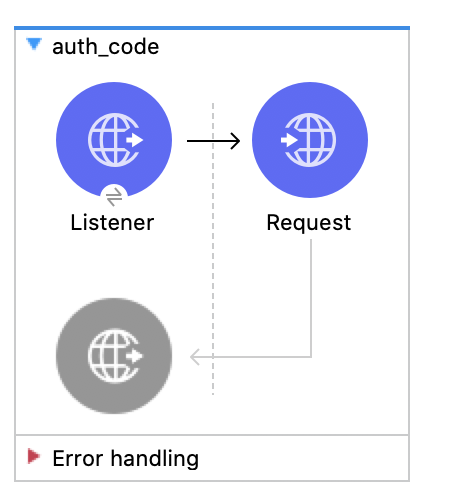
2. Drag a Listener, choose the HTTP_Listener_config and set the path to /auth_code.
Then drag a Request and configure it:
Name: HTTP_Request_configuration-Auth_Code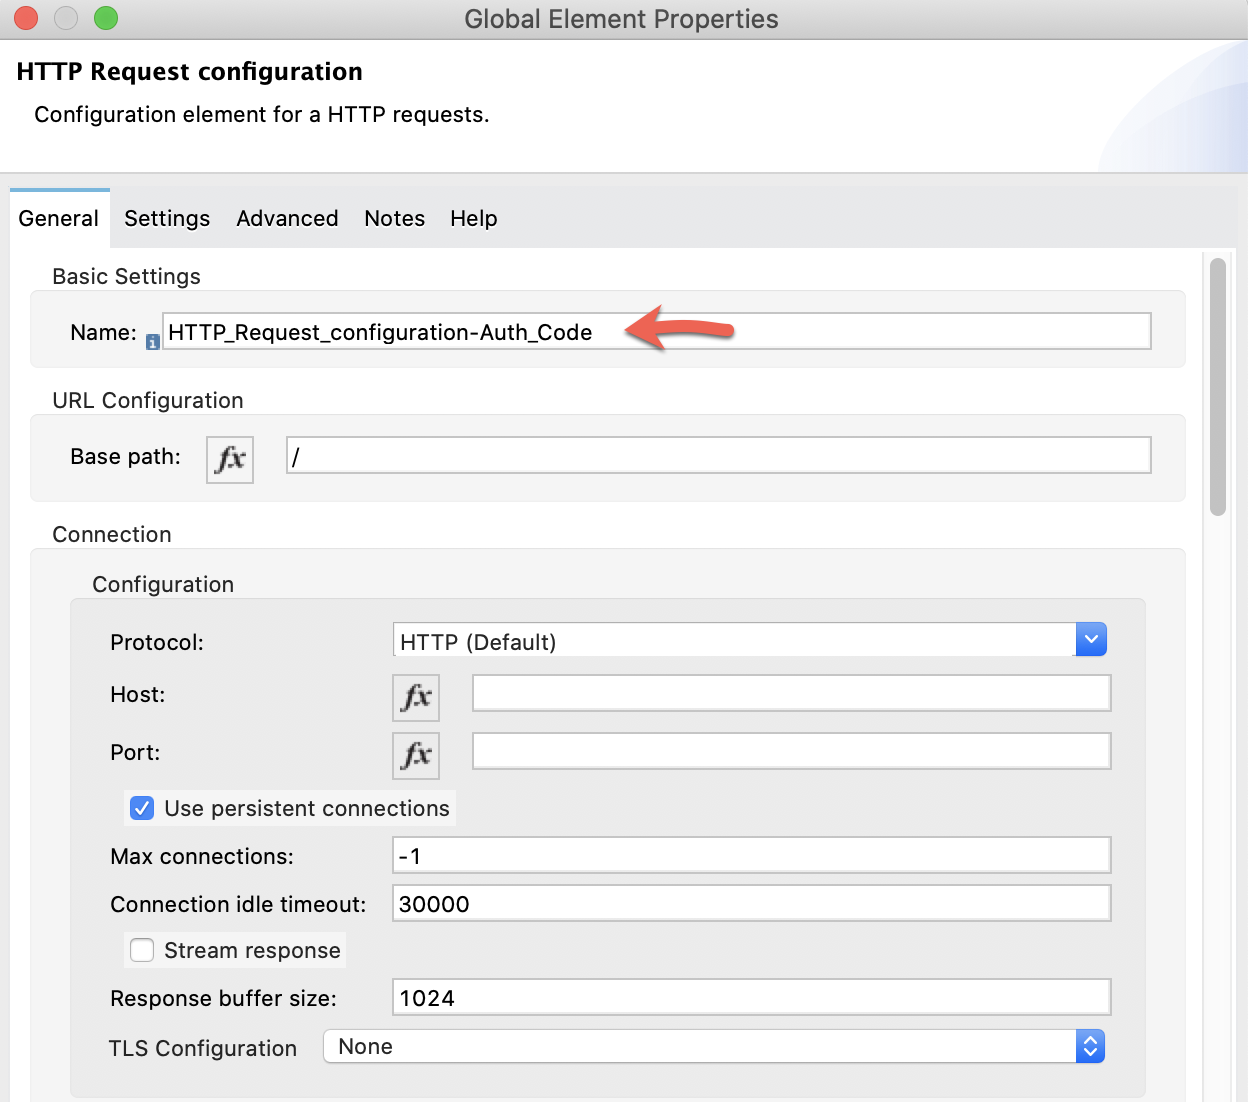
Authentication: Authorization code grant type
Local callback config: HTTP_Listener_config
Local callback config path: ${native_app.auth_code.login_callback_path}
External callback url: ${native_app.auth_code.external_callback_url}
Local authorization url: ${native_app.auth_code.local_auth_url}
Authorization url: ${okta.auth_url}
Custom parameters: Edit inline (and add some state)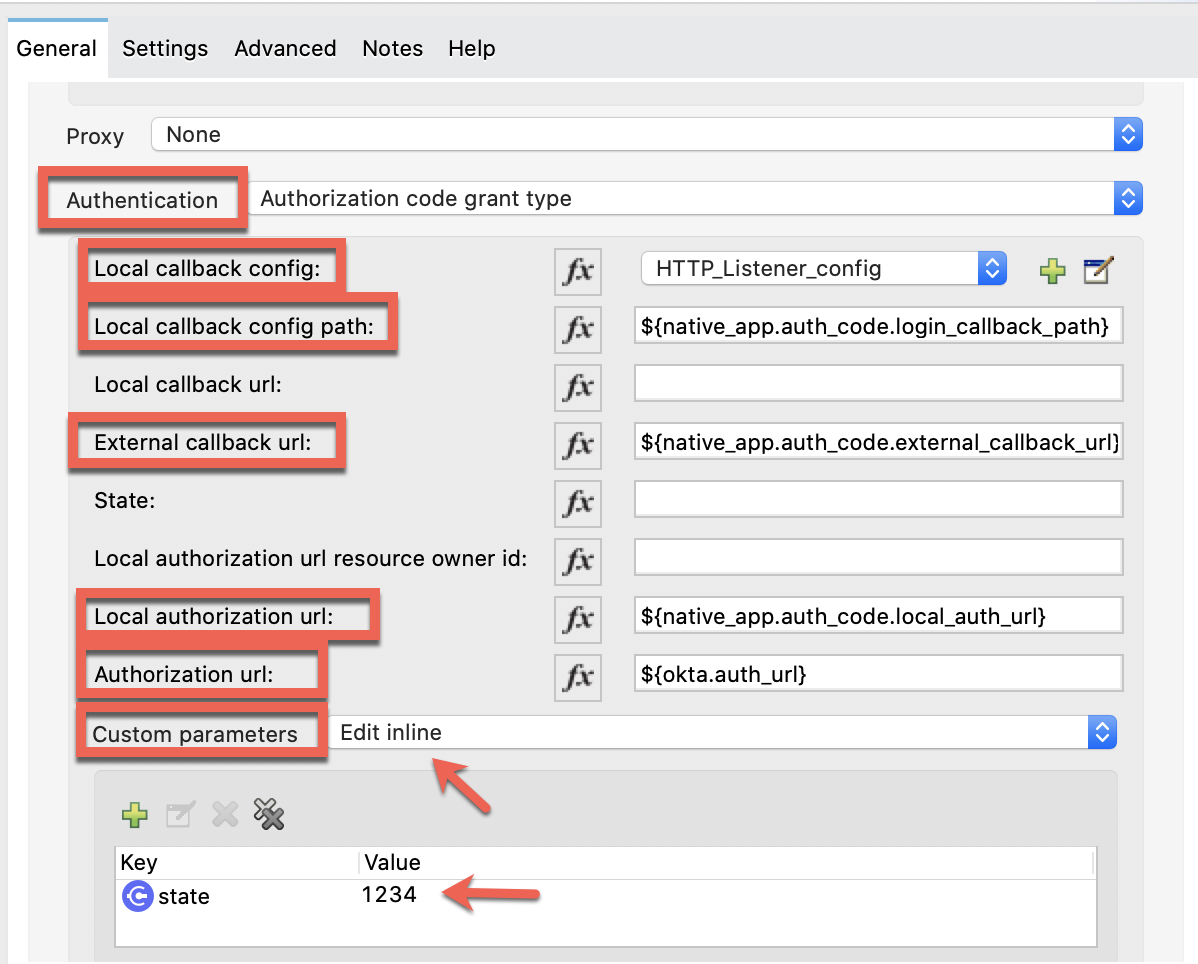
Client id: ${native_app.client_id}
Client secret: ${native_app.client_secret}
Scopes: ${native_app.scope}
Token Manager: Same as in Client Credentials. Add "Tokens" to the Object Store.
Token url: ${okta.token_url}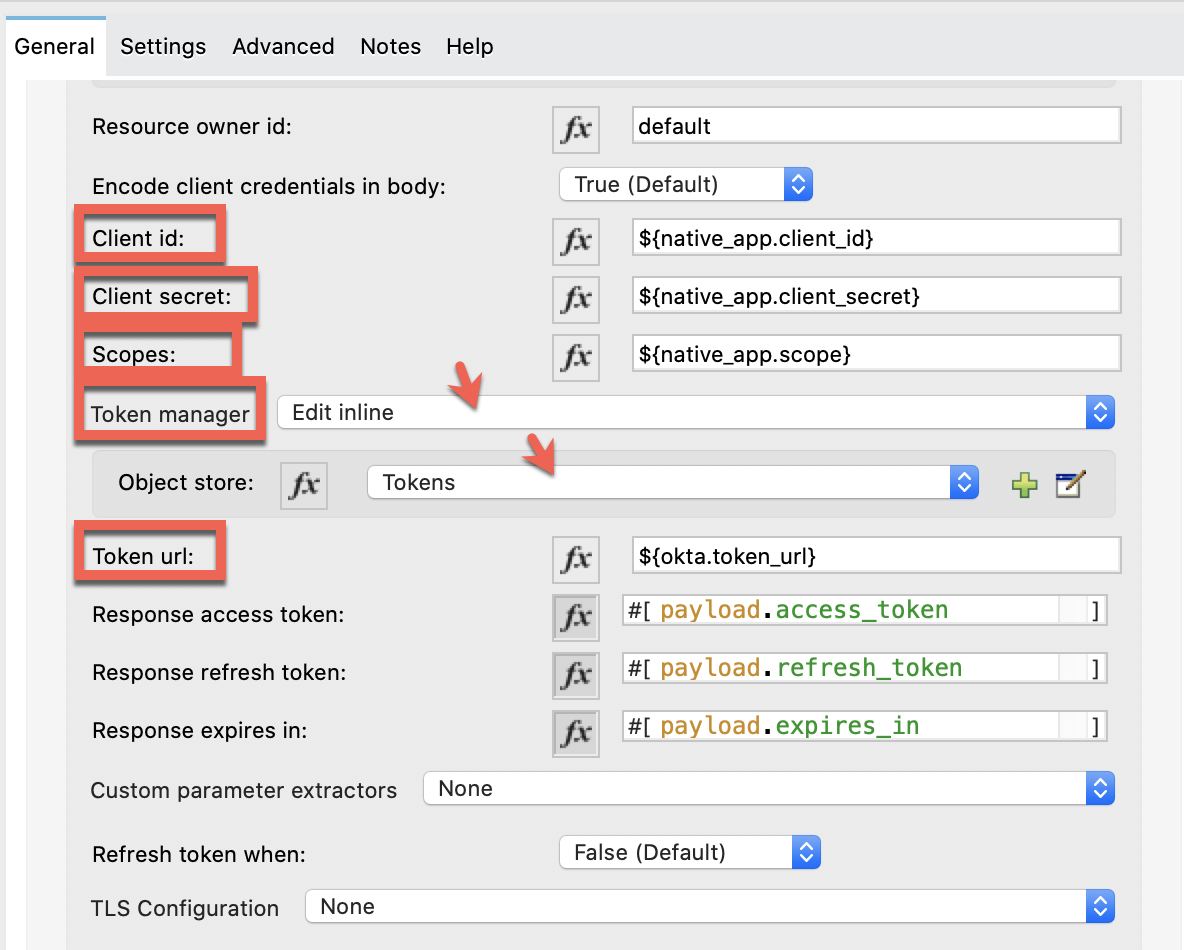
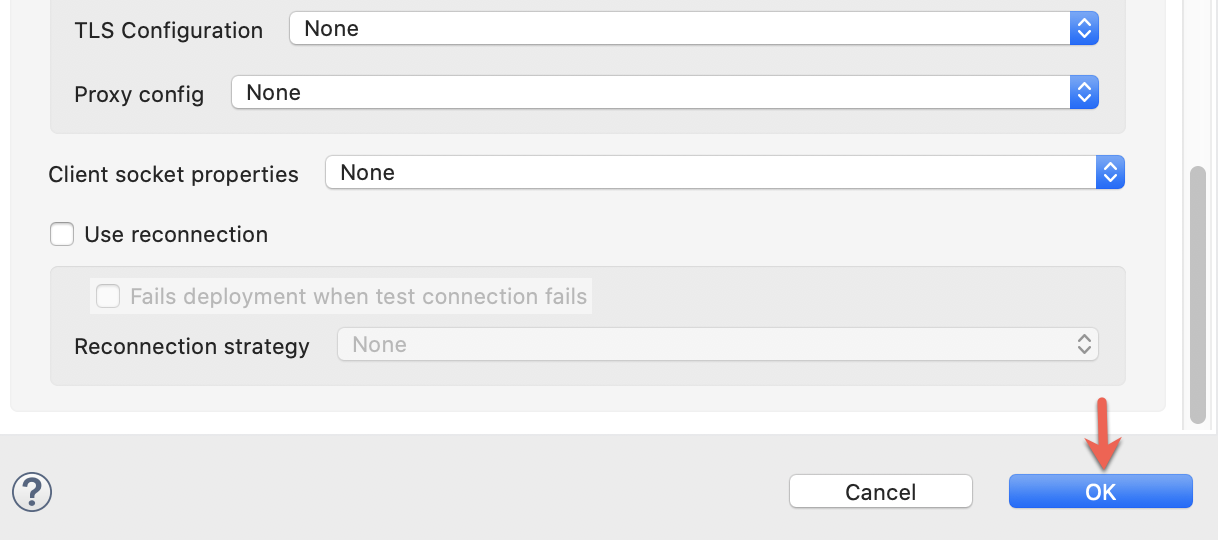
And finish the configuration:
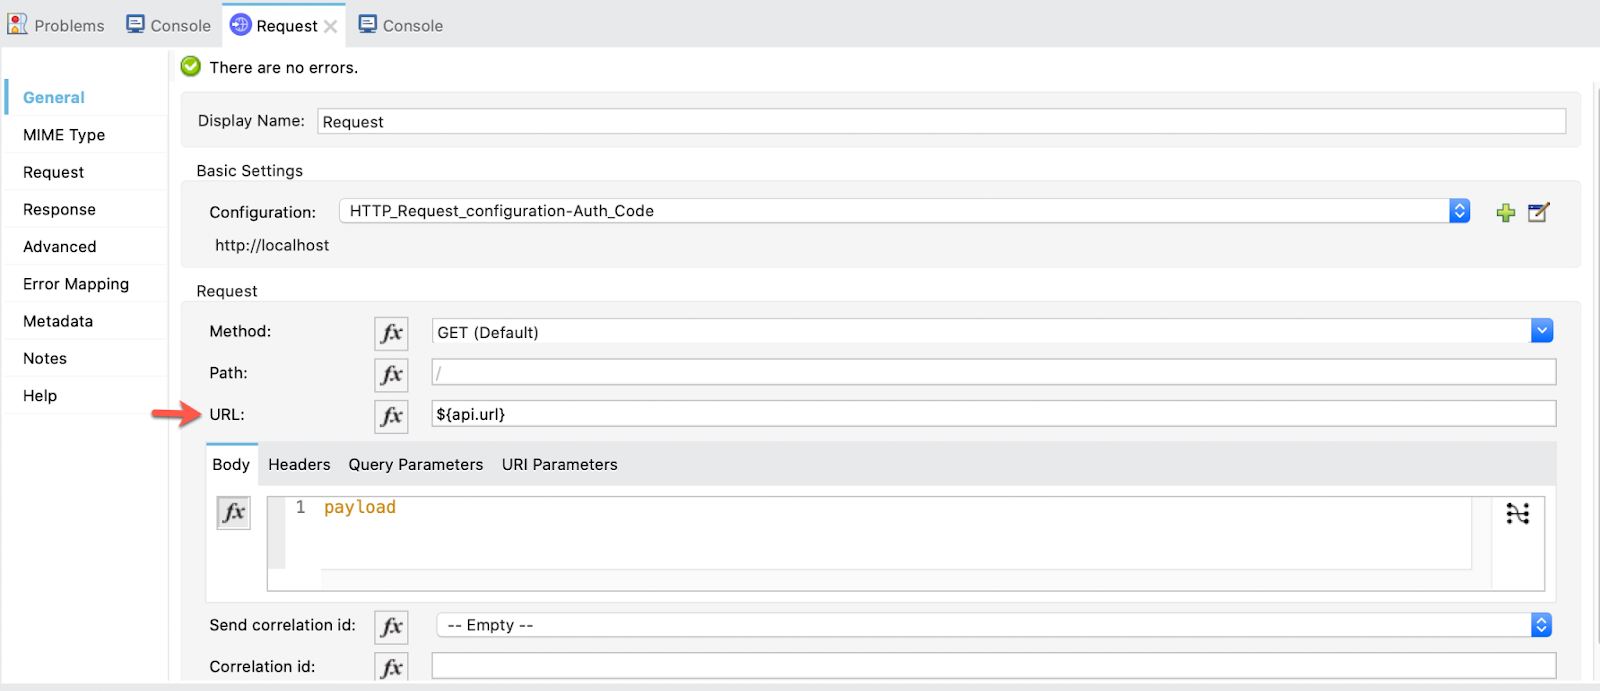
3. Add the API URL to the Request.
URL: ${api.url}
We are ready to test this Grant Type!
4. Before testing the auth_code flow we need to point out something.
The flow tokens is collecting the access tokens we are creating and they will be stored until we clean or invalidate them.
The purpose of having the tokens stored is to automate as much as possible our application. But, for the purpose of showing the functionality of the Auth Code Grant Type (and the next ones), we already created a flow to invalidate the stored tokens. So that when we use this grant type we don't skip steps.
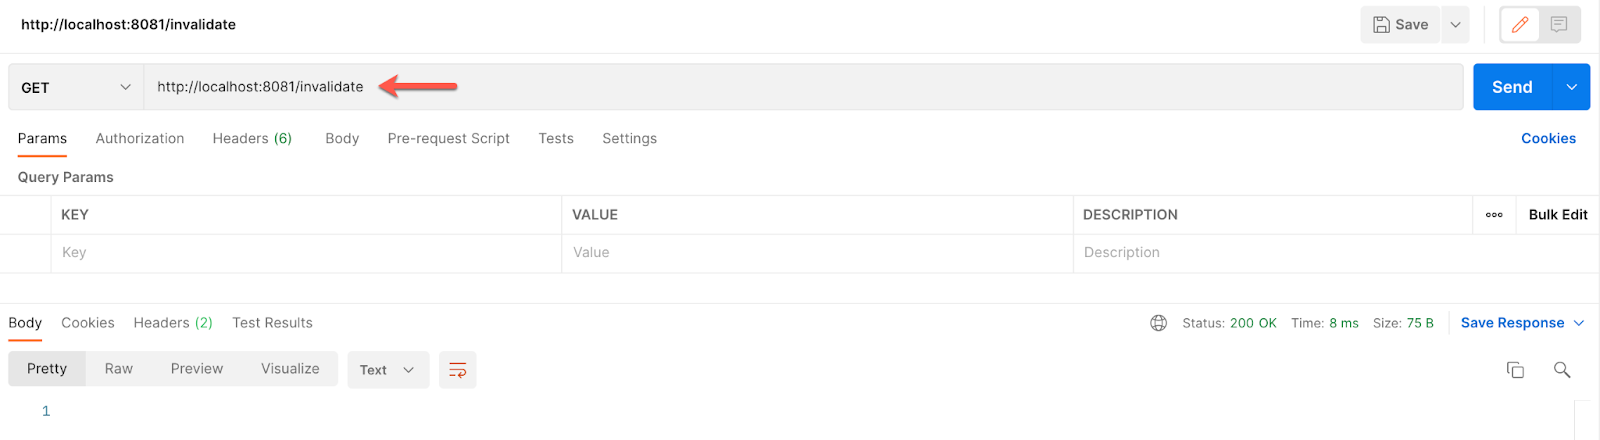
So, first, go to Postman and send a GET request to:
http://localhost:8081/invalidate
The response will be empty but what it is really doing is cleaning up the stored tokens.
Now, if we try to call the auth_code flow we should get this:
http://localhost:8081/auth_code
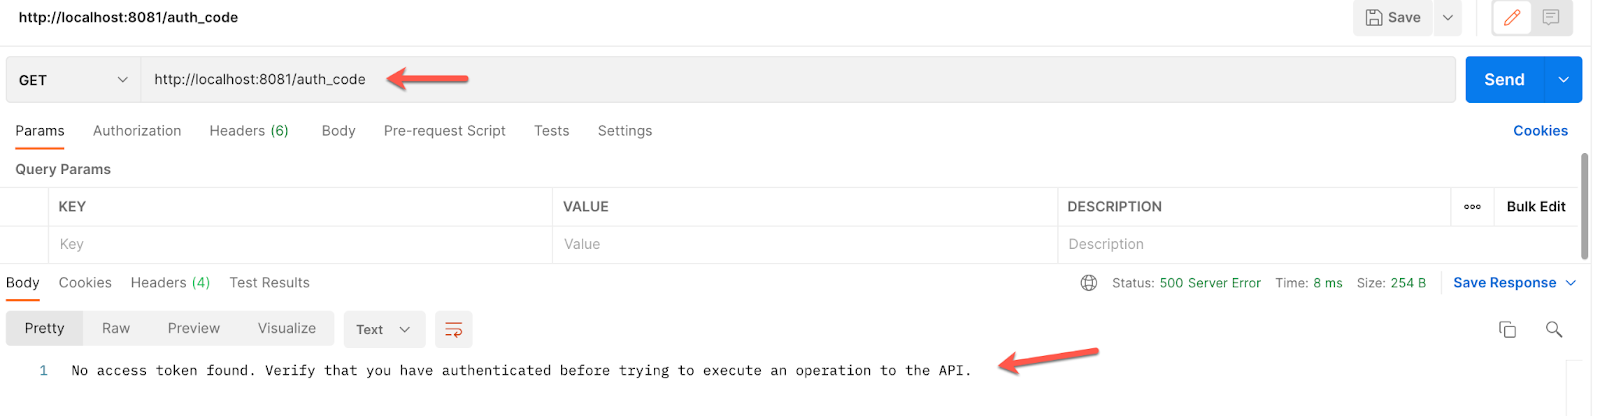
So, we first need to authenticate.
5. For that, we go to a new tab on the browser and paste our external callback url:
http://localhost:8081/login

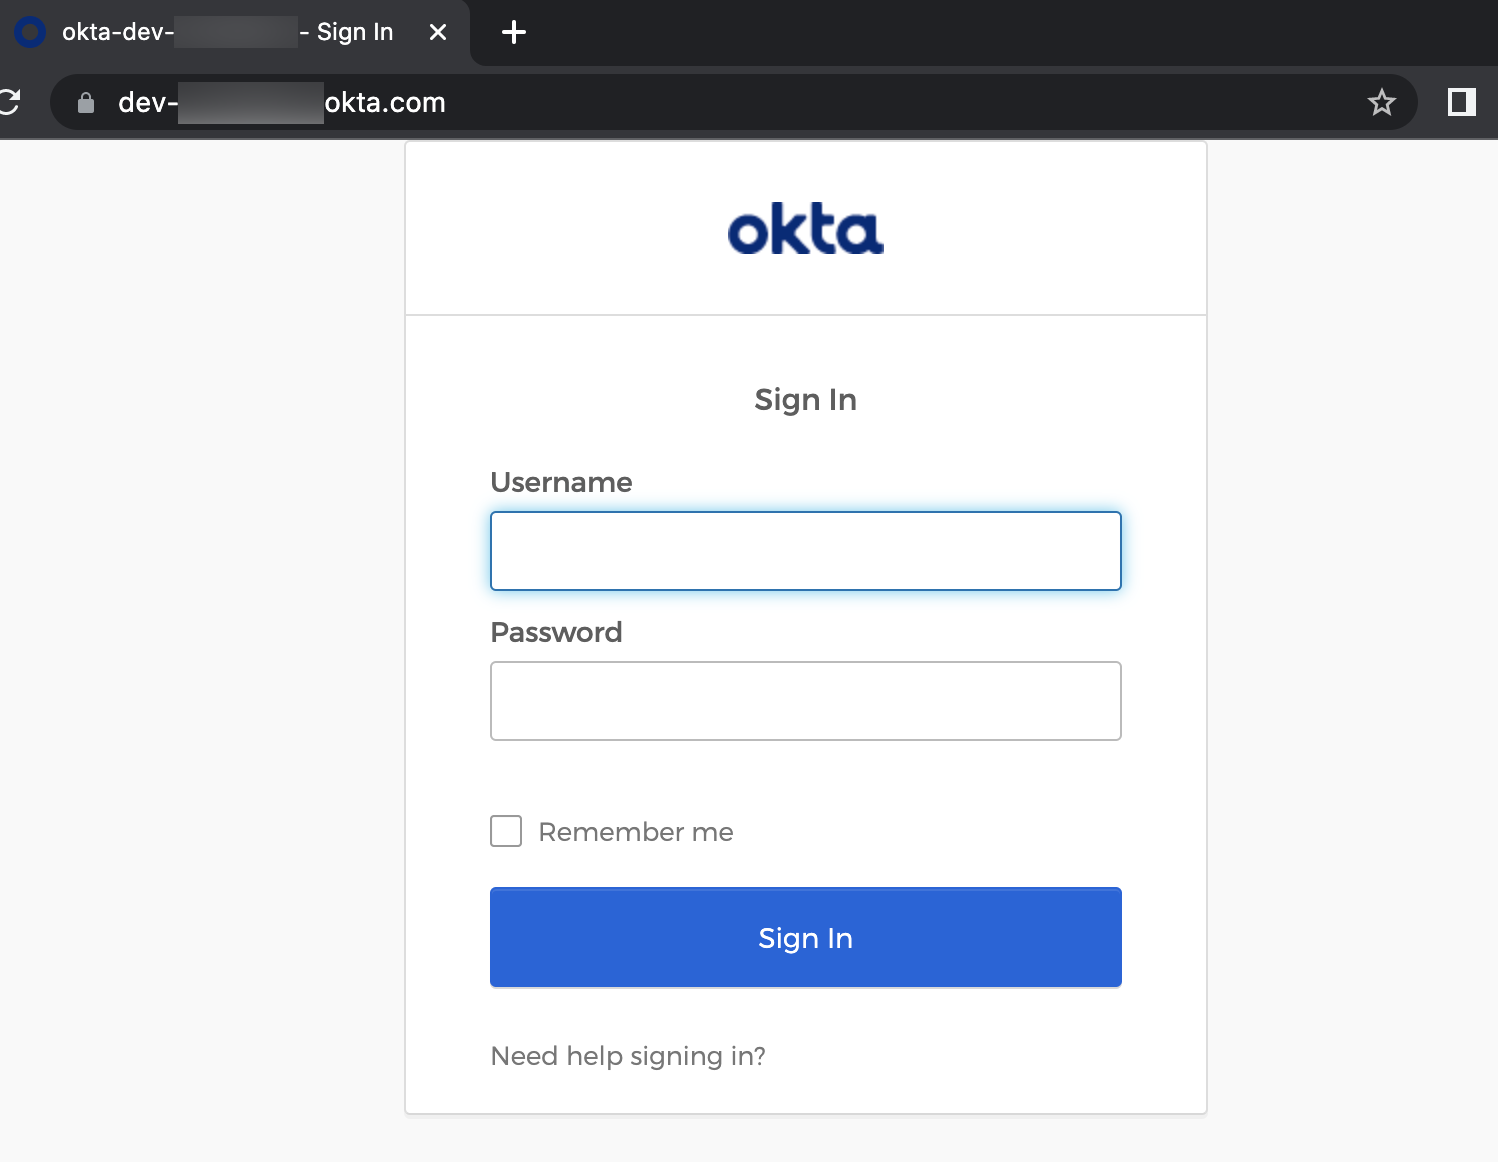
It will redirect us to Okta's login page (if you aren't logged in yet) and ask for your credentials.
Once logged in, a successful message will appear. In the browser URL you can see the code that is retrieving. This code is the one that is used to get the access token to call the API.

This access token is now stored in the Object Store Tokens. So, if we return to Postman and make a call to the auth_code flow, now we'll be able to see the response effectively.
http://localhost:8081/auth_code
With this, we conclude the Authorization Code Grant Type part and we are ready for the next level → Resource Owner Password Grant Type!
For this one, we are using the Native App also. This Grant Type and the next one (Implicit) are not predefined in the OAuth Module, so we are going to implement them manually.
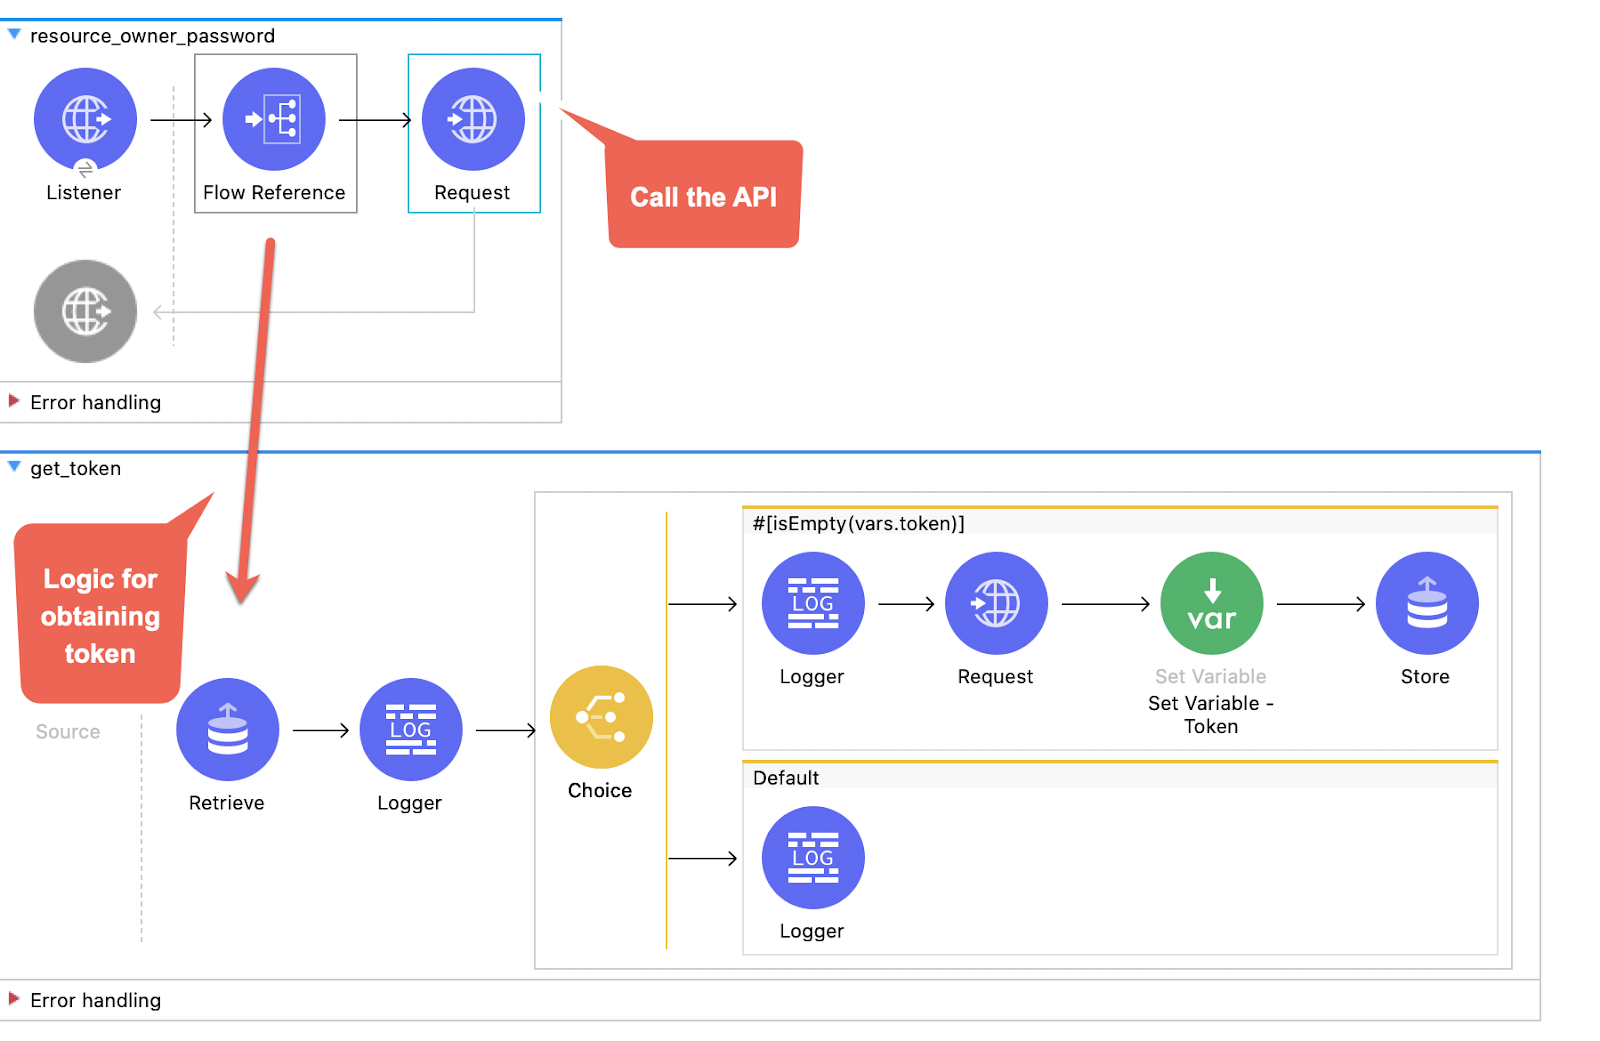
1. Create a new flow and name it resource_owner_password and another one named get_token. The first flow will have a flow reference to the second one that has all the logic for obtaining the token manually. And then we call the API.
At the end, they will look like this:
2. So, let's begin. In our first flow resource_owner_password drag a Listener. Use the default global configuration HTTP_Listener_config and set the path to /password.
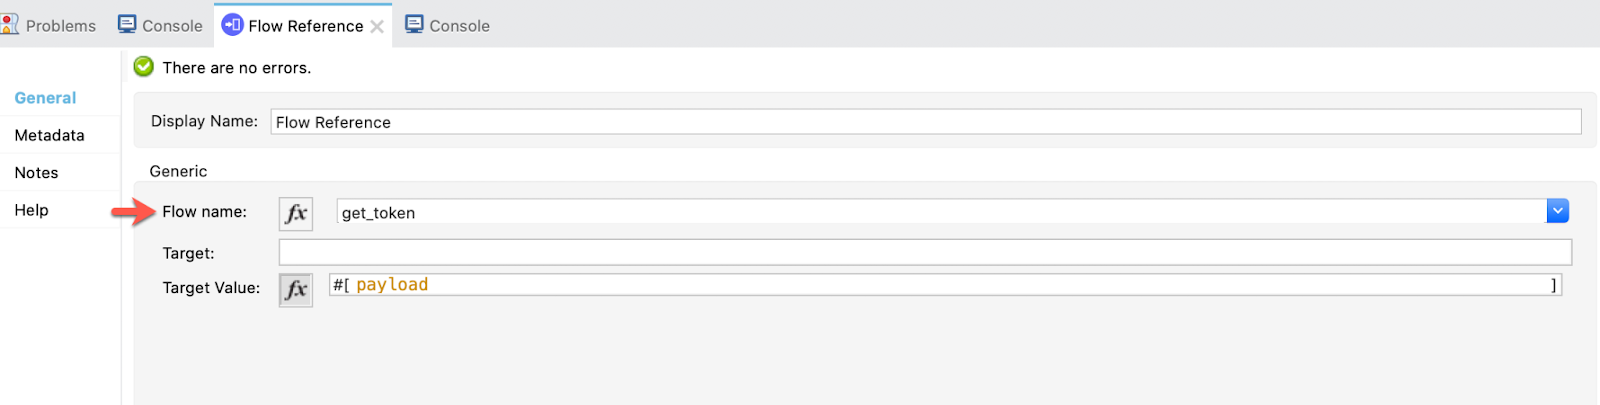
Then, drag a Flow Reference that references the get_token flow:
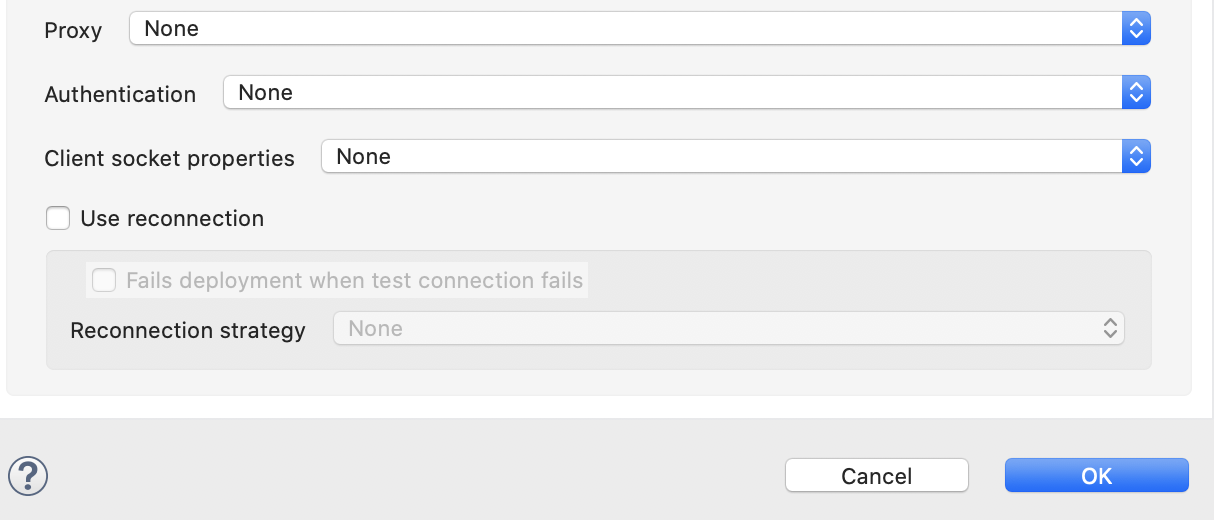
And finally a Request with the default configuration. As I said, in this Request operation the Password and Implicit Grant Types will not be inherited from the OAuth module. So, we are using a default configuration for both Password and Implicit:
Name: HTTP_Request_congifuration-Resource_Owner-Implicit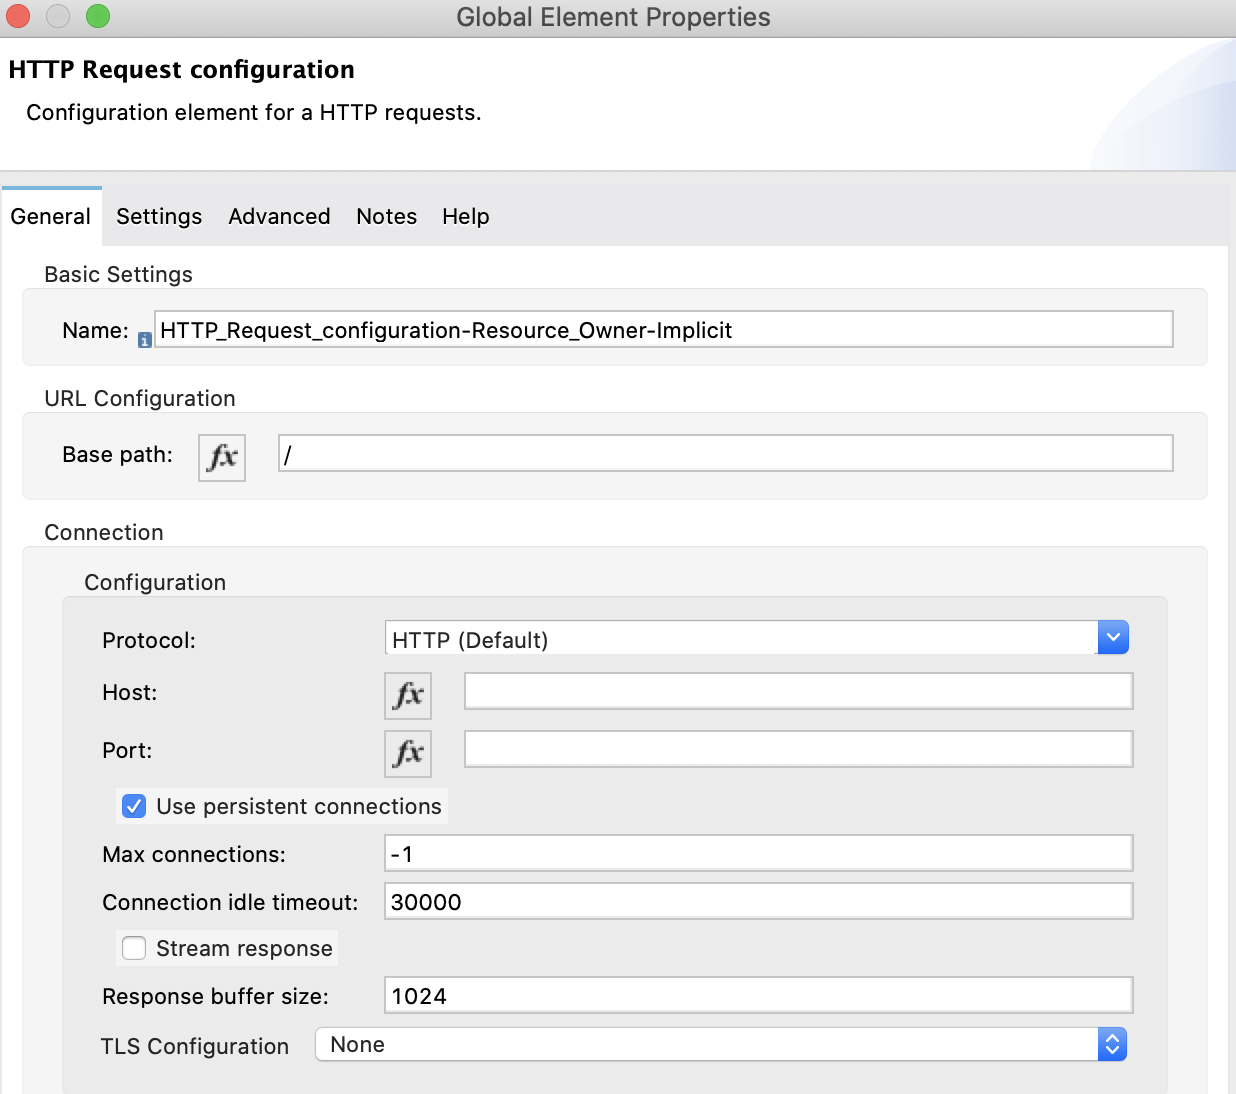
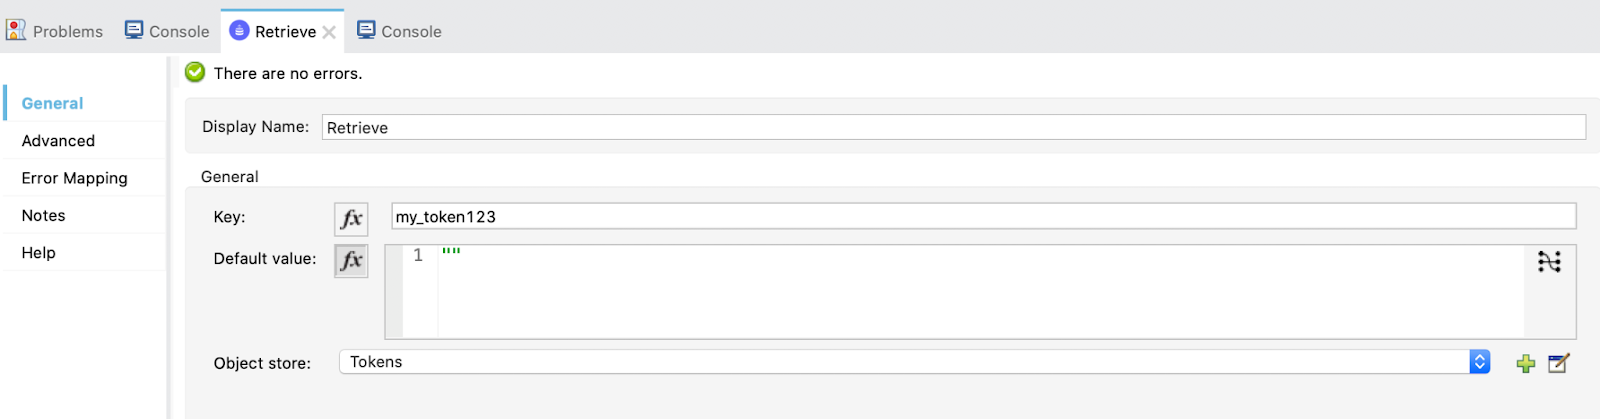
3. In the next flow get_token, we start with a Retrieve operation. Maybe we already have one token in the Object Store so we are checking:
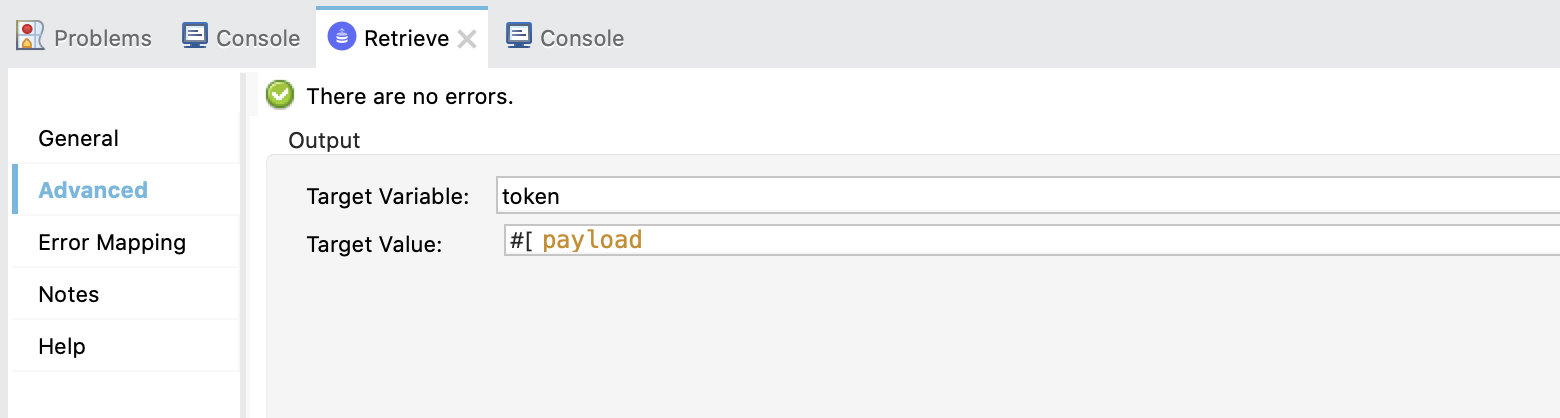
Also, in the advanced tab, put a target variable and value so that the payload is not overwritten.
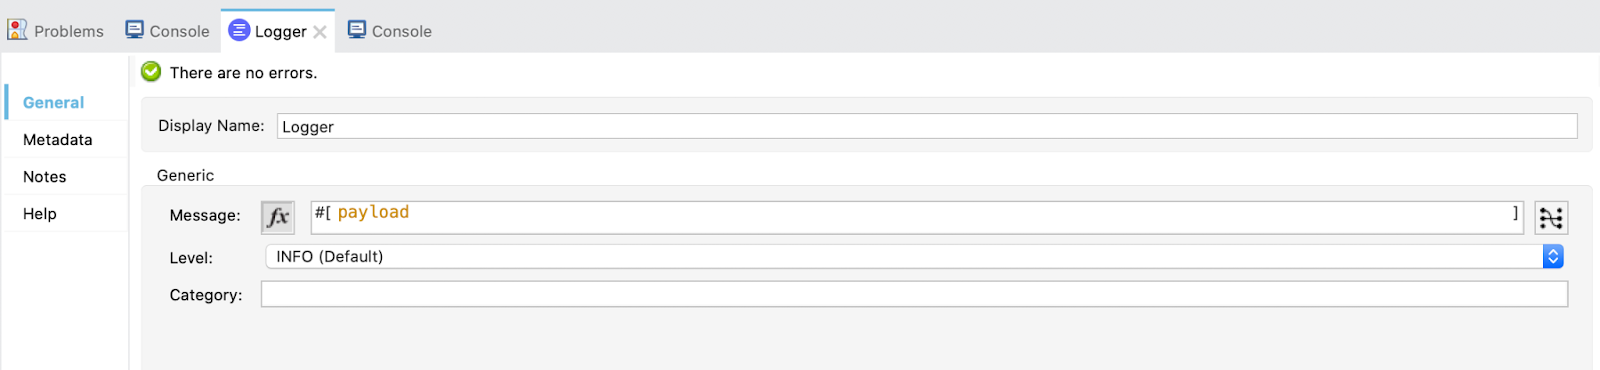
4. Drag a Logger to see the payload.
5. Now, drag a Choice operation. If we already have a token we will log that the token is found and continue by calling the API in the upper flow. But, if we don't have a token, we will make a Request to Okta to obtain it.
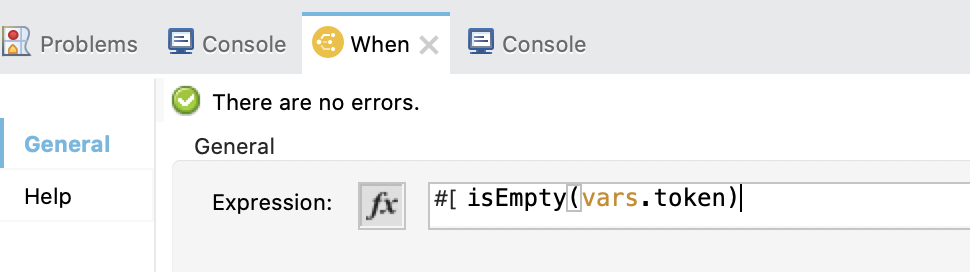
The first When element has the following expression:
isEmpty(vars.token)
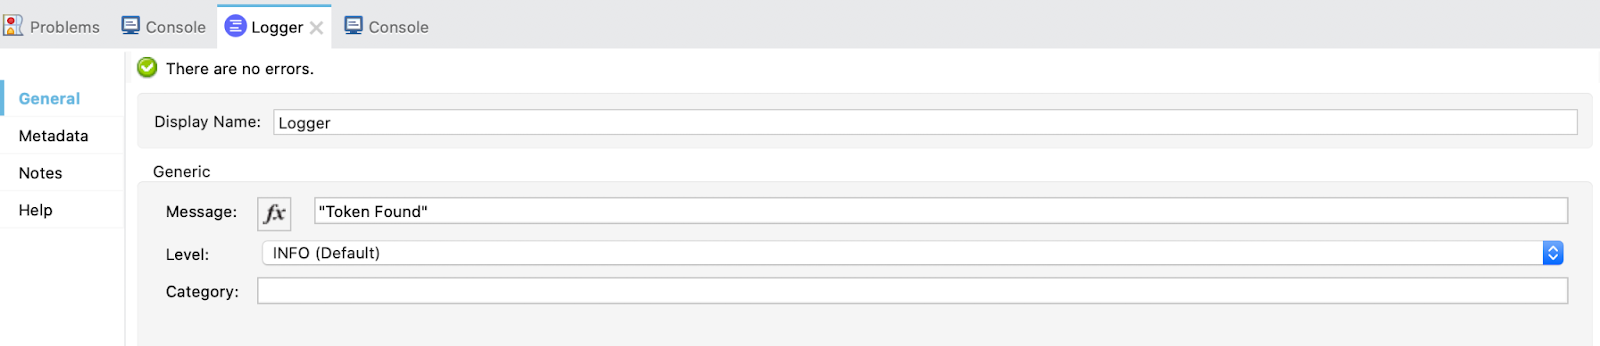
And the second When element is the default and has a Logger printing that the token has been found.
6. Let's take a deeper look at the first When element.
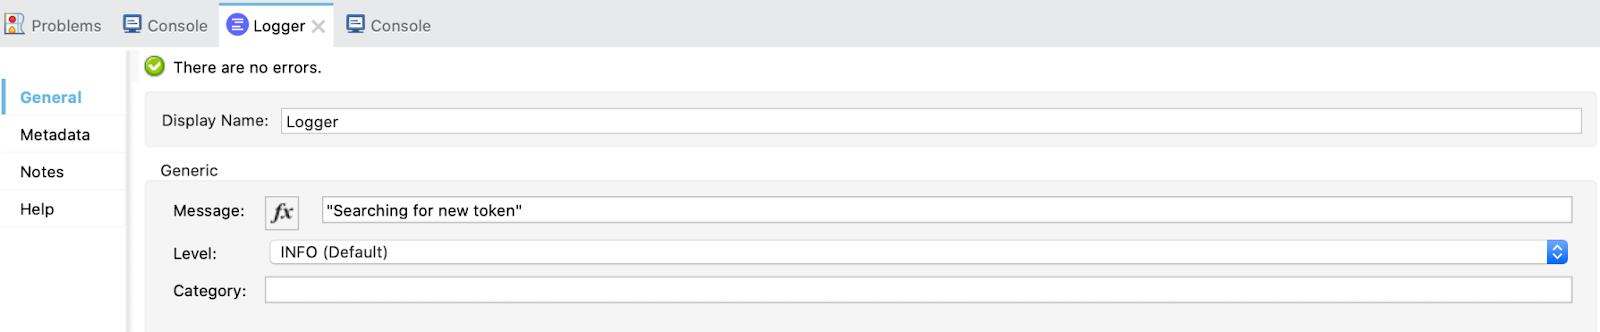
It first logs that the token wasn't found:
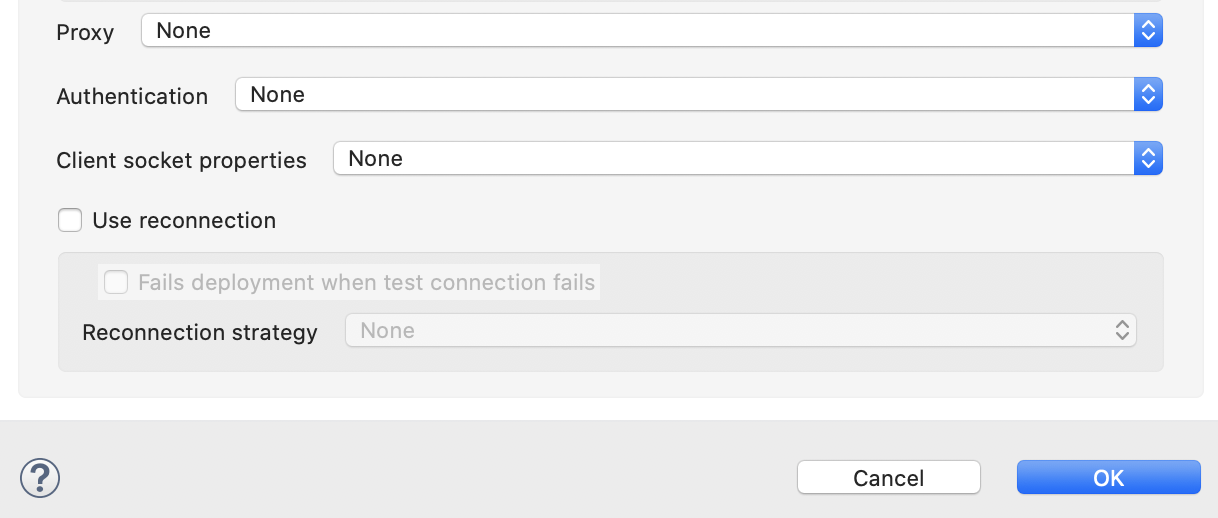
Then, it makes the Request to Okta with the following configuration:
Name: HTTP_Request_configuration-Okta
Host: ${okta.domain}
Protocol: ${okta.port}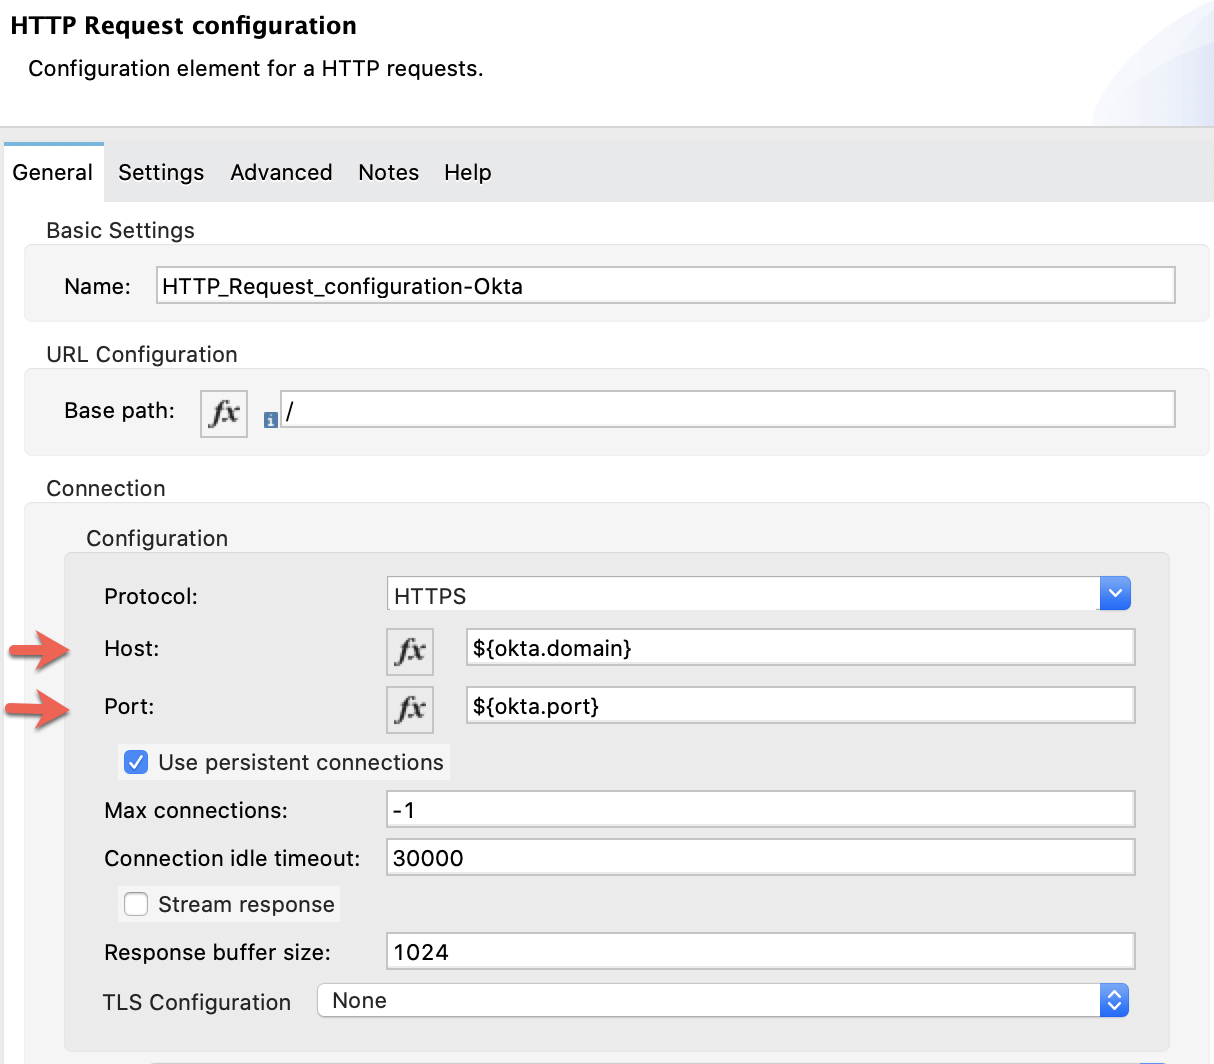
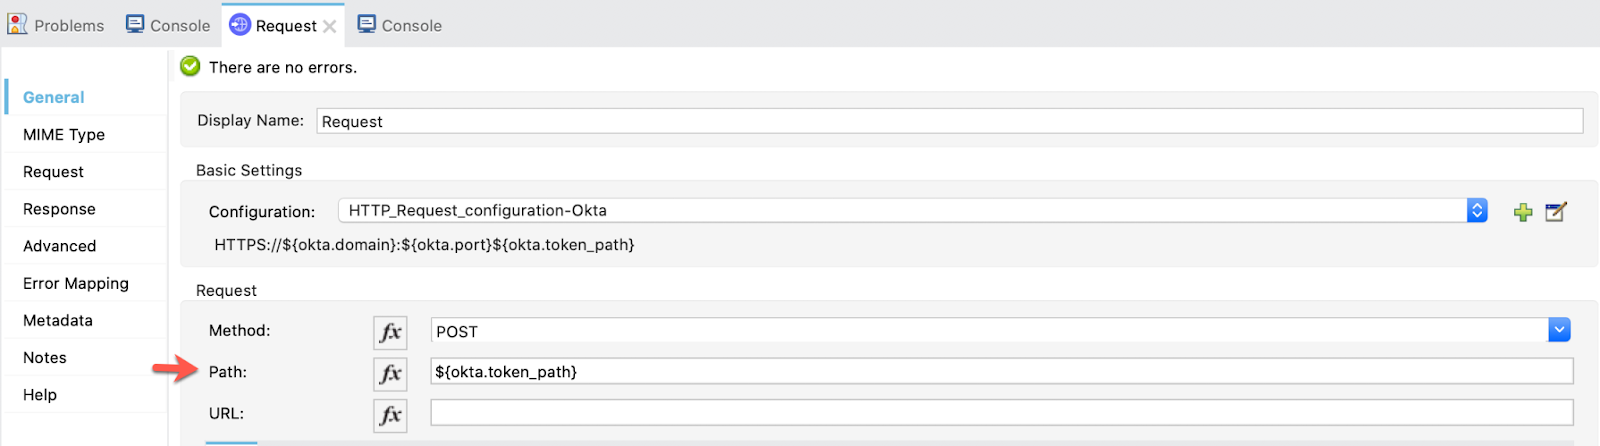
We set the path to:
${okta.token_path}
And the we configure the Request manually:
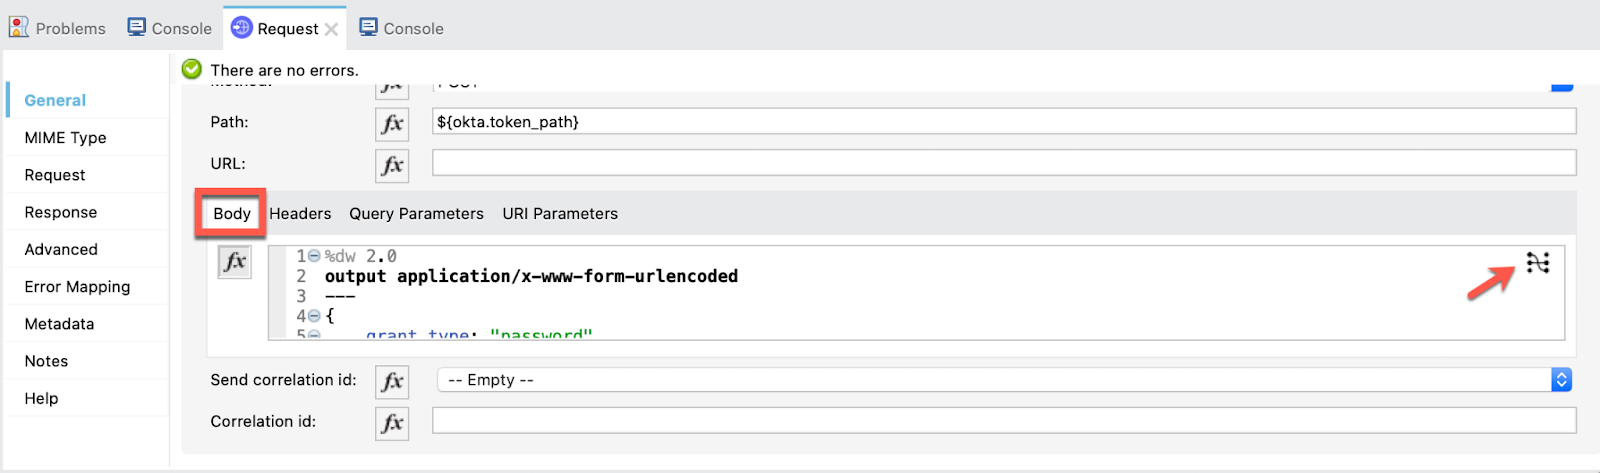
%dw 2.0
output application/x-www-form-urlencoded
---
{
        grant_type: "password",
        redirect_uri: p('native_app.redirect_uri'),
        username: p('okta.username'),
        password: p('okta.password'),
        scope: p('native_app.scope'),
        client_id: p('native_app.client_id'),
        client_secret: p('native_app.client_secret')
}
Select Done and we pass to the Headers now:
"Accept": "application/json"
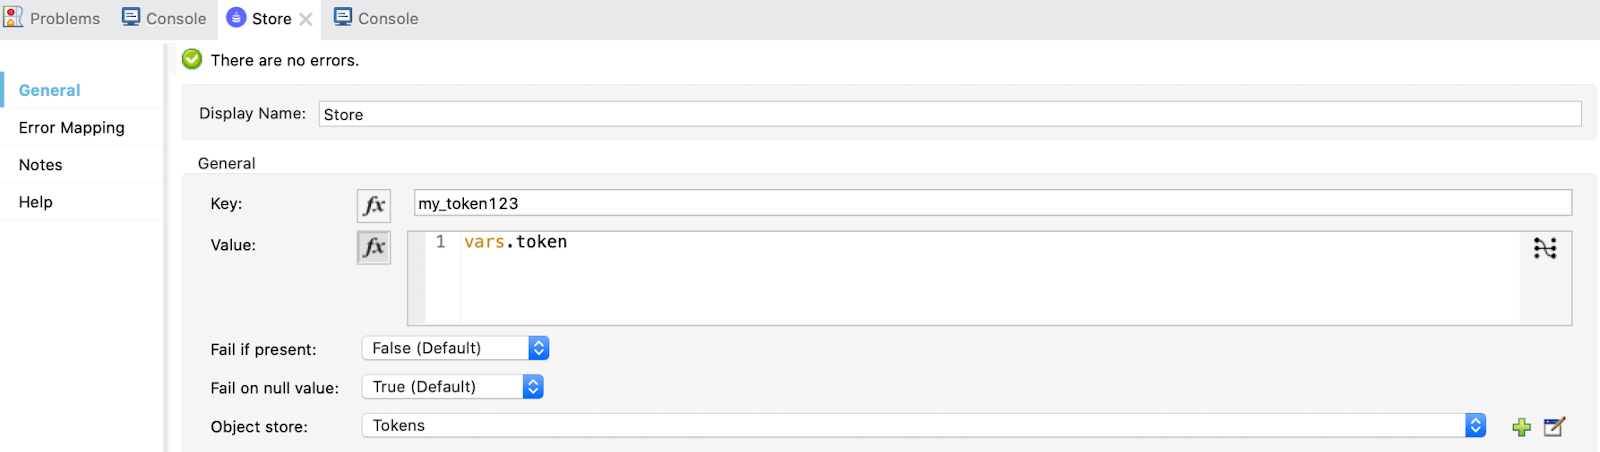
The Request configuration is finished. Now, drag a Set Variable to set the value of payload.access_token to the variable token:

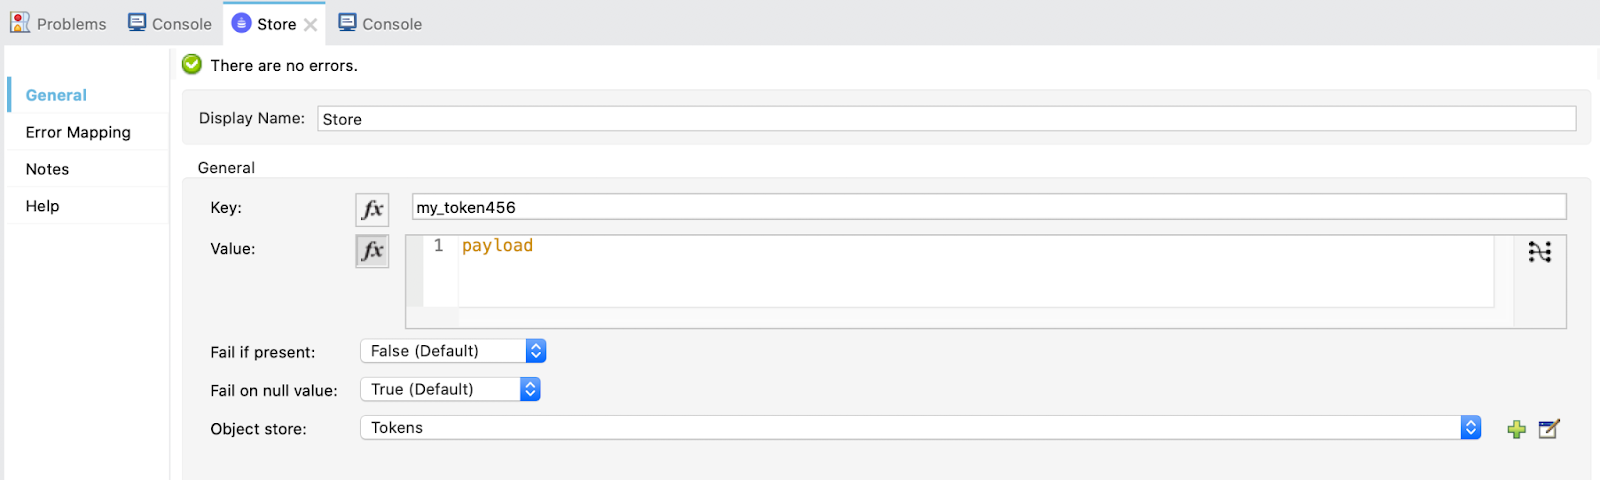
Finally, store the token by using a Store operation:
When this is complete, a call will be made to the API using the access token.
With this, we finish the entire flow for implementing the Password Grant Type. Now, we are going to test it.
7. Go to Postman, and make a GET Request first to /invalidate for later appreciate the difference between searching for a new token in Okta and already having a token:
http://localhost:8081/invalidate
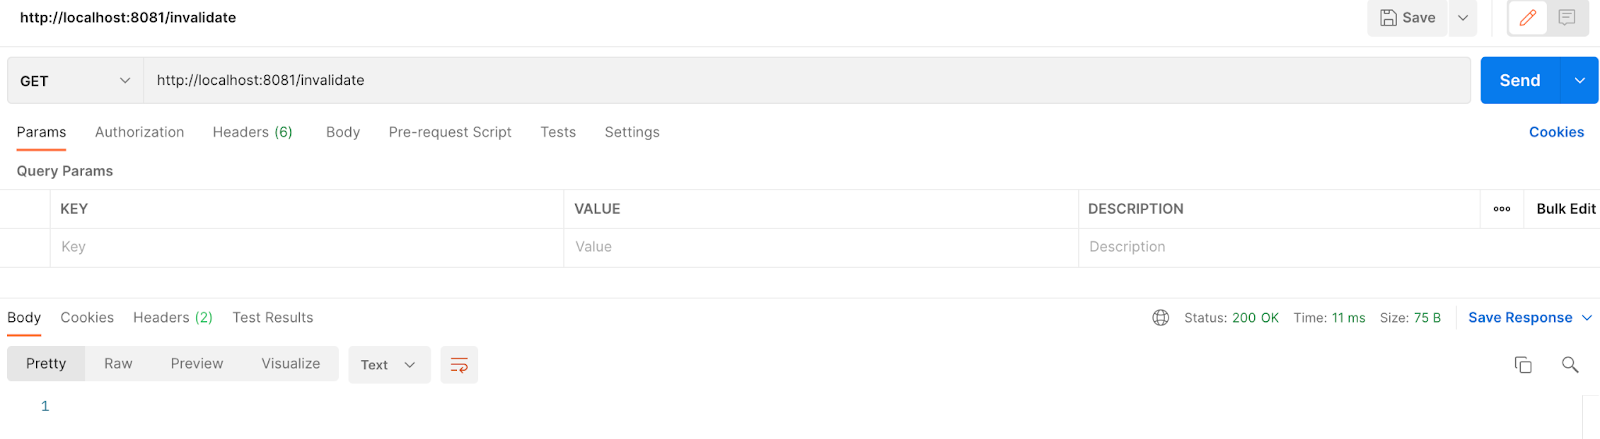
Now, make a GET Request to:
http://localhost:8081/password
It may take a little bit to get the token because we are obtaining it from Okta now and then making a second Request to the API. But you'll see the response in 2 or 3 seconds.
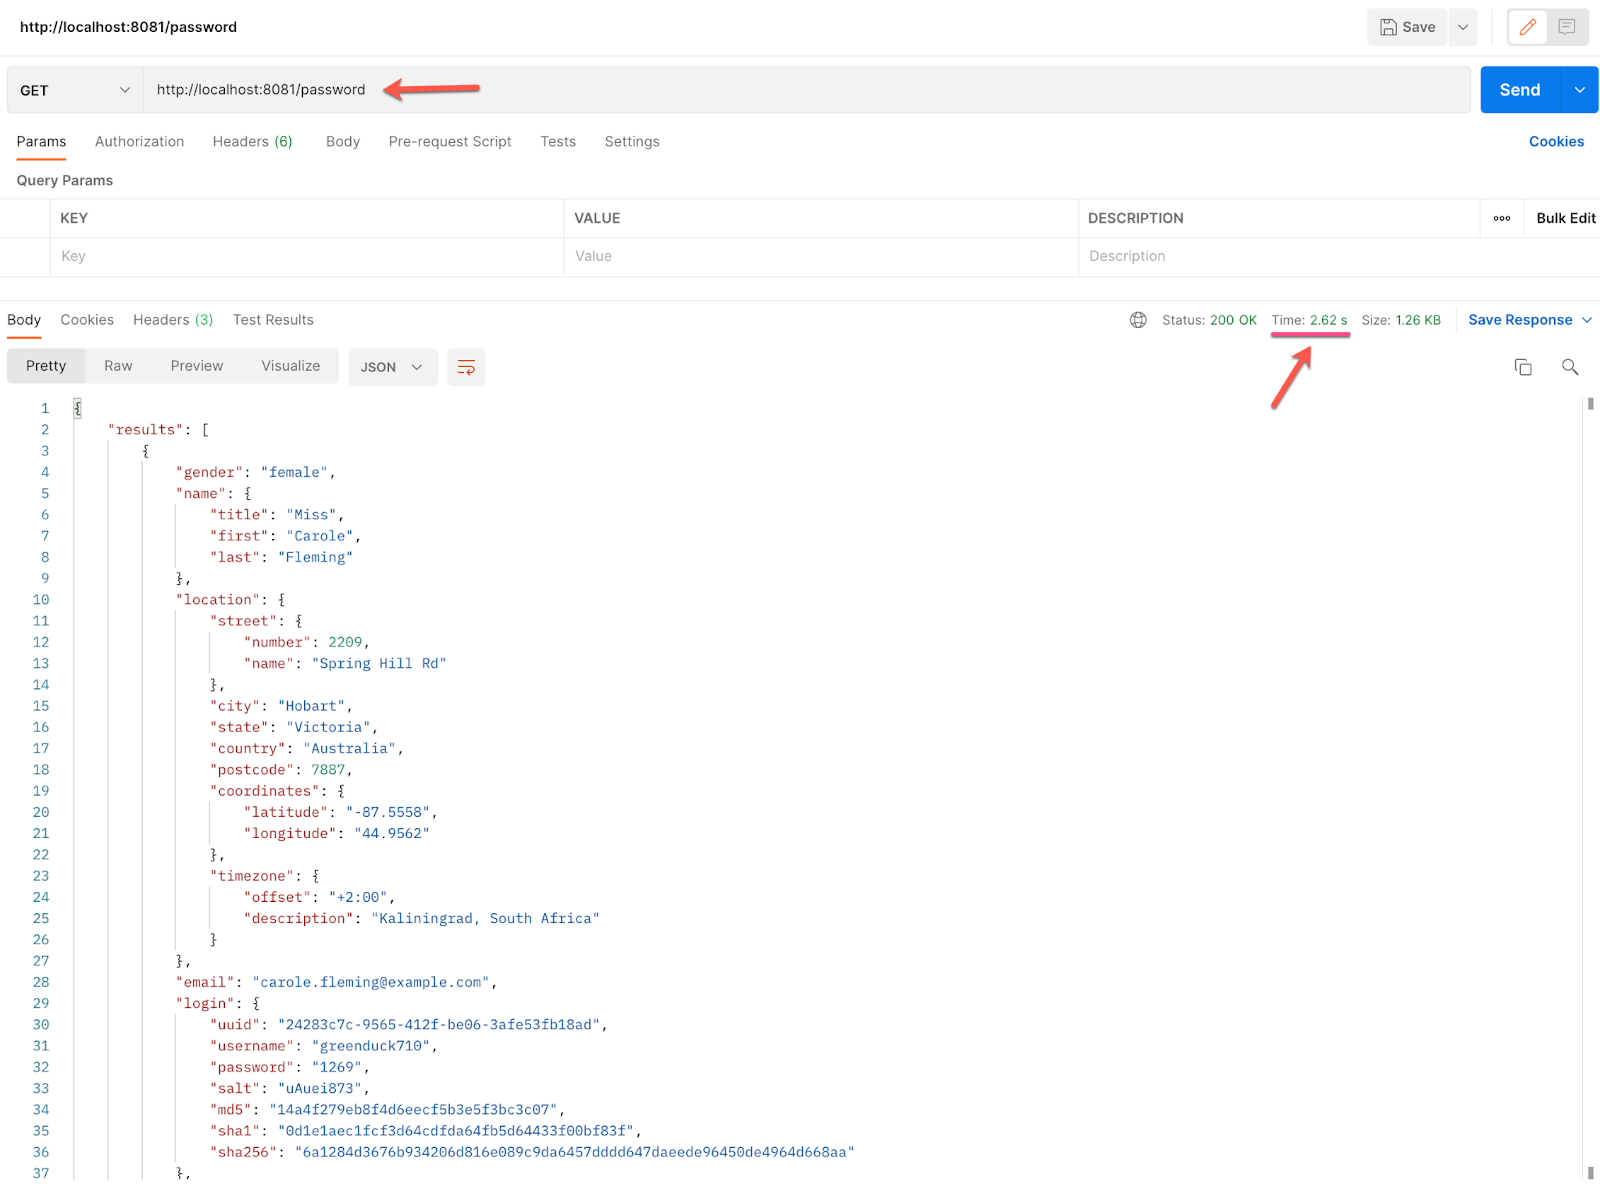
If we go to the Console in Studio we can see the Logger printing "Searching for new token" (scroll up a little bit):

If we make a Request again to /password we'll get the response almost instantly because we are using the stored token now!

And in the Console of Studio we can see the Logger printing "Token found" (the second When element of the Choice Router):

With this, we finish the Resource Owner Password Grant Type demonstration!
Let's go to the LAST ONE of them, the Implicit Grant Type and finish this Codelab!
We reached the last step! With this Grant Type we are also using the Native App in Okta.
For the implementation of this one, we are going to create 4 flows and play a little bit with DataWeave and with a script of HTML. A big part of the complexity of this one is because it's not meant to be automated as we mentioned in the beginning.
It's really interesting, so, let's get down to work!
1. First, let's take a look at how all this is going to work.
Here are the 4 flows we are going to implement:
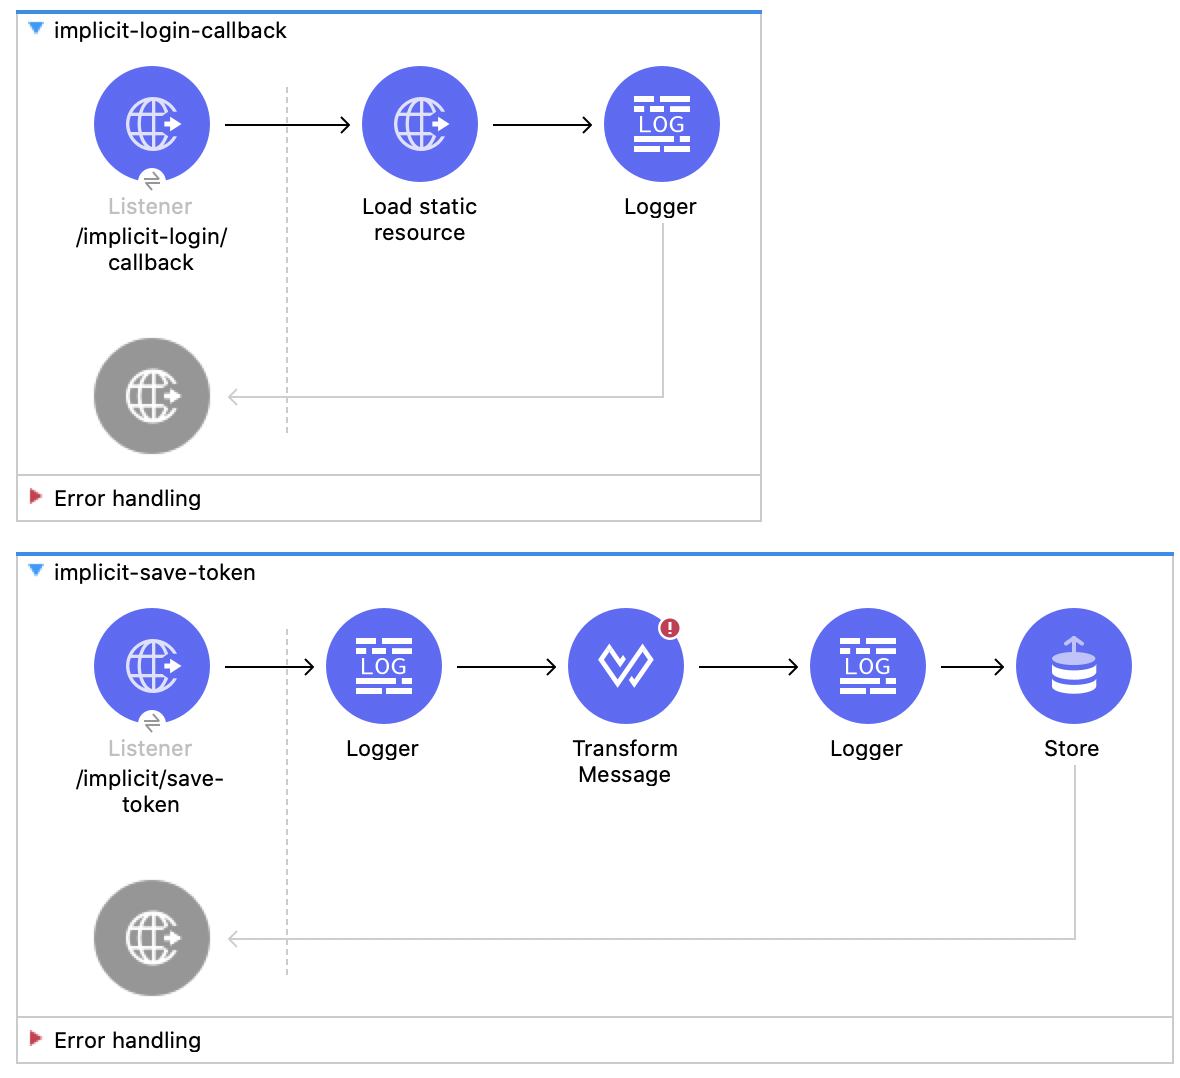
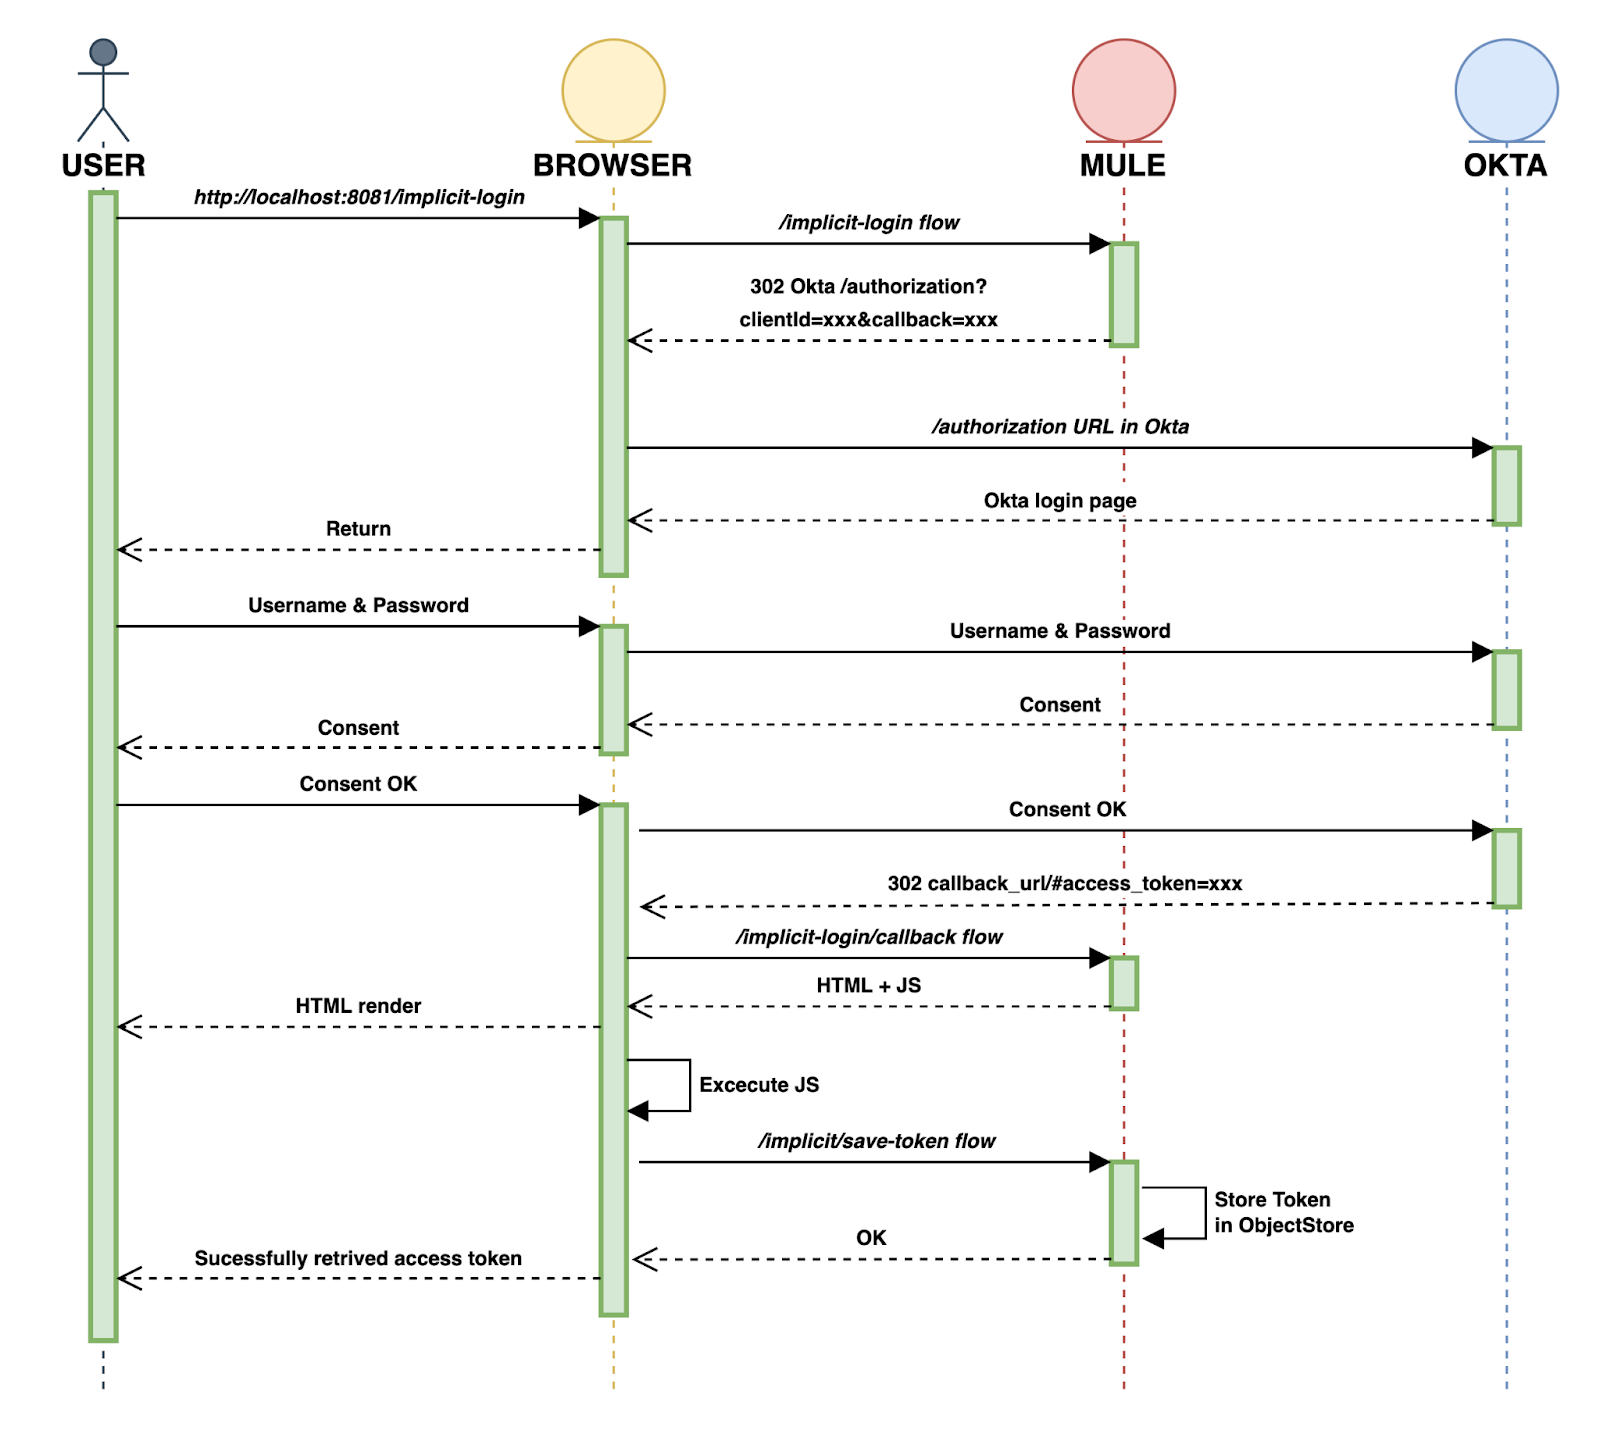
And, for better understanding, here is a Sequence Diagram of how all this works:
FIRST PART (obtaining the Access Token from Okta):
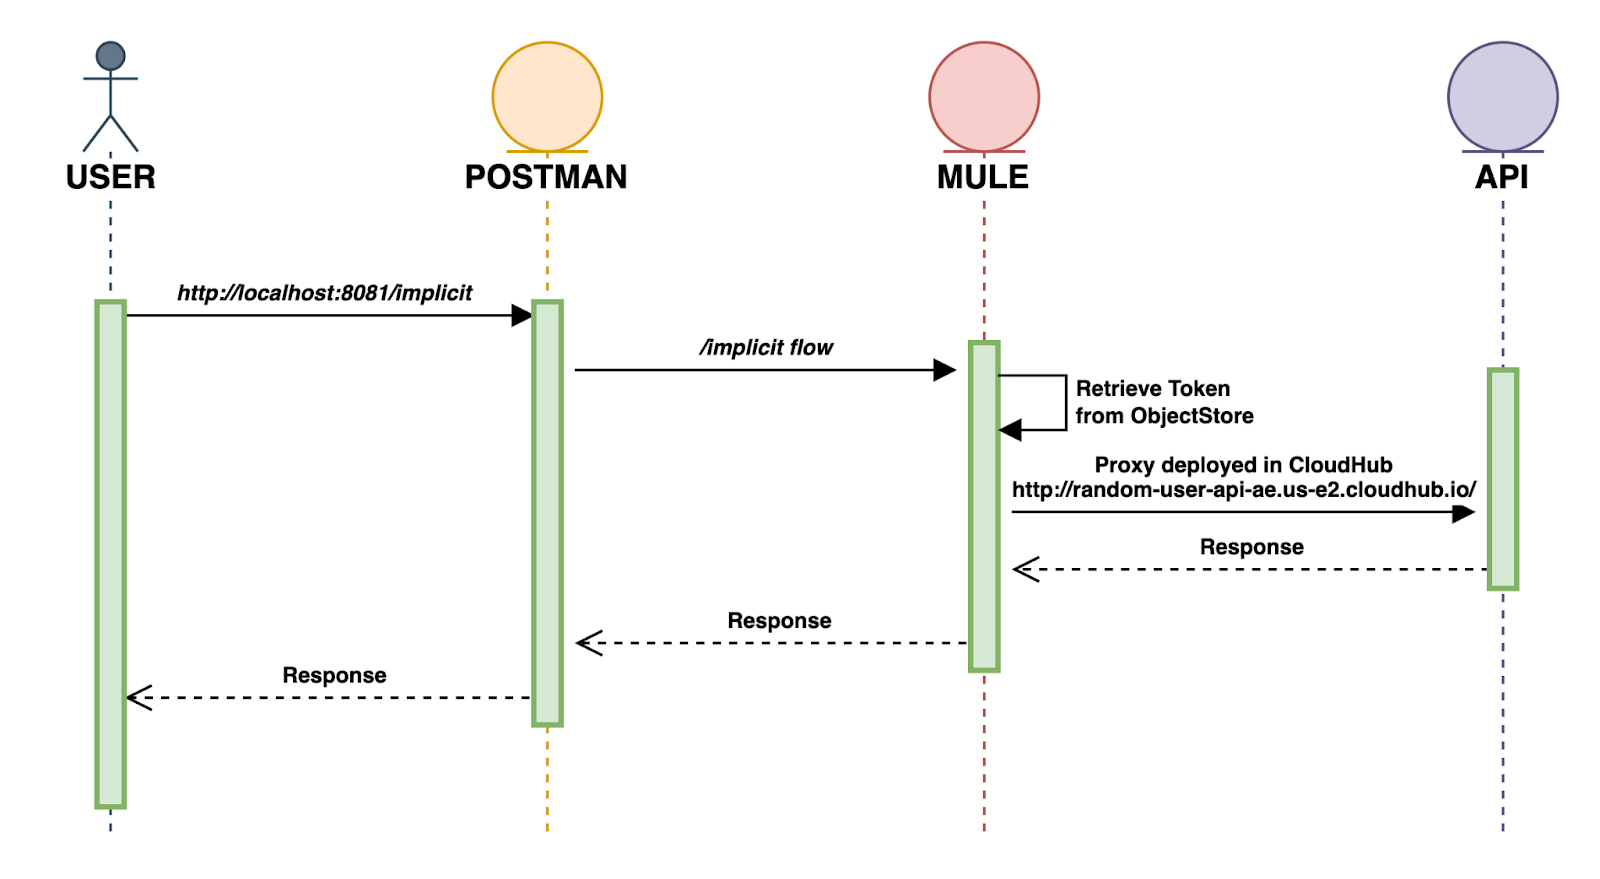
SECOND PART (calling the /implicit flow from Postman to GET the API Response):
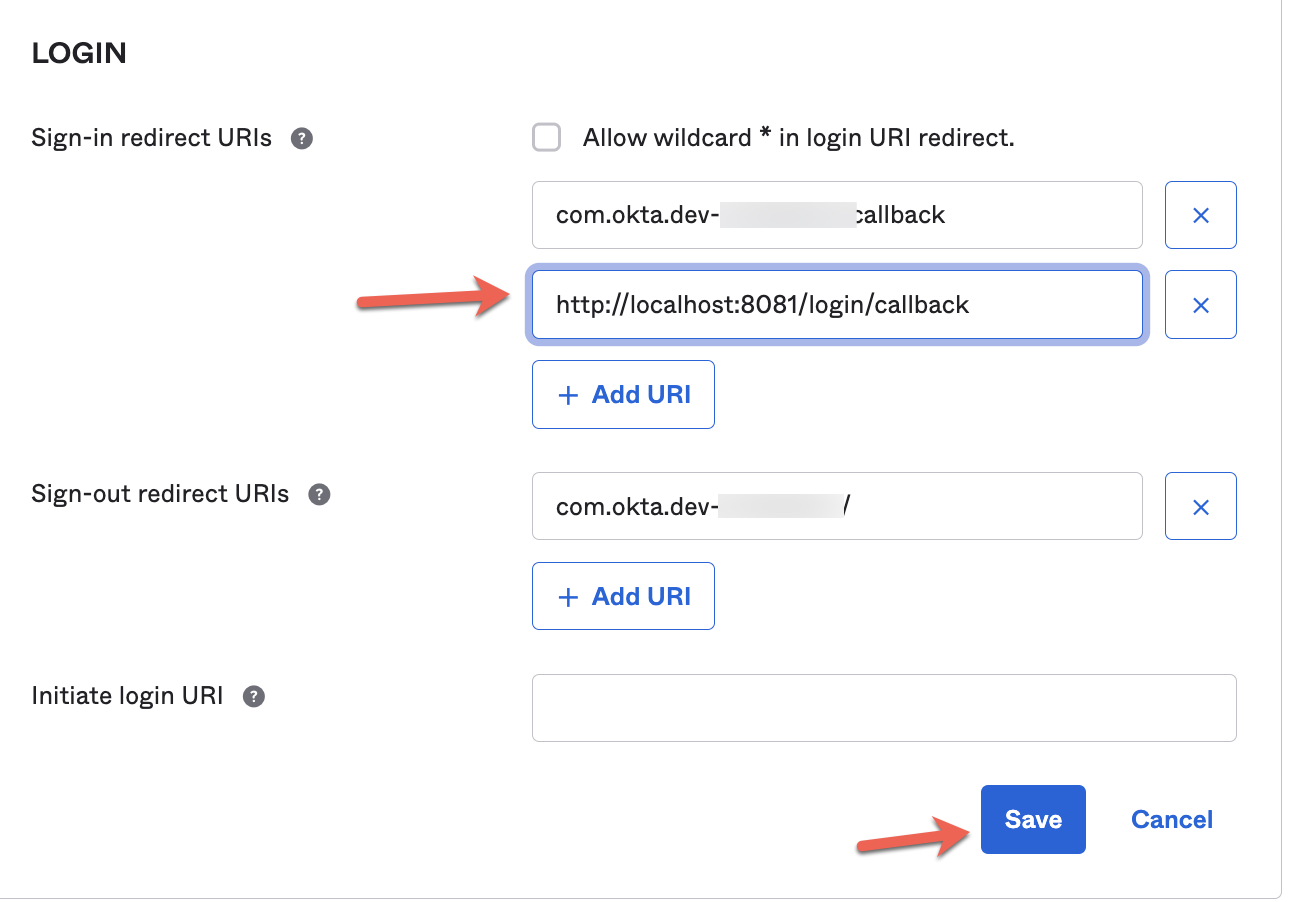
2. Before implementing everything in Studio, we need to go back to Okta to add this new callback.
Go to the Native App general tab and select the edit button. Scroll down to "Sign-in redirect URIs" and add the new callback http://localhost:8081/implicit-login/callback.
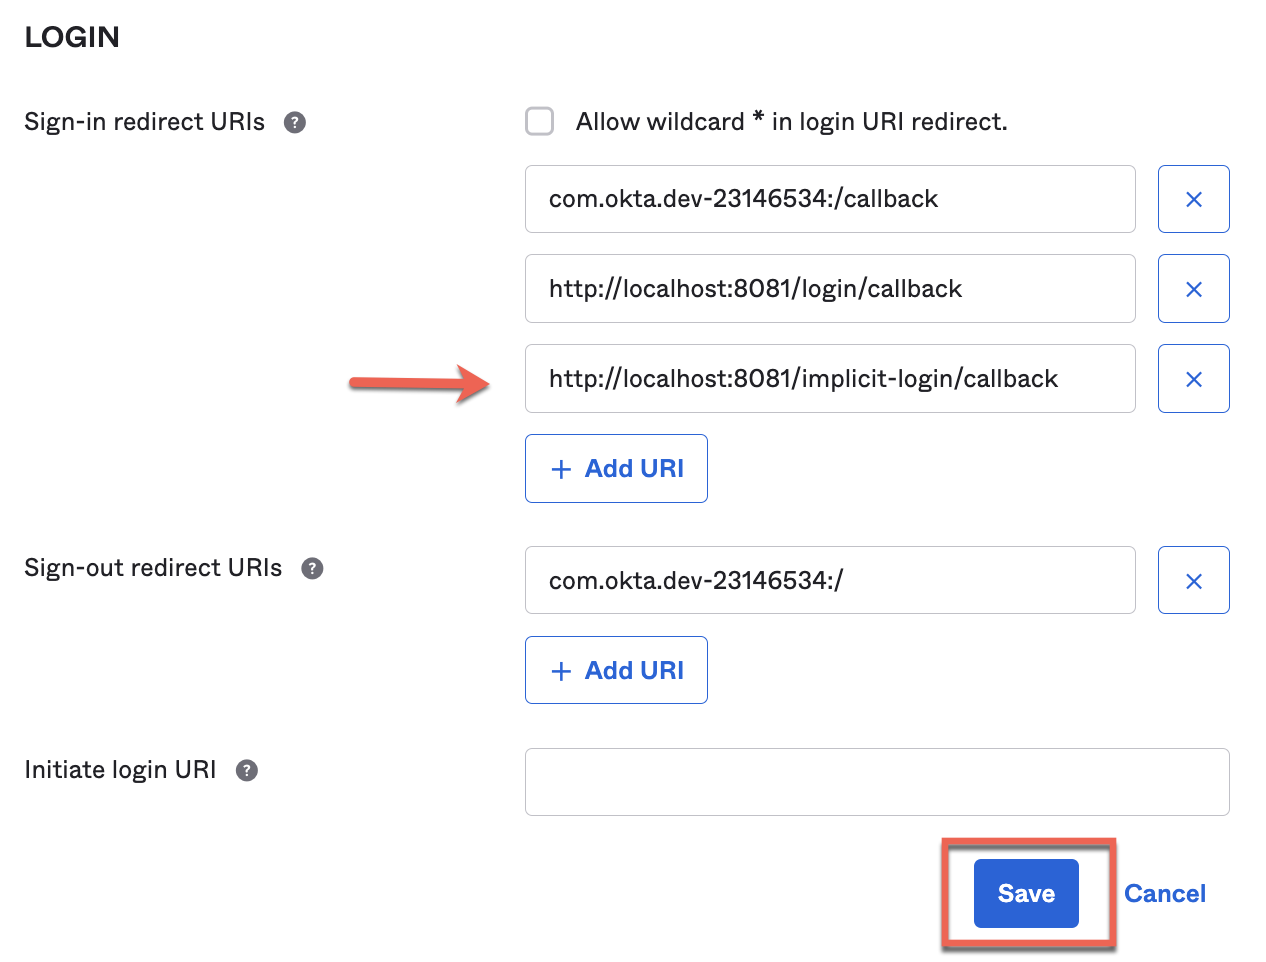
And Save it.
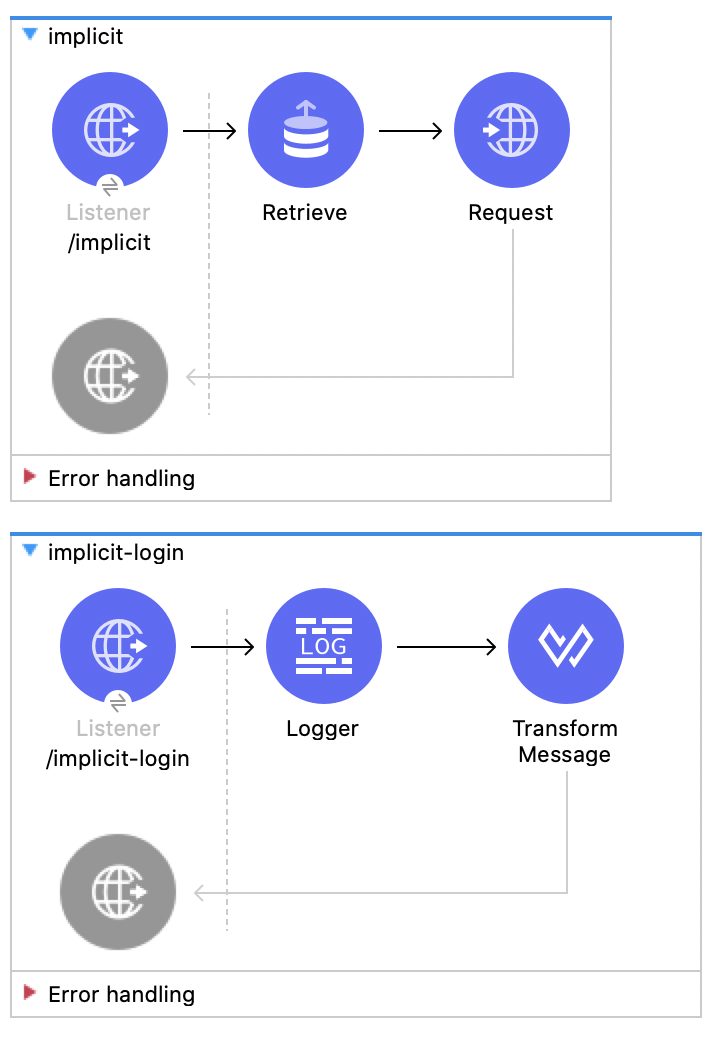
3. Alright, let's begin implementing the first flow.
Create a new flow and name it implicit-login. This is the one that will interact with Okta and redirect us to the callback using a 302 status code.
Drag a Listener, select the default HTTP_Listener_configuration and set the path to /implicit-login.
Then, go to the responses tab. In the Headers section add vars.respHeaders and in Status code write 302. This is to perform the redirect.
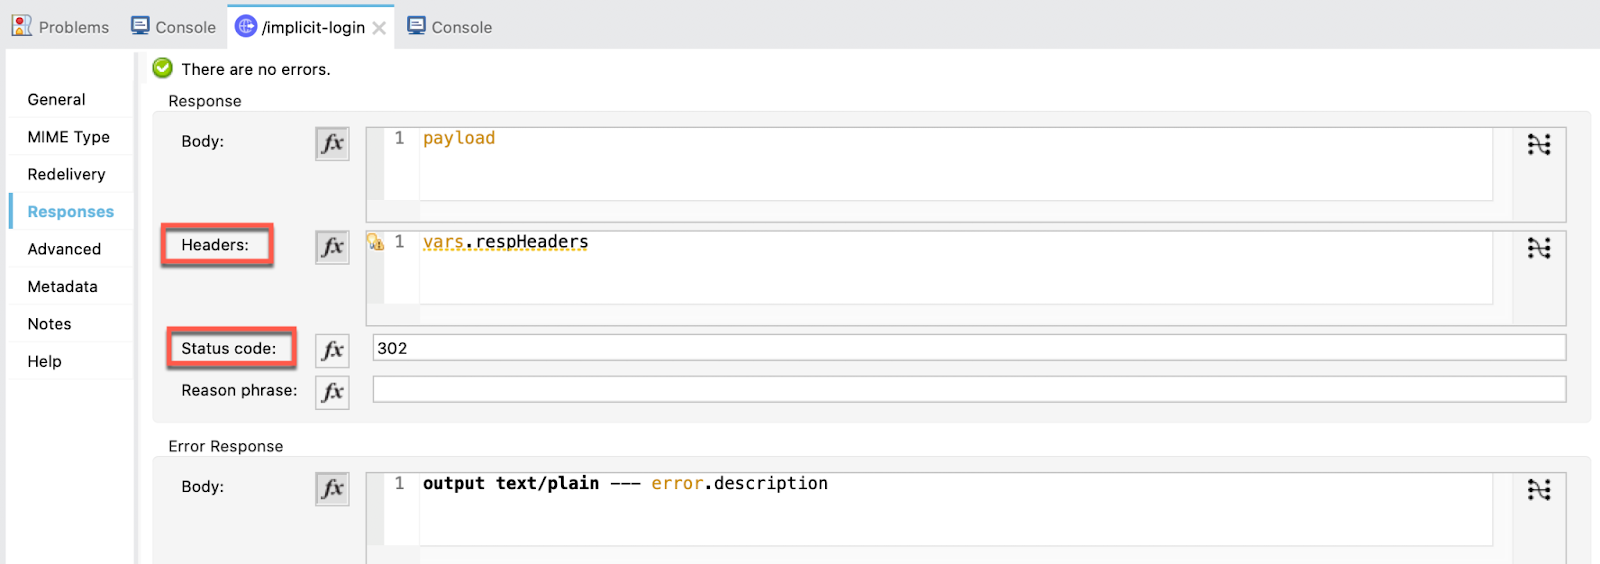
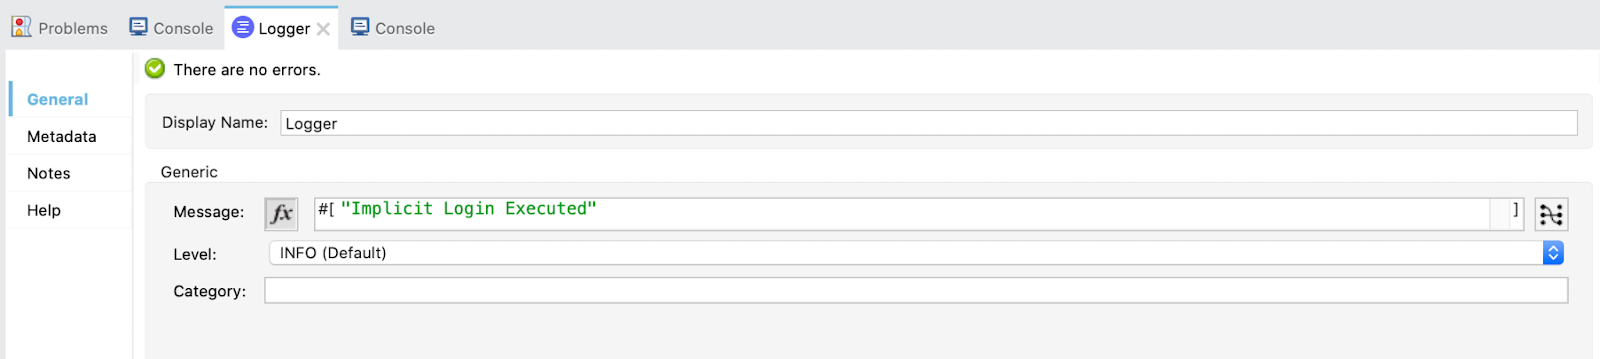
Drag a Logger just to keep track of which flow is executing:
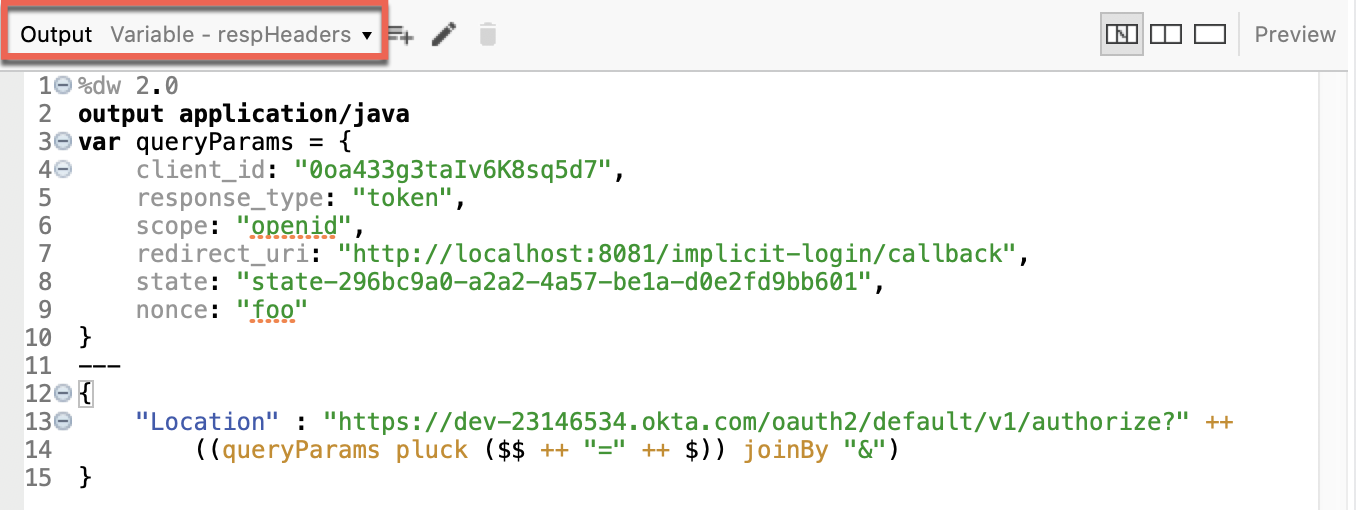
And at the end, add a Transform. Select the output to be the variable respHeaders and write the next DataWeave code to perform the redirect:
%dw 2.0
output application/java
var queryParams = {
        client_id: "0oa433g3taIv6K8sq5d7",
        response_type: "token",
        scope: "openid",
        redirect_uri: "http://localhost:8081/implicit-login/callback",
        state: "state-296bc9a0-a2a2-4a57-be1a-d0e2fd9bb601",
        nonce: "foo"
}
---
{
    "Location" : "https://dev-23146534.okta.com/oauth2/default/v1/authorize?" ++
            ((queryParams pluck ($$ ++ "=" ++ $)) joinBy "&")
}
4. The next flow to implement is the callback.
Create a new flow and name it implicit-login-callback. This one loads an HTML script that is executed in the browser.
What is does is remove from the URL the hash (#) before the access token present in the URL. If the hash was there, we wouldn't be able to obtain the token from the URL. So, we need to do this "trick".
First of all, drag a Listener, select the default HTTP_Listener_configuration and set the path to /implicit-login/callback.
Now we are going to write the script.
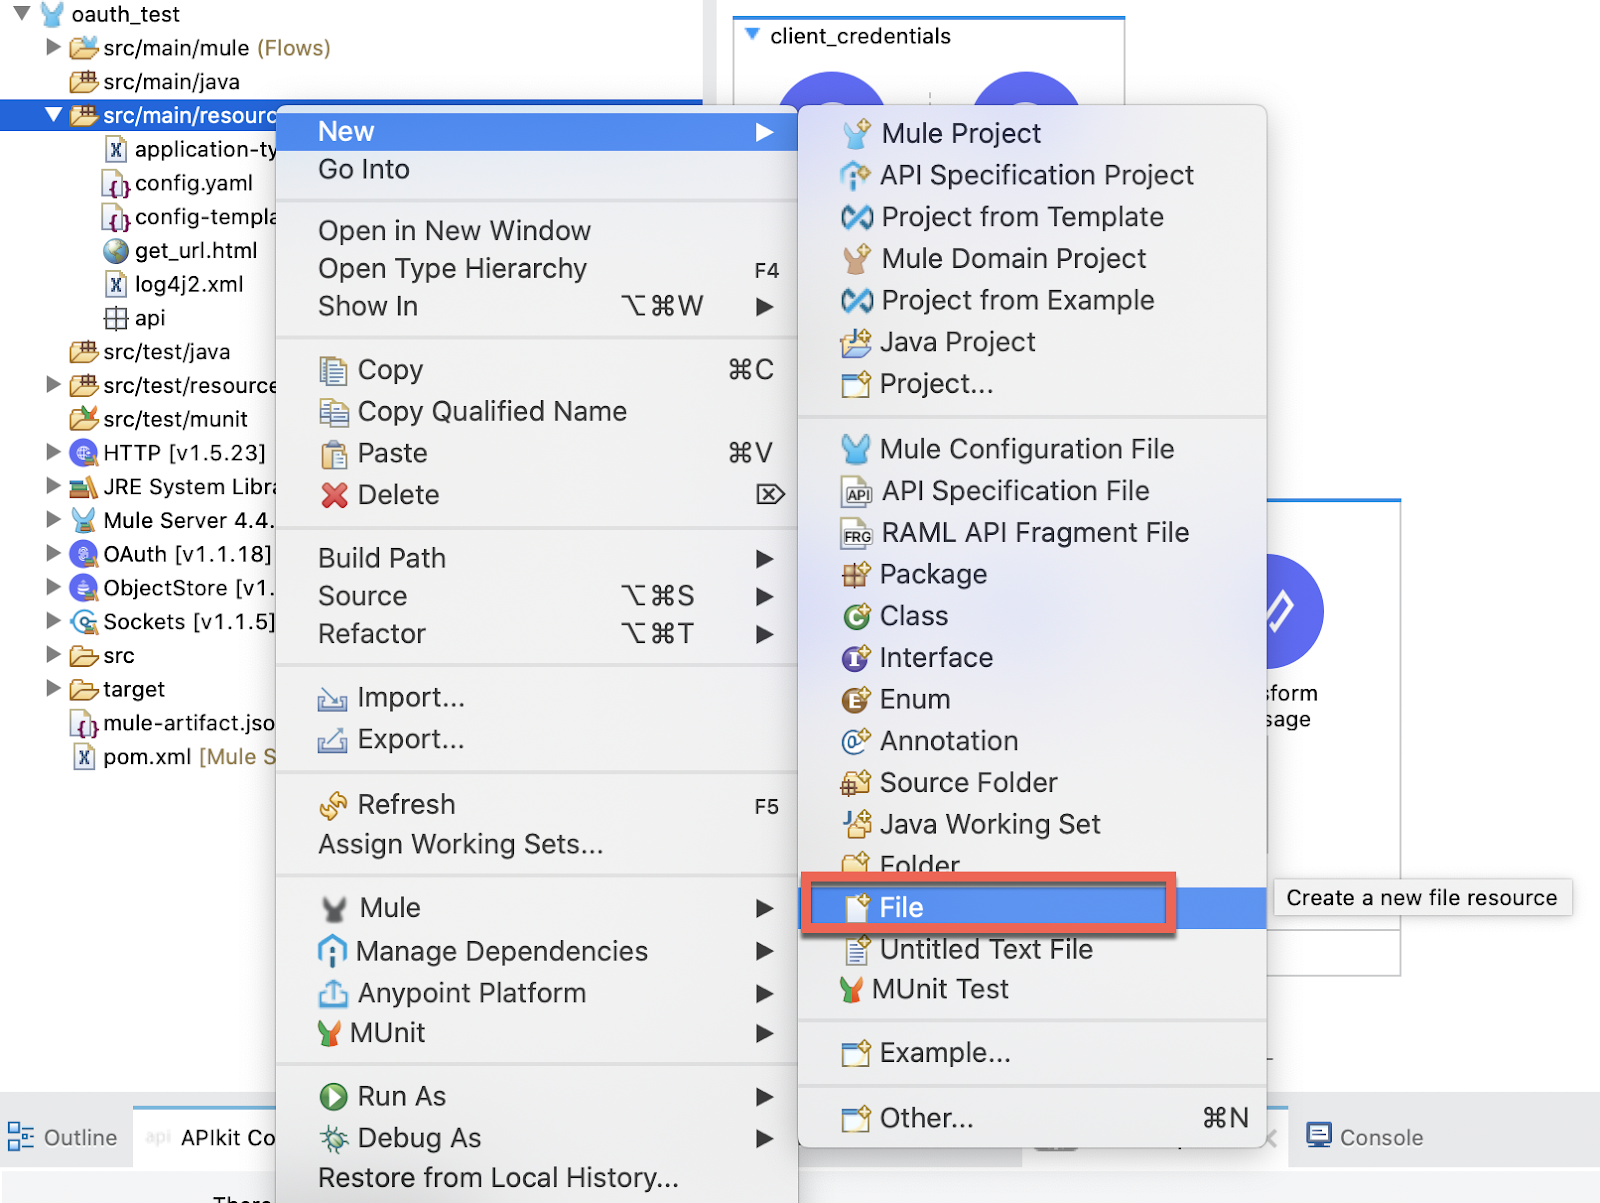
From the Package Explorer, go to src/main/resources and create a new file:
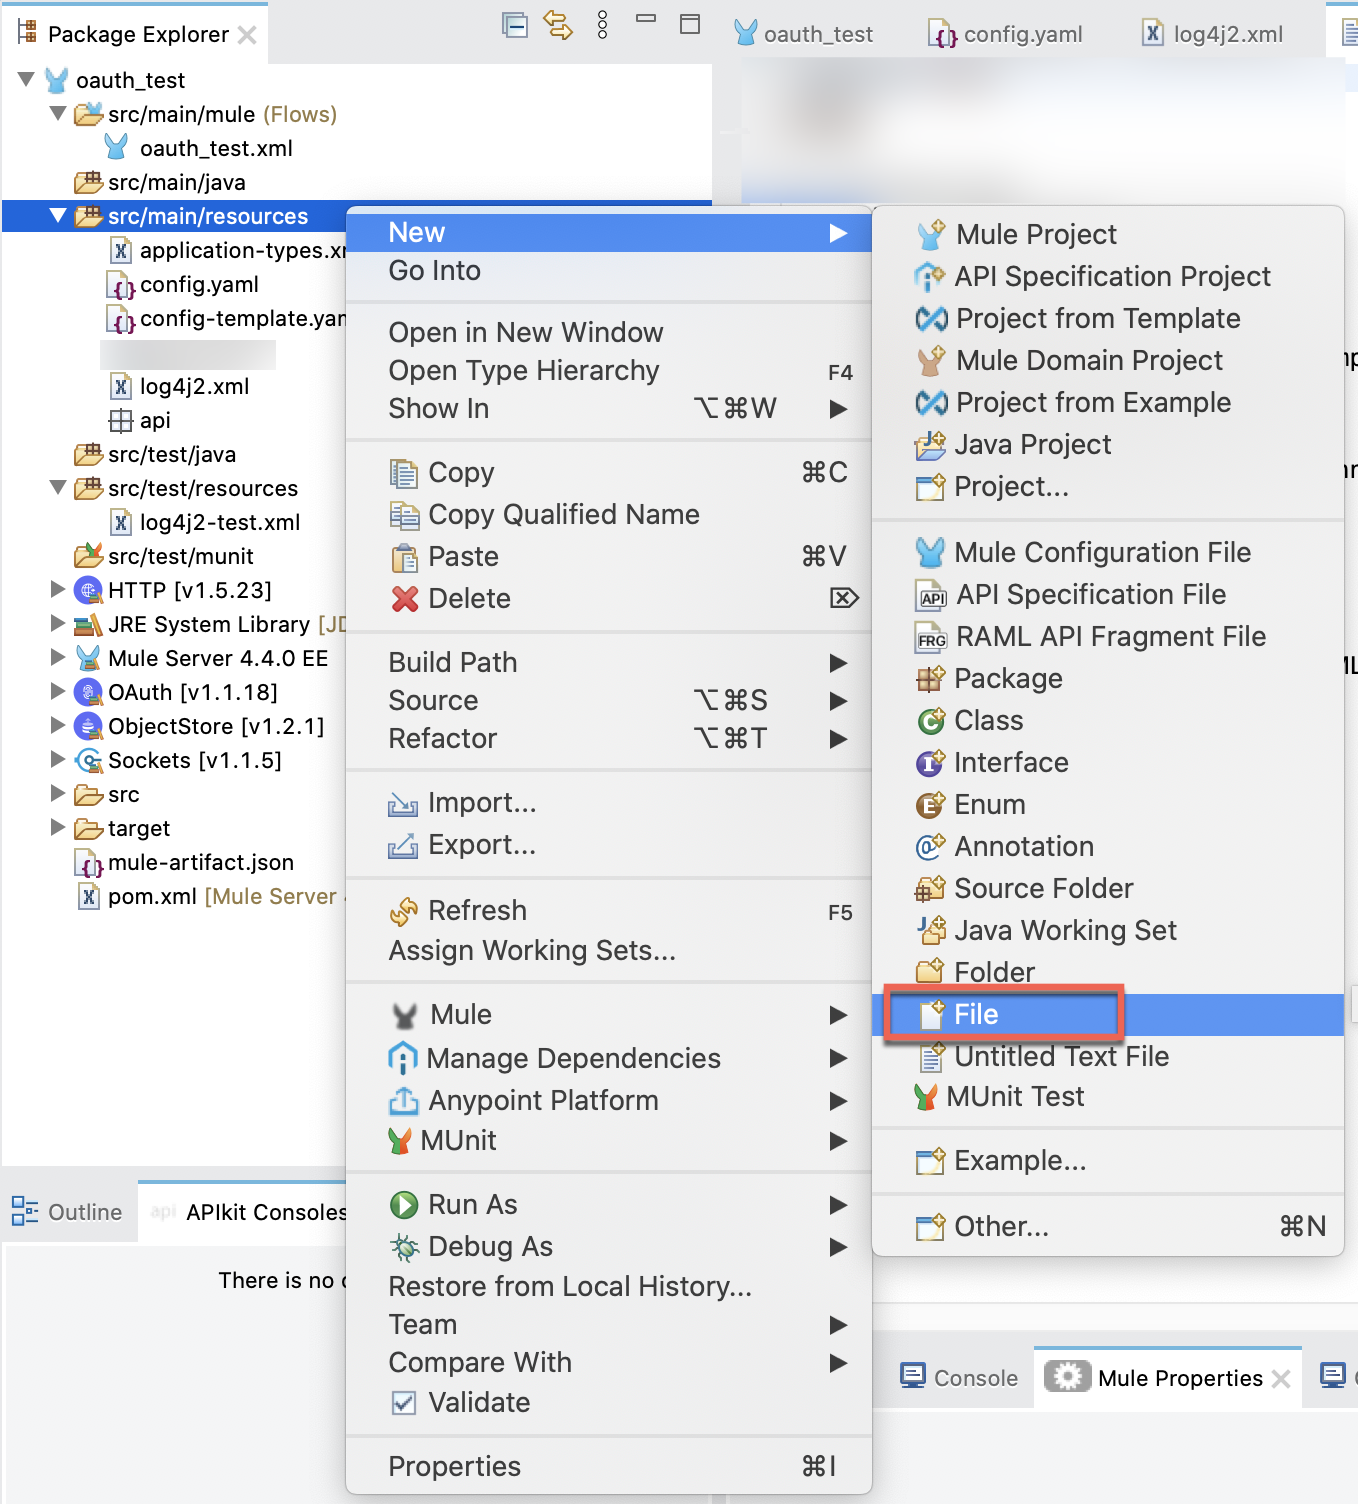
Name it get_url.html.
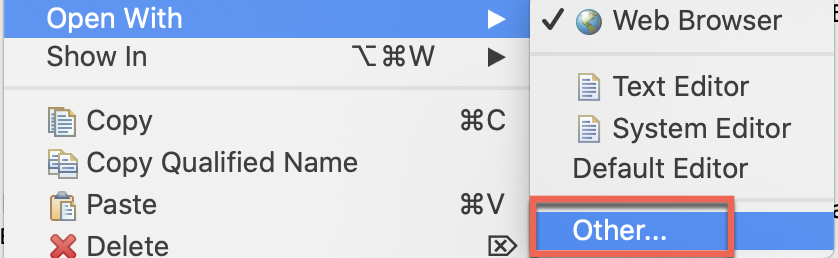
It will open a new tab in your browser but just go back to Studio. Right click on the file and select "Open With → Other... ":
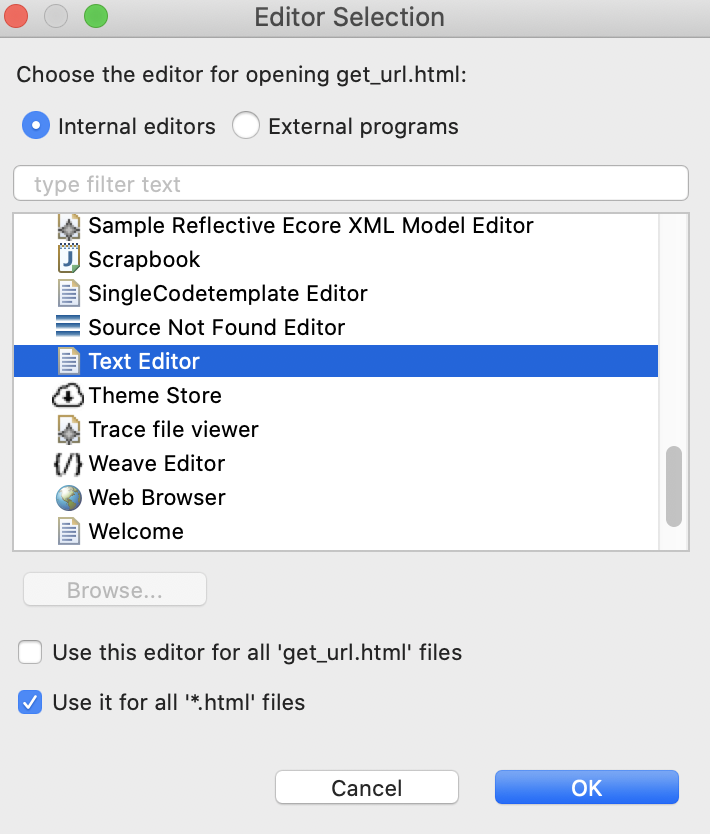
Select "Internal editors", "Text Editor" and "Use it for all ‘*html' files":
Now, paste this script:
<!DOCTYPE html>
<html>
<body>

<p id="any"></p>
<p id="status"></p>

<script>
  window.onload = function() {
    const Http = new XMLHttpRequest();
    const url='http://localhost:8081/implicit/save-token?url=' + encodeURIComponent(window.location.href);
    Http.open("GET", url);
    Http.onreadystatechange = (e) => {
      console.log(Http.responseText);
      document.getElementById("any").innerHTML = "Successful call";
    }
    Http.send();
  };
</script>

<script>
document.getElementById("any").innerHTML =
window.location.href;
</script>

</body>
</html>
This script is calling the last flow implicit-save-token and saving the entire URL in a Query Parameter named url. Then we will access that url and get the access token.
Once the script is ready, go back to the implicit-login-callback flow and drag a Load static resource operation. Configure as this:
Resource base path: ${static_resource.path}
Default file: get_url.html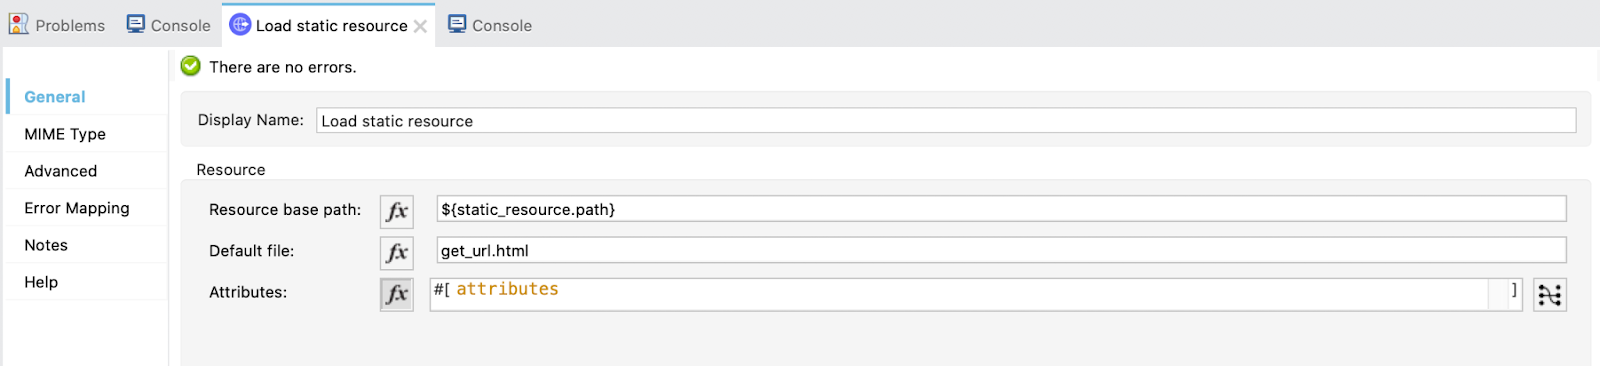
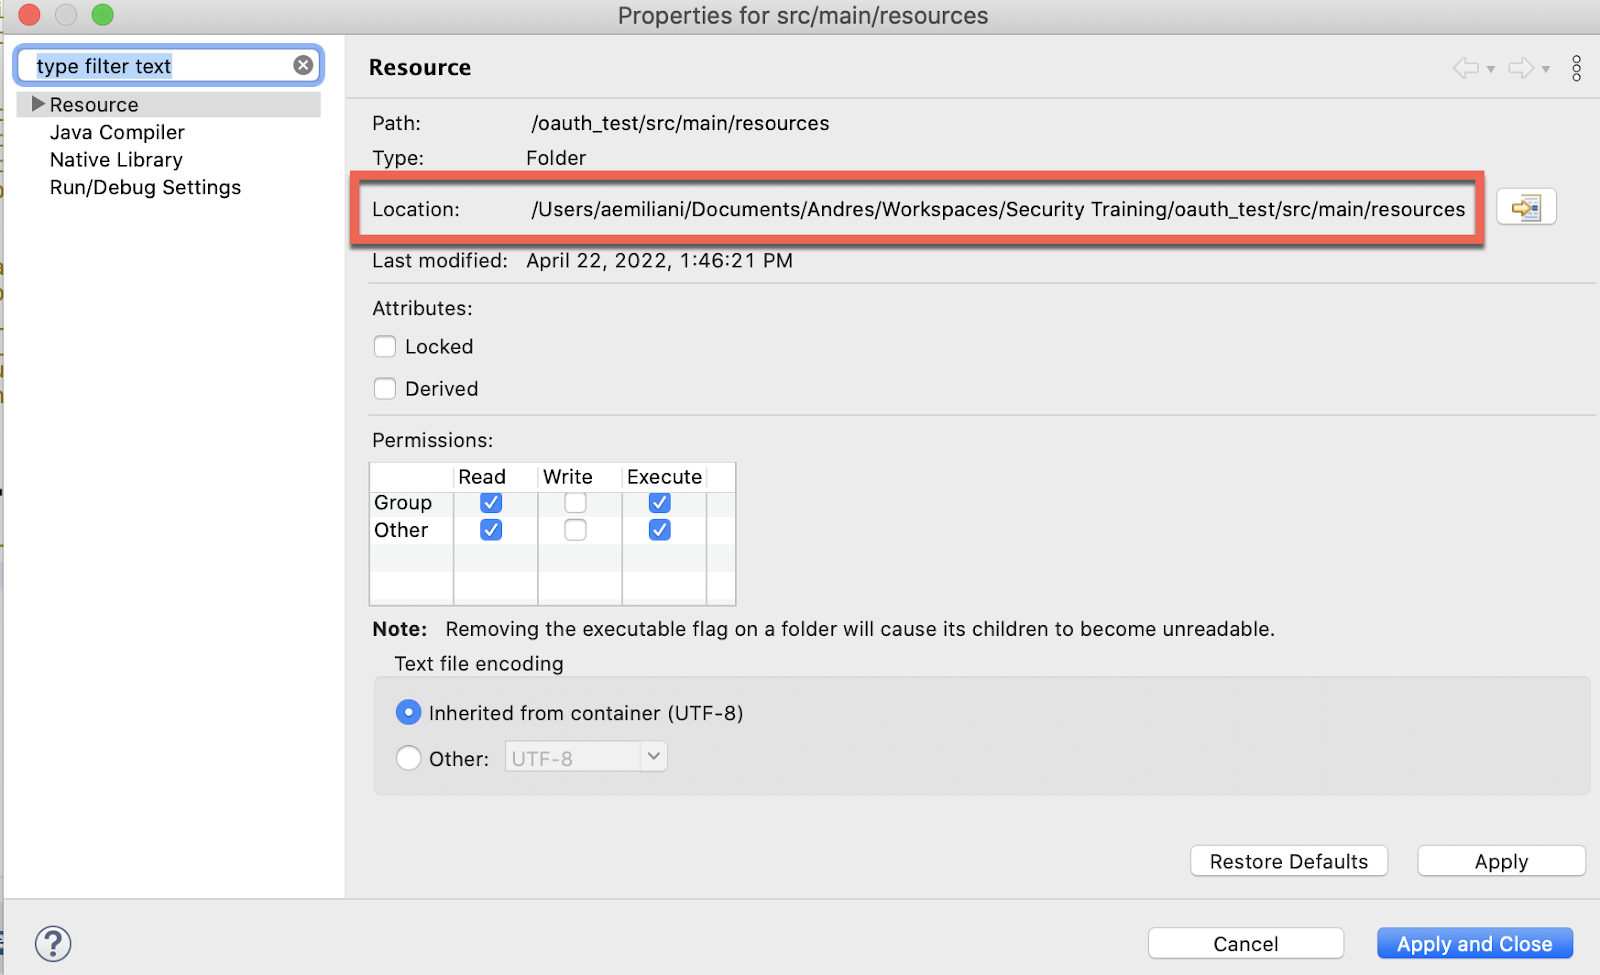
Now is time to go back to the config.yaml and set the path where the script is.
In my case is like this:
"/Users/aemiliani/Documents/Andres/Workspaces/Security Training/oauth_test/src/main/resources"
In your case it will be different. If you want to find the path/location of the file easily, you can right click in the folder src/main/resources and select Properties.
From there, copy the entire path (the one next to Location) and then close this window:
Now paste it in the config.yaml:

Go back to the implicit-login-callback flow and add a Logger to log the payload.
5. That was all for the callback, now, we are going to implement the flow to save the token for later using it in the implicit flow to call the API.
Create a new flow and call it implicit-save-token. This flow will get the access token in the URL that the implicit-login-callback flow obtained and it will save it in the Object Store Tokens that we created.
Drag a Listener, select the default HTTP_Listener_configuration and set the path to /implicit/save-token.
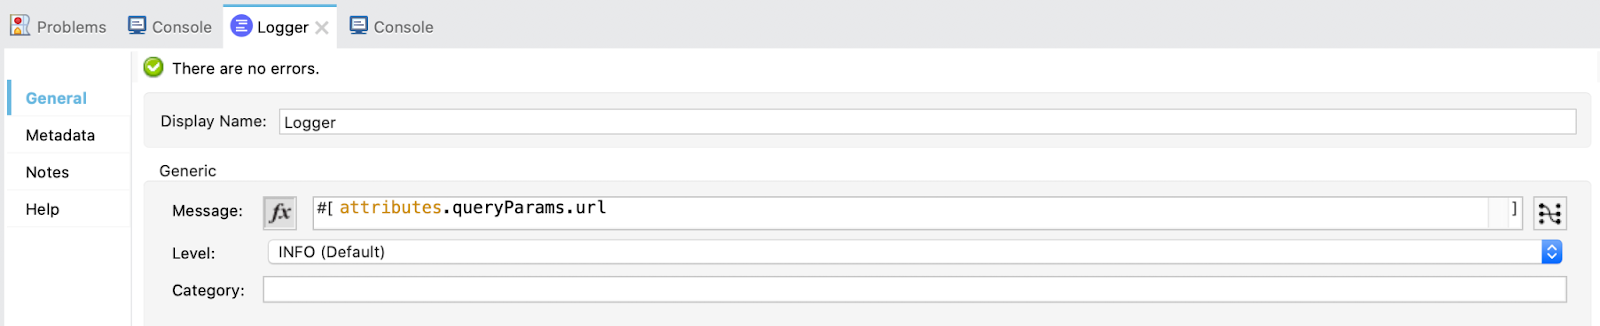
Drag a Logger to control that the URL we are getting is OK.
Then, add a Transform component. Select the Output payload and paste this DataWeave code:
%dw 2.0
import * from dw::core::URL
output application/java
---
{(splitBy(parseURI(attributes.queryParams.url).fragment, "&") map (
    do {
        var param = $ splitBy  "="
        ---
        {
            (param[0]): param[1]
        }
    }
))}.access_token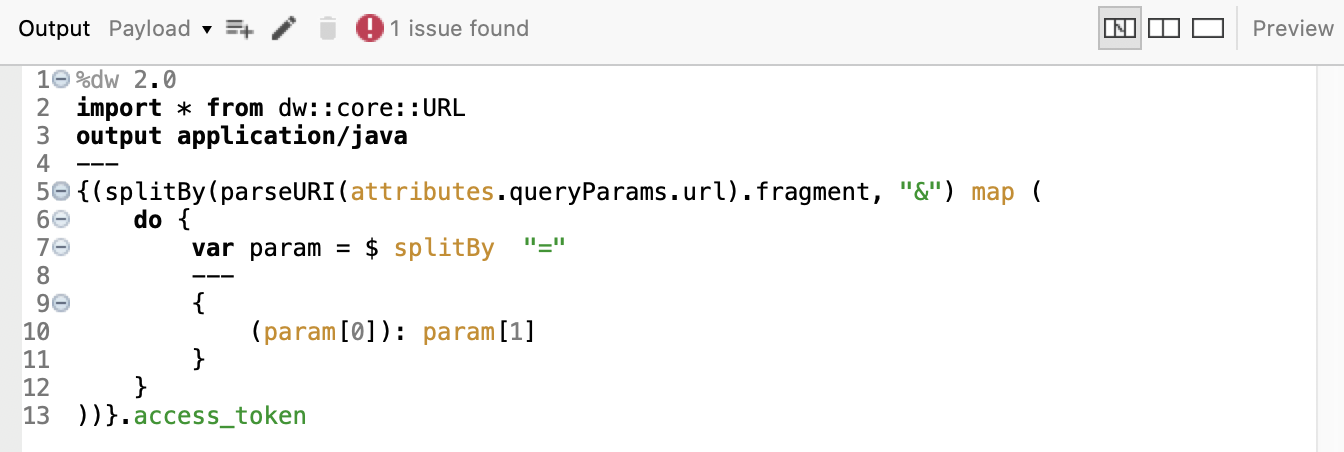
This code is getting only the access token from the URL we got and passing it to the next processors as the payload.
Drag a Logger to log the payload, that should be only the access token.
Finally, add a Store operation from the OAuth module to store the access token obtained.
This is all for the flow to save the token!
6. Finally, the last one...
Create a new flow and name it implicit. This one just gets the access token and calls the Random User API.
Drag a Listener, select the default HTTP_Listener_configuration and set the path to /implicit.
Drag a Retrieve operation from the OAuth module and configure like this:
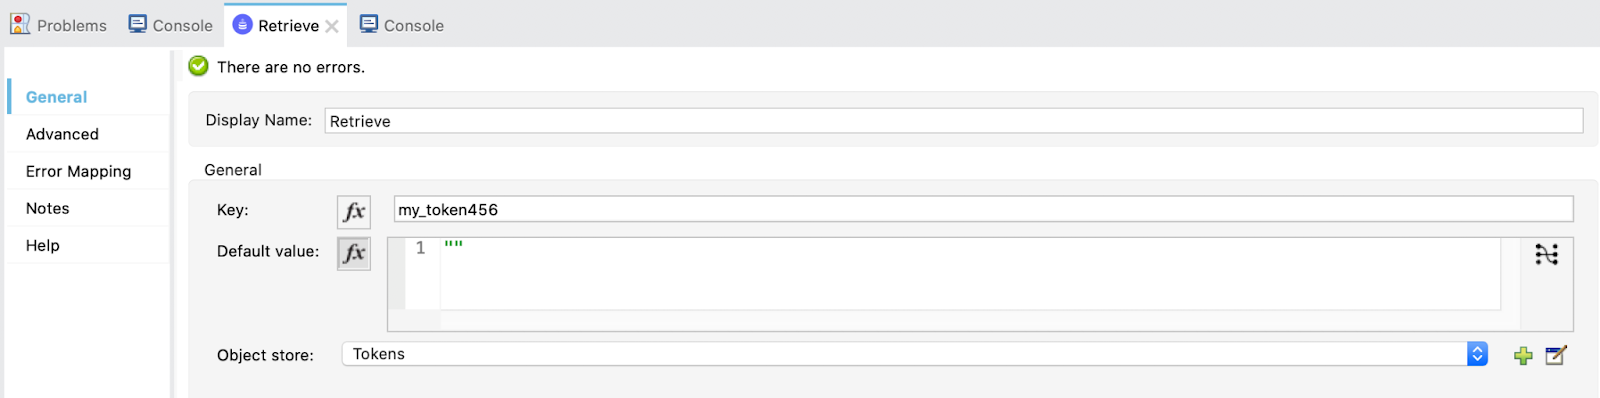
Here we are obtaining the token for then calling the Random User API.
In the advanced tab, add a target variable and value:

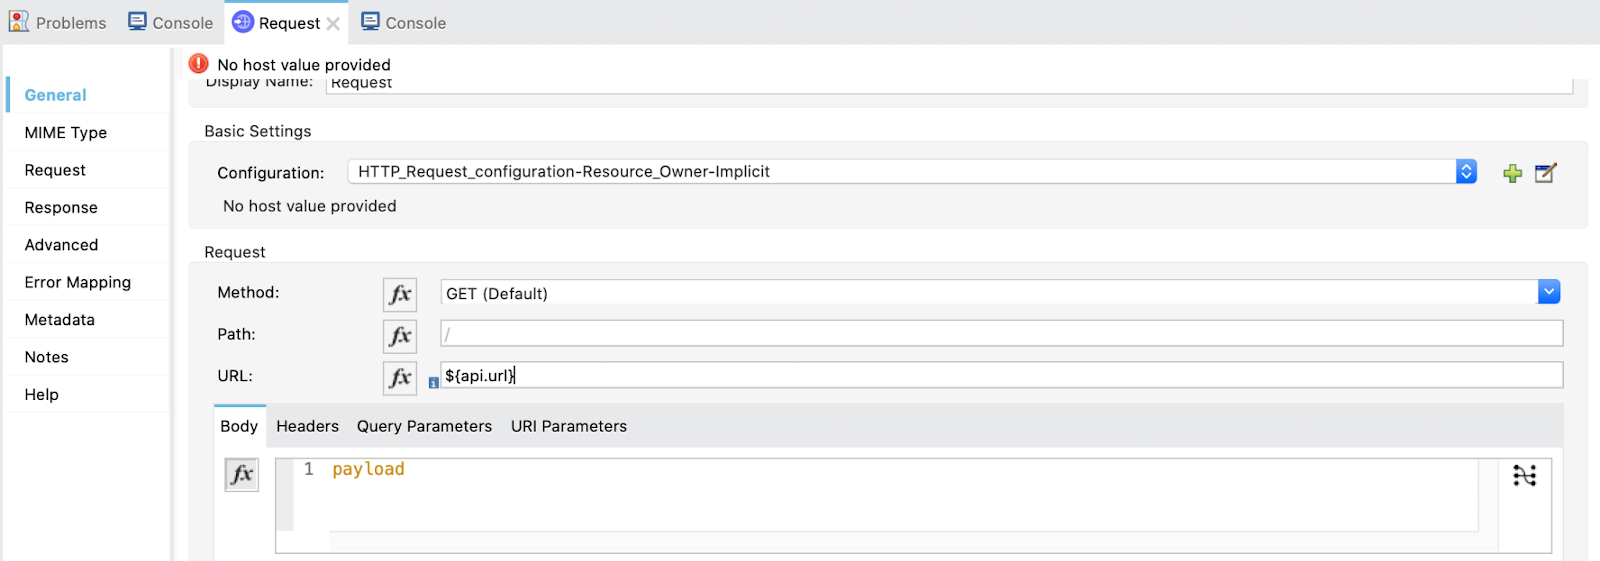
Finally, call the API. Drag a Request and select the HTTP_Request_configuration-Resource_Owner-Implicit (the same we used for Resource Owner Password Grant Type) and add the in the URL ${api.url}.
We are all set! Now let's try it out!
6. Same as in Auth Code flow. First make a GET request to:
http://localhost:8081/invalidate
The response will be empty but it is cleaning up the stored tokens.
Then, if we try to call the implicit flow we should get this:
http://localhost:8081/implicit
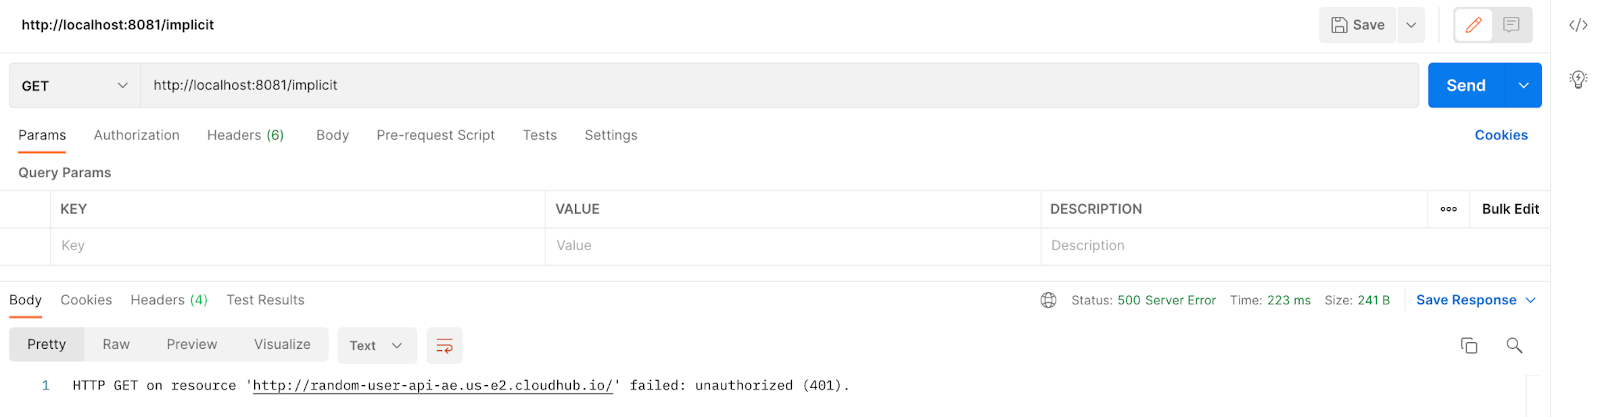
We first need to authenticate.
Open a new tab in your browser and call the implicit-login flow:
http://localhost:8081/implicit-login
It will redirect us to Okta's login page (if you aren't logged in yet) and ask for your credentials.
Once logged in, a successful message ("successfully retrieved access token" or "successful call", something like that) will appear. In the browser URL you will be able to see the unaccessible access token with the hash # before.

The ‘magic' will be done and the access token is now stored in the Object Store Tokens.
Return to Postman and make a GET request again to:
http://localhost:8081/implicit
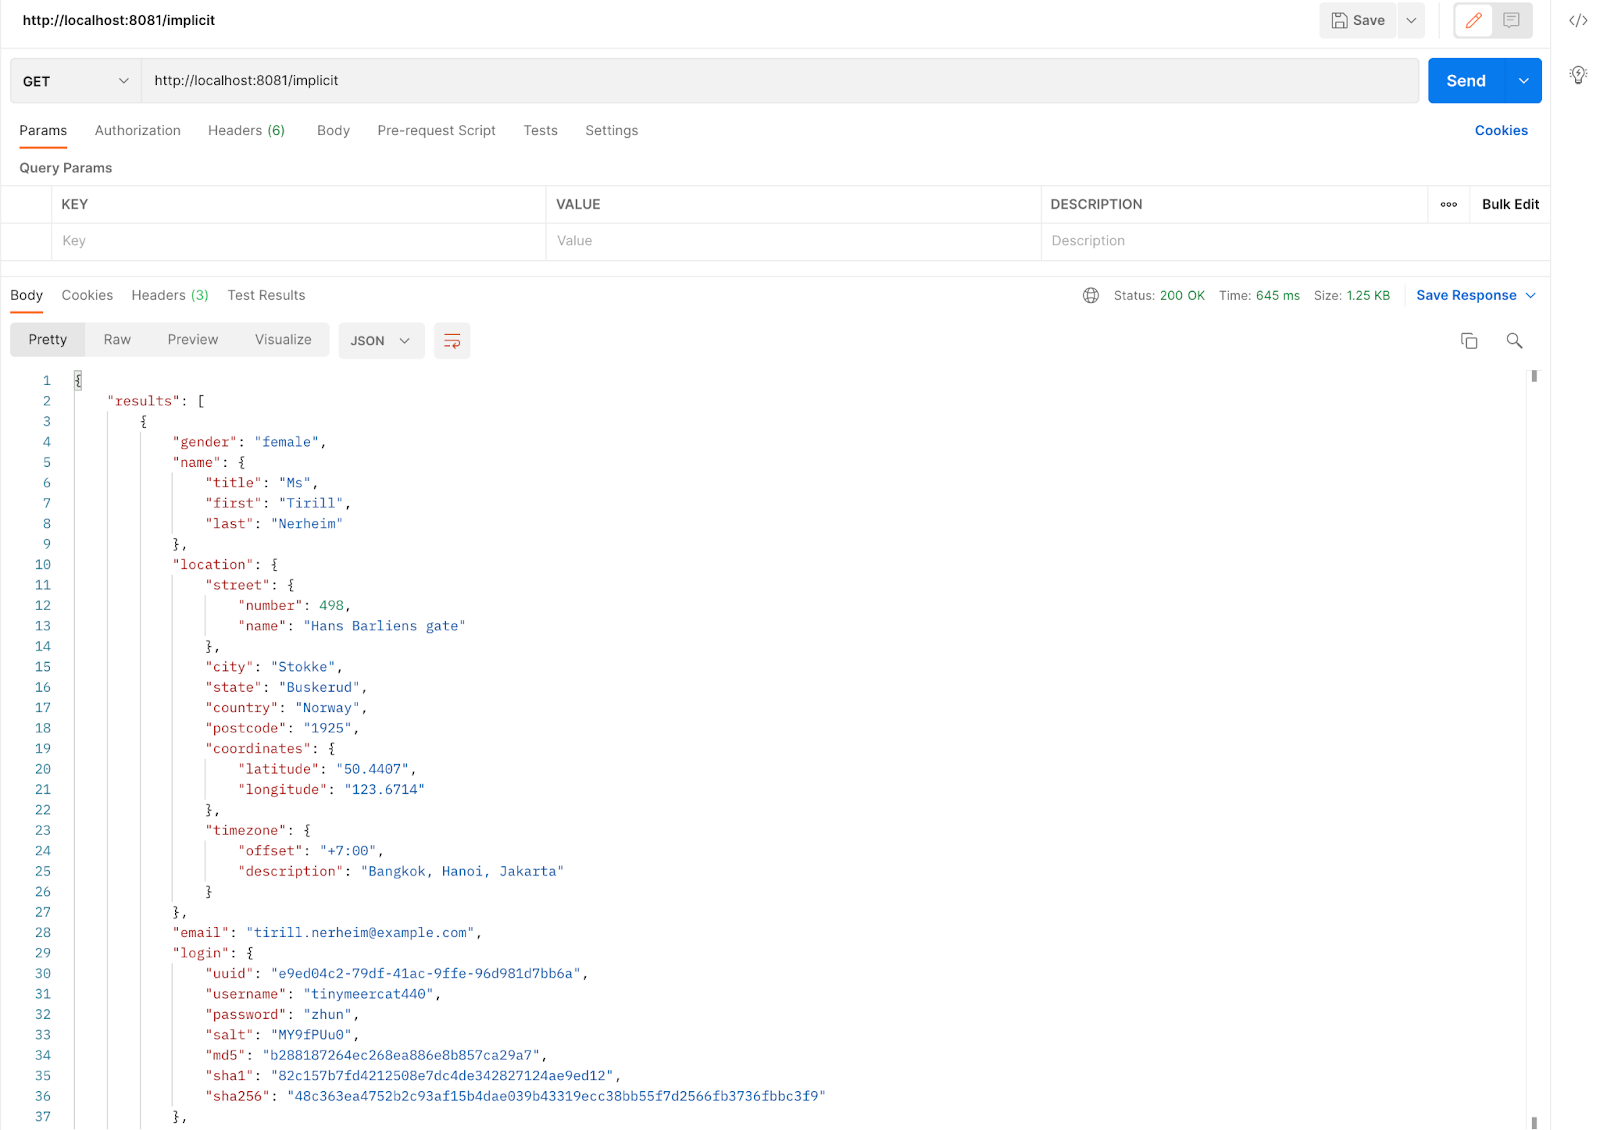
And there is the response! This is great, we've got to the end of this tutorial.
But, there is one more thing... just jump to the next step!
If you want to learn more about Okta, OAuth 2.0, Anypoint Platform, Anypoint Studio and how to set up Client Management, here is a Codelab I wrote for you:
How to Setup & Demo Client Management with Okta & OpenID Connect-OIDC in Anypoint Platform
Thank you for reading! I hope you could make it to the end and I hope you enjoyed the Codelab!
See you in the next one :)