This cookbook will walk you through the process of installing Anypoint Runtime Fabric (RTF) on Google Kubernetes Engine (GKE). You will create a Google Kubernetes Cluster (GKE) and install RTF. Once completed you will deploy a sample MuleSoft application to verify everything is working.
Pre-reqs
- The following cookbook requires a Google Cloud Platform account.
- Access to Anypoint Platform
- A valid MuleSoft license.lic
Follow instructions below to use GUI (suggested) or alternatively use command line:
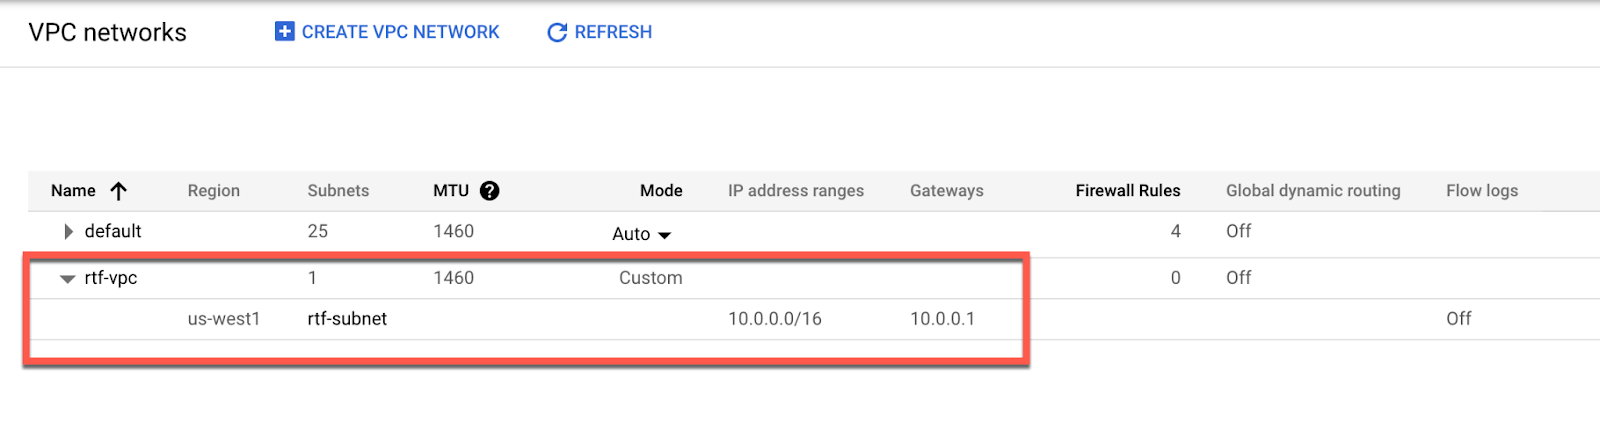
gcloud compute networks create rtf-vpc --project=infra-ratio-309301 --subnet-mode=custom --mtu=1460 --bgp-routing-mode=regional

gcloud compute networks subnets create rtf-subnet --project=infra-ratio-309301 --range=10.0.0.0/16 --network=rtf-vpc --region=us-west1
Suggested Instructions:
- From any browser, go to this URL to access Google Cloud Console:
https://console.cloud.google.com/
- Click on the upper left navigation bar. Select VPC networks

- Click CREATE VPC NETWORK
- Enter the following information:
- Name: rtf-vpc
- Subnet Name: rtf-subnet
- Subnet Region: us-west1
- Subnet IP address range: 10.0.0.0/16

- Leave all defaults and click Create. Wait for network to be created.
Follow instructions below to use GUI (suggested) or alternatively use command line:
gcloud beta container --project "infra-ratio-309301" clusters create "rtf-cluster" --region "us-west1" --no-enable-basic-auth --cluster-version "1.18.16-gke.302" --release-channel "regular" --machine-type "e2-medium" --image-type "COS" --disk-type "pd-standard" --disk-size "100" --metadata disable-legacy-endpoints=true --scopes "https://www.googleapis.com/auth/devstorage.read_only","https://www.googleapis.com/auth/logging.write","https://www.googleapis.com/auth/monitoring","https://www.googleapis.com/auth/servicecontrol","https://www.googleapis.com/auth/service.management.readonly","https://www.googleapis.com/auth/trace.append" --num-nodes "1" --enable-stackdriver-kubernetes --enable-ip-alias --network "projects/infra-ratio-309301/global/networks/rtf-vpc" --subnetwork "projects/infra-ratio-309301/regions/us-west1/subnetworks/rtf-subnet" --default-max-pods-per-node "110" --no-enable-master-authorized-networks --addons HorizontalPodAutoscaling,HttpLoadBalancing,GcePersistentDiskCsiDriver --enable-autoupgrade --enable-autorepair --max-surge-upgrade 1 --max-unavailable-upgrade 0 --enable-shielded-nodesSuggested Instructions:
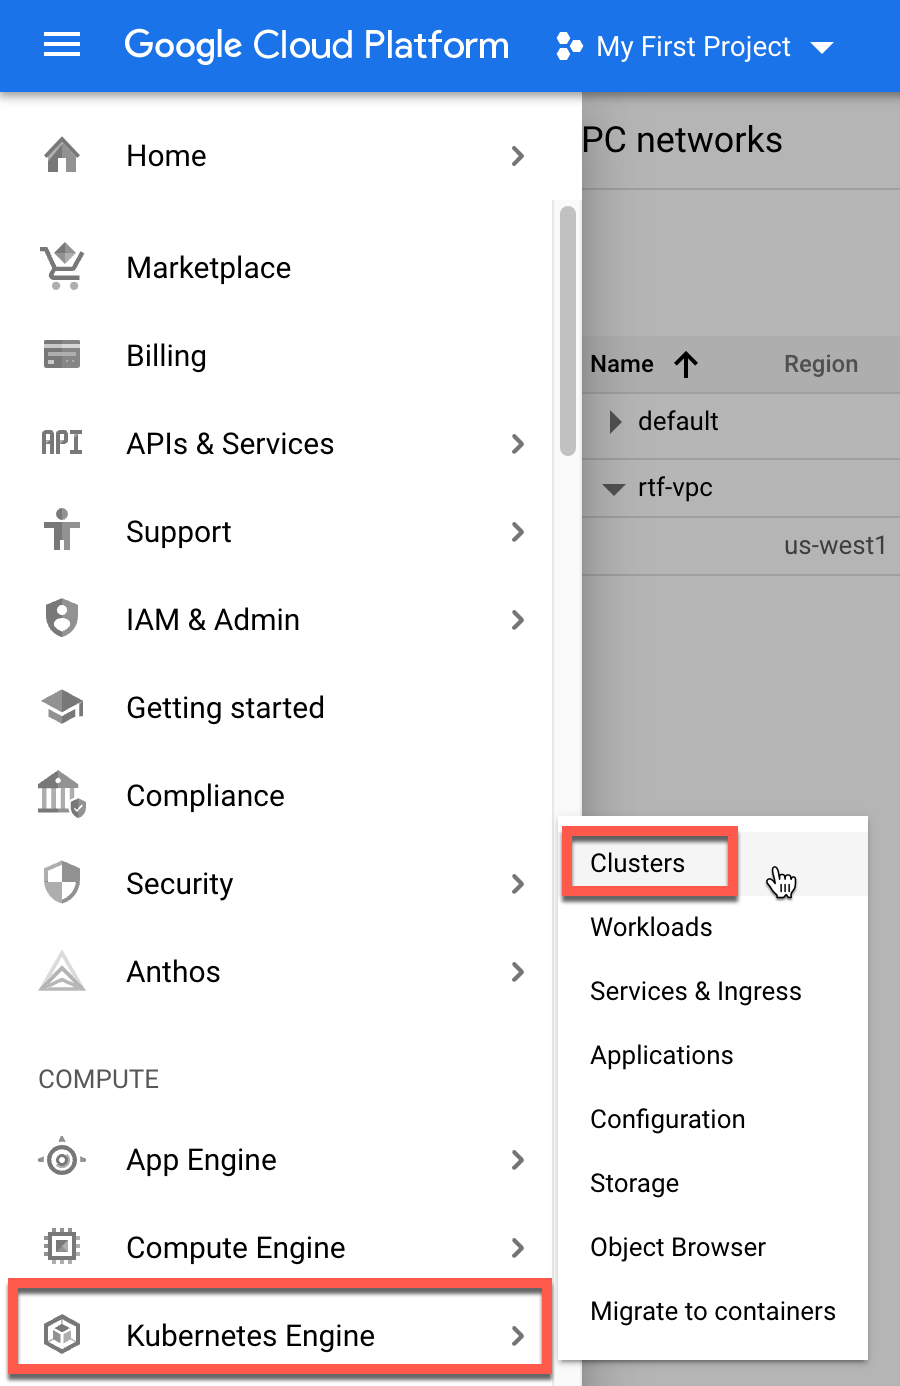
- Click on the upper left navigation bar. Select Kubernetes Engine -> Clusters
- Click Create and then click CONFIGURE for Standard cluster. As of today, RTF is not supported on Autopilot.
- Enter the following:
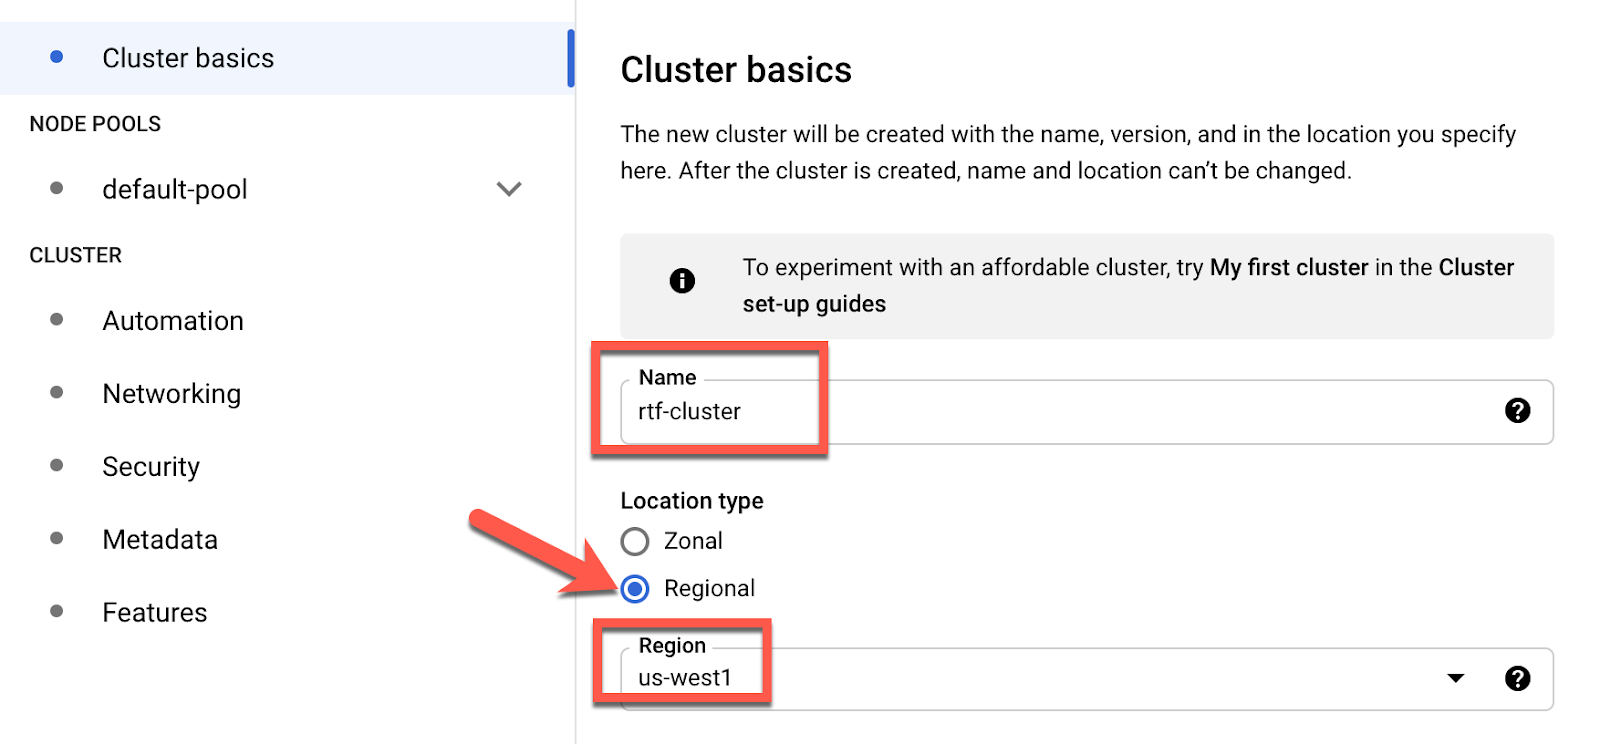
- Name: rtf-cluster
- Location type: regional
- Region: us-west1
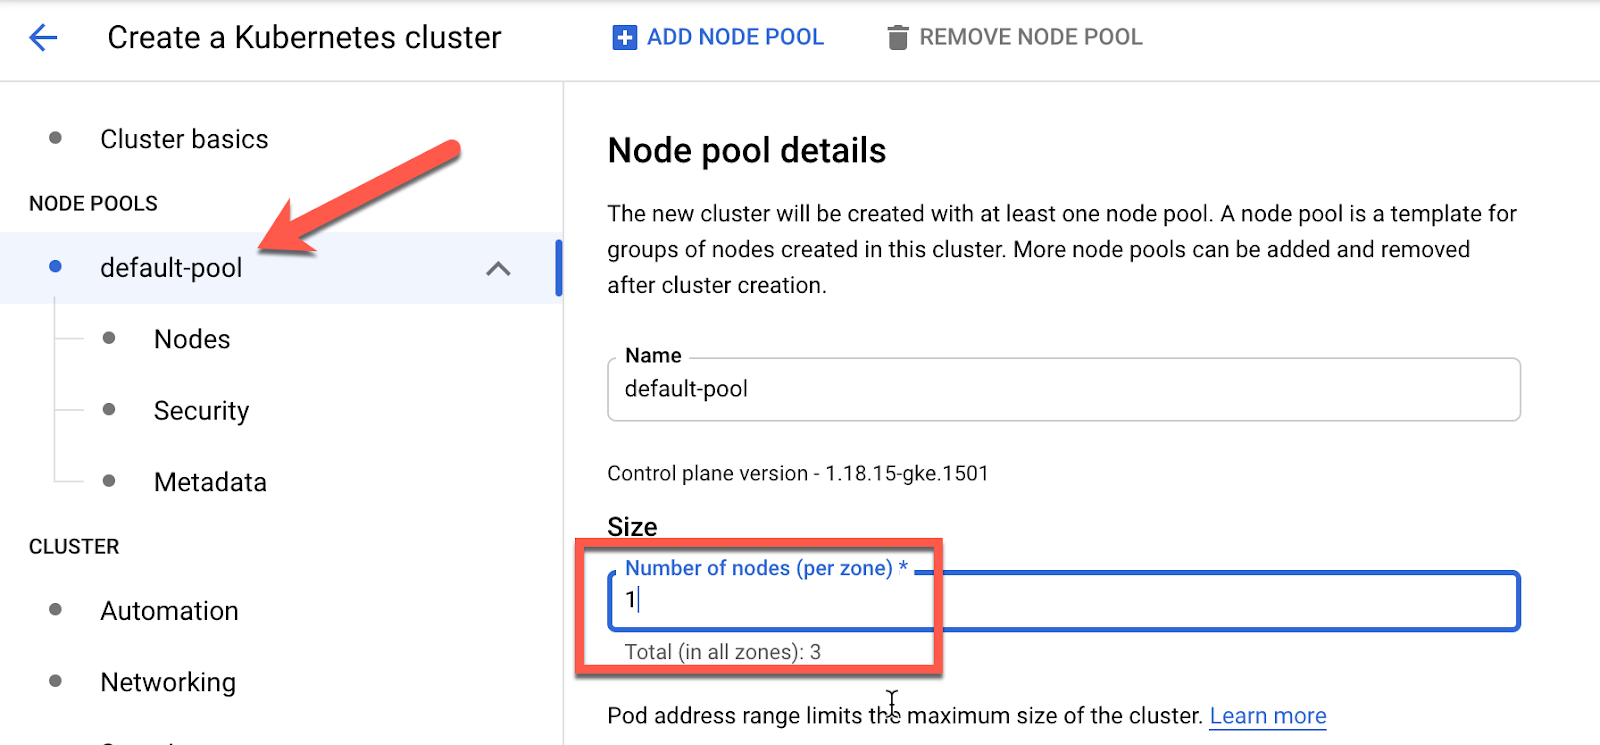
- Under NODE POOLS click default-pool. Set the Size to 1 node per zone. Since us-west1 has 3 zones, this will create 3 nodes.
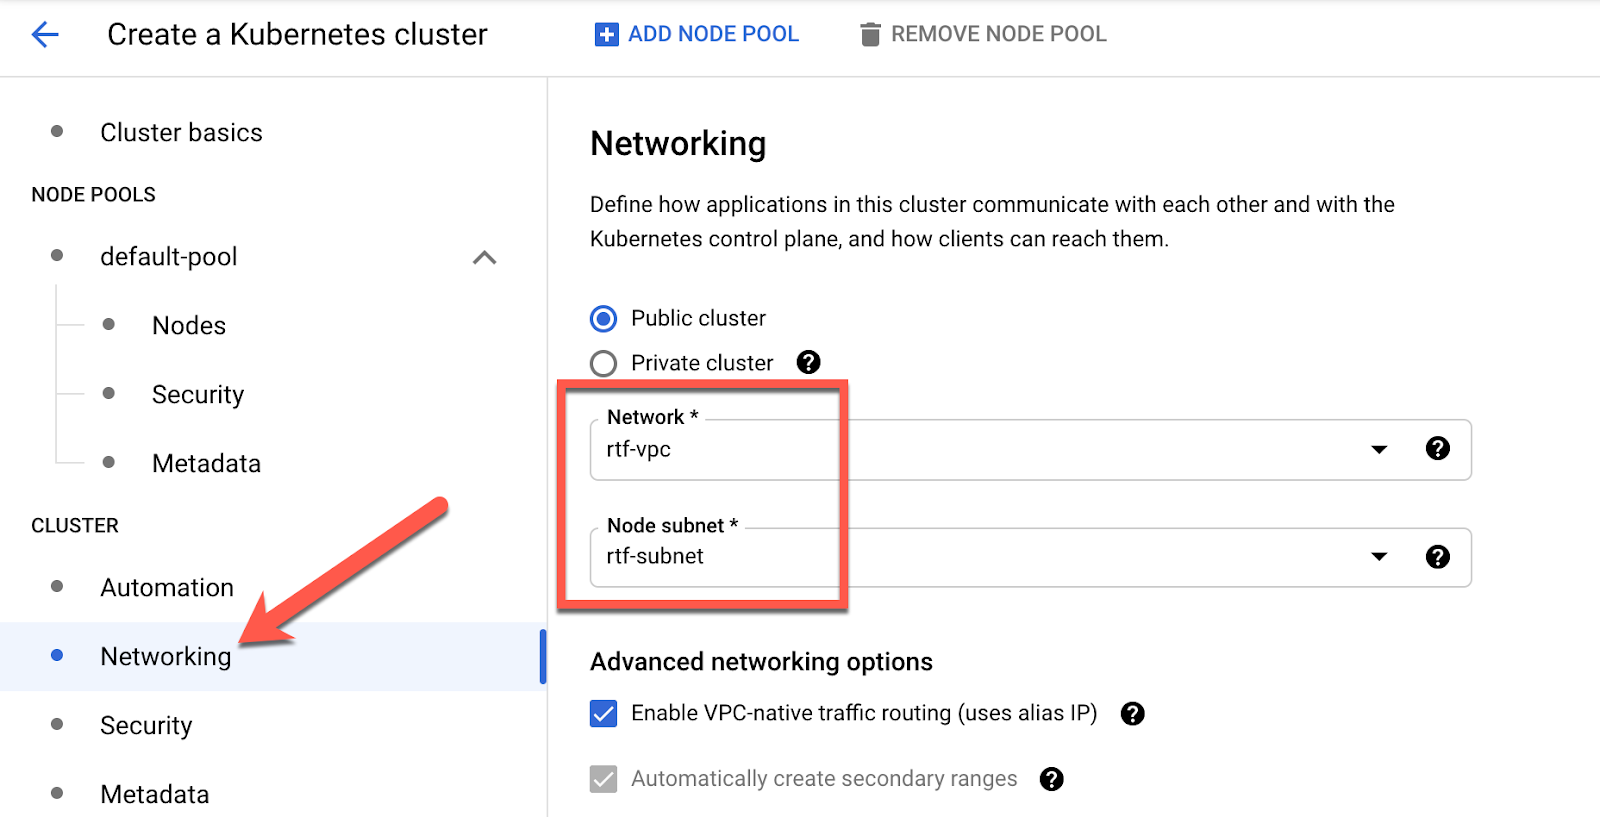
- Next, click Networking and select rtf-vpc network
- Click CREATE and wait for the cluster to be created.

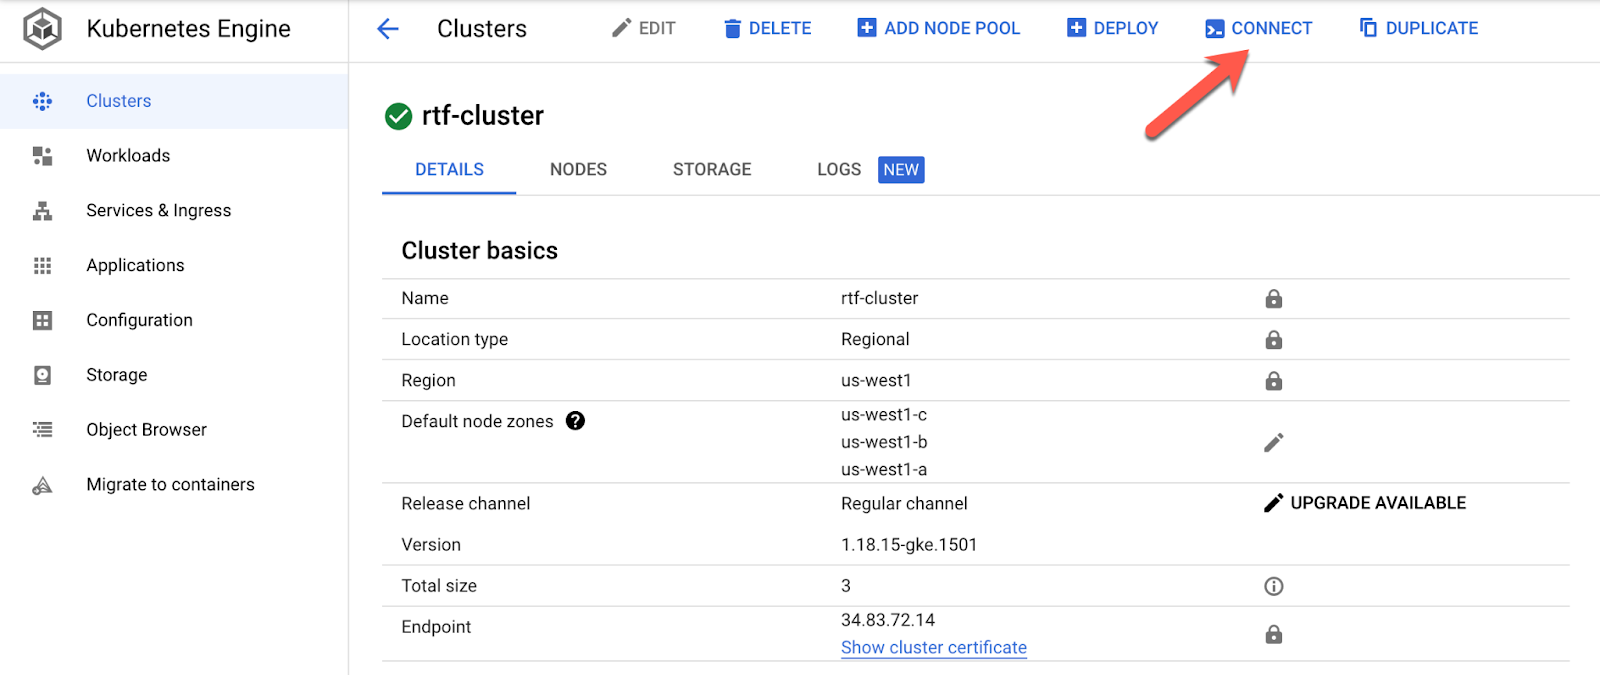
- Click rtf-cluster link to view details of the new provisioned GKE cluster.
- From this page click CONNECT
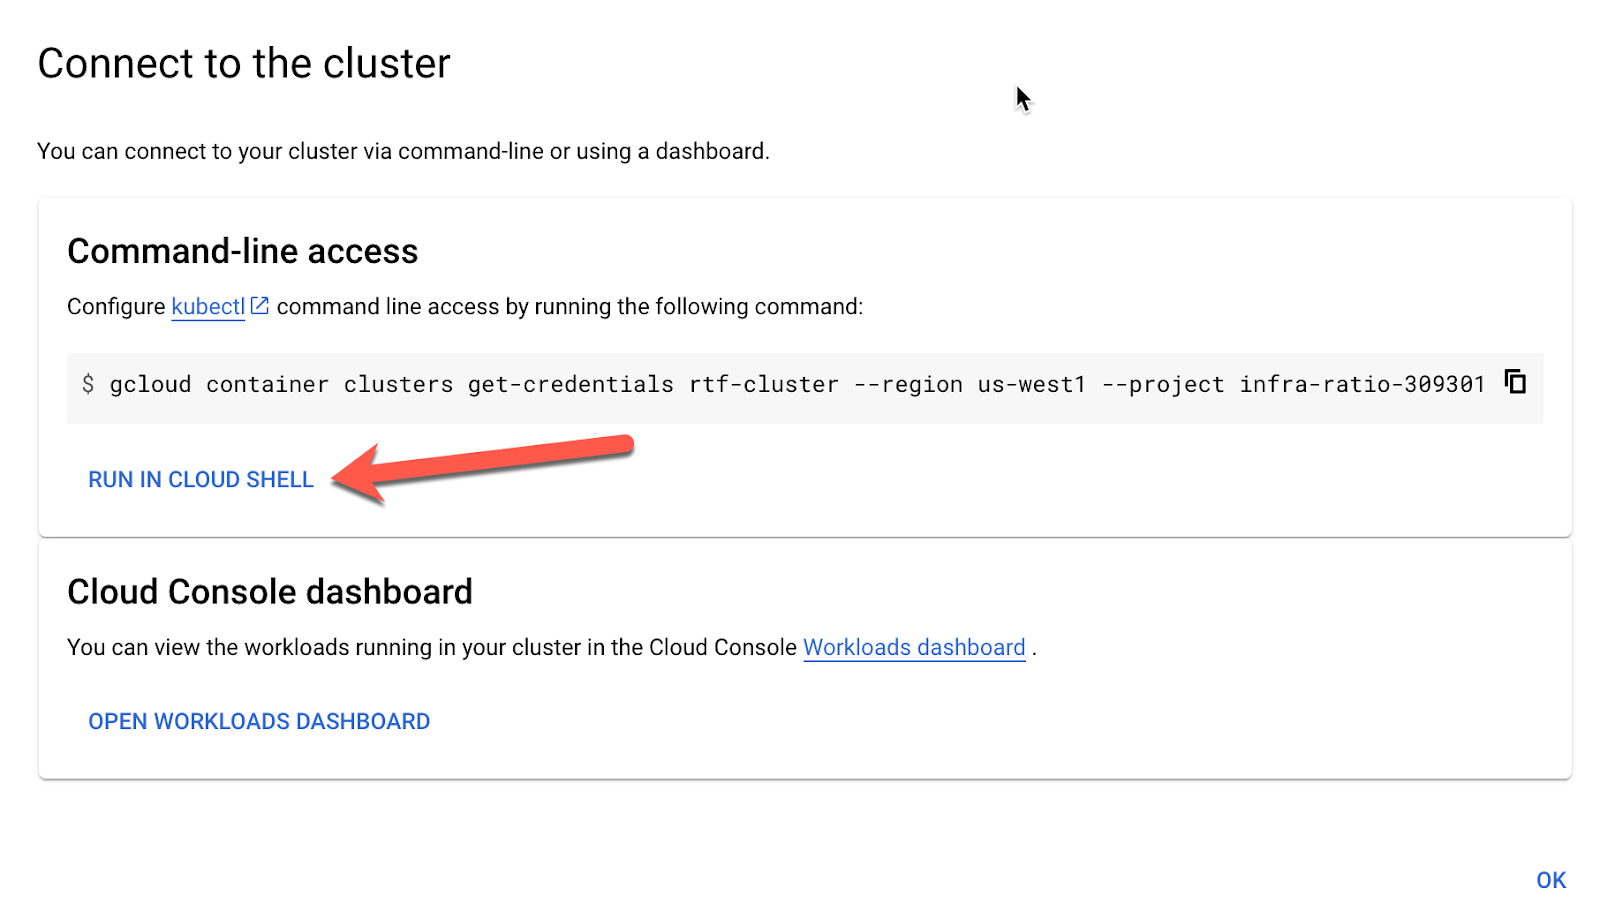
- From the pop-up screen, click RUN IN CLOUD SHELL. For this cookbook we will be using Google Cloud Shell to keep the configuration simple. If you want to run from your laptop, you will need the gcloud command-line tool. Press return once Cloud Shell has been started.

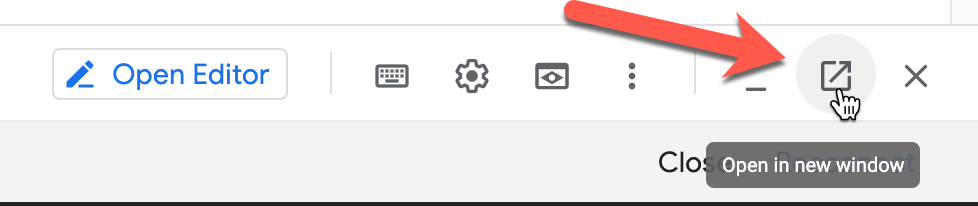
- On the right side of the Cloud Shell, click Open in new window. This will allow us to have the Cloud Shell in it's own tab from the Google Cloud Console.
- Next run the following command to verify that your cluster is running.
Kubectl get namespaces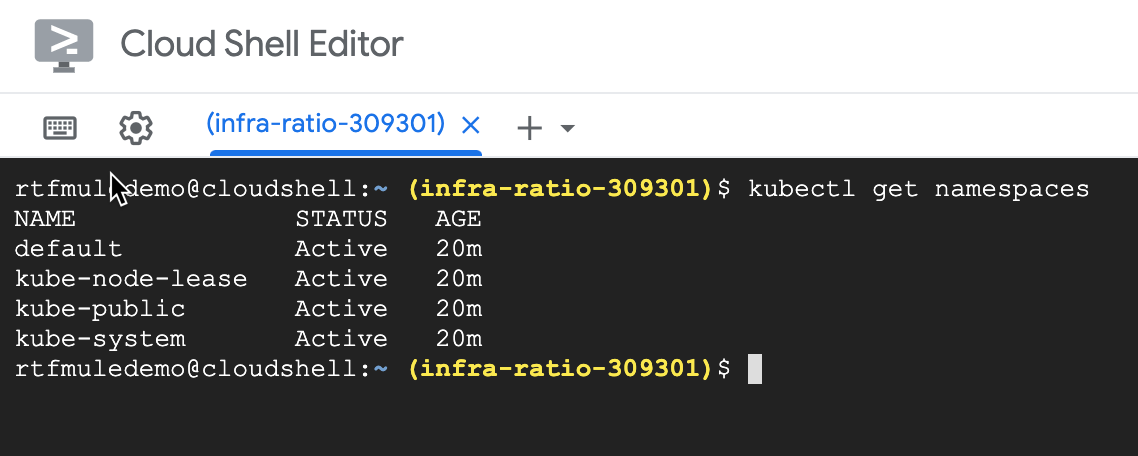
Download rtfctl
- Rtfctl is supported on Windows, MacOS, and Linux. Download this utility using the URL below for the Linux distribution:
curl -L https://anypoint.mulesoft.com/runtimefabric/api/download/rtfctl/latest -o rtfctl- Change file permission for the rtfctl command
chmod +x rtfctl
Create RTF in Runtime Manager
- Open a new tab in your browser and enter the following URL to login to Anypoint Platform. Enter Username and Password and click Sign In.
- https://anypoint.mulesoft.com
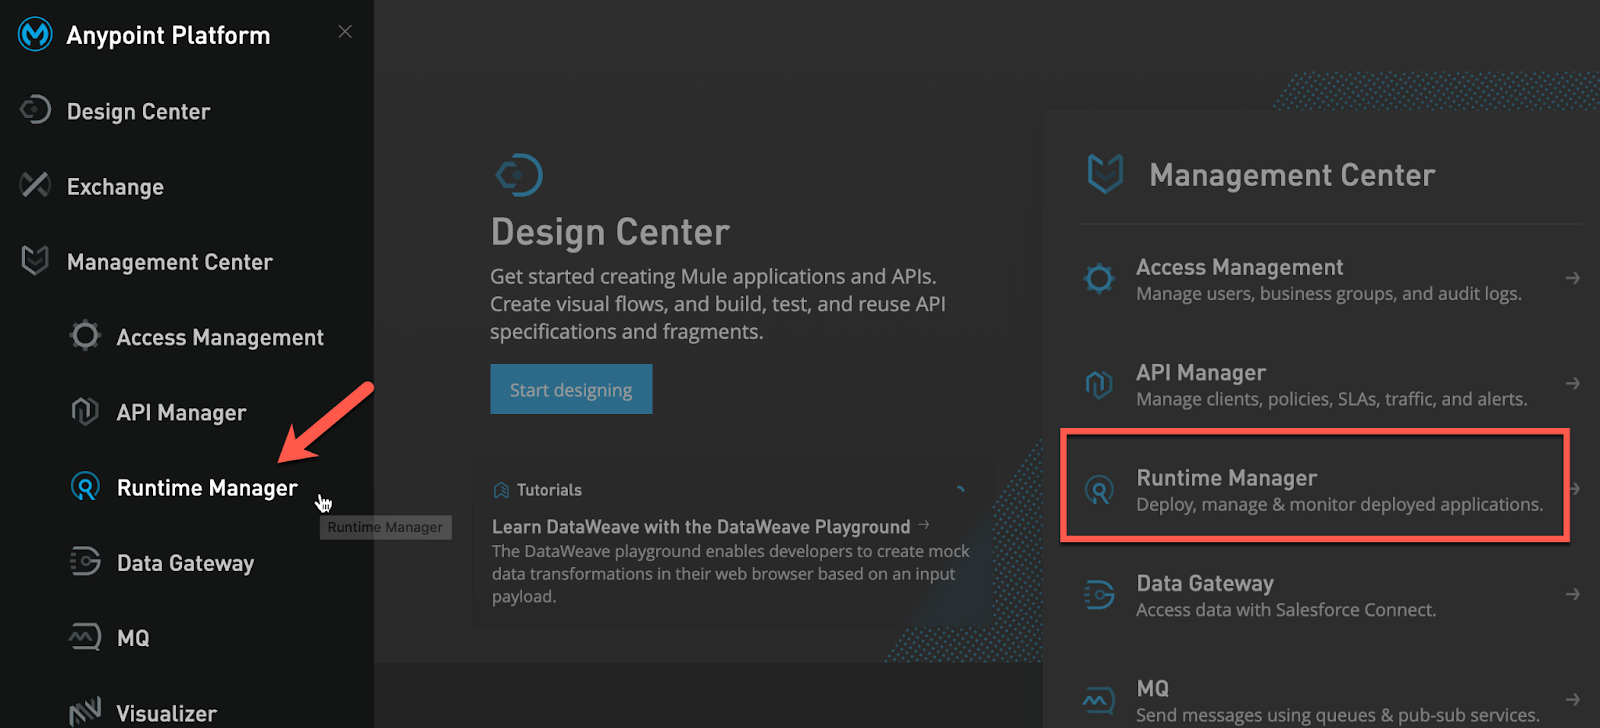
- From the main page click Runtime Manager or use the left navigation bar to navigate to Runtime Manager.
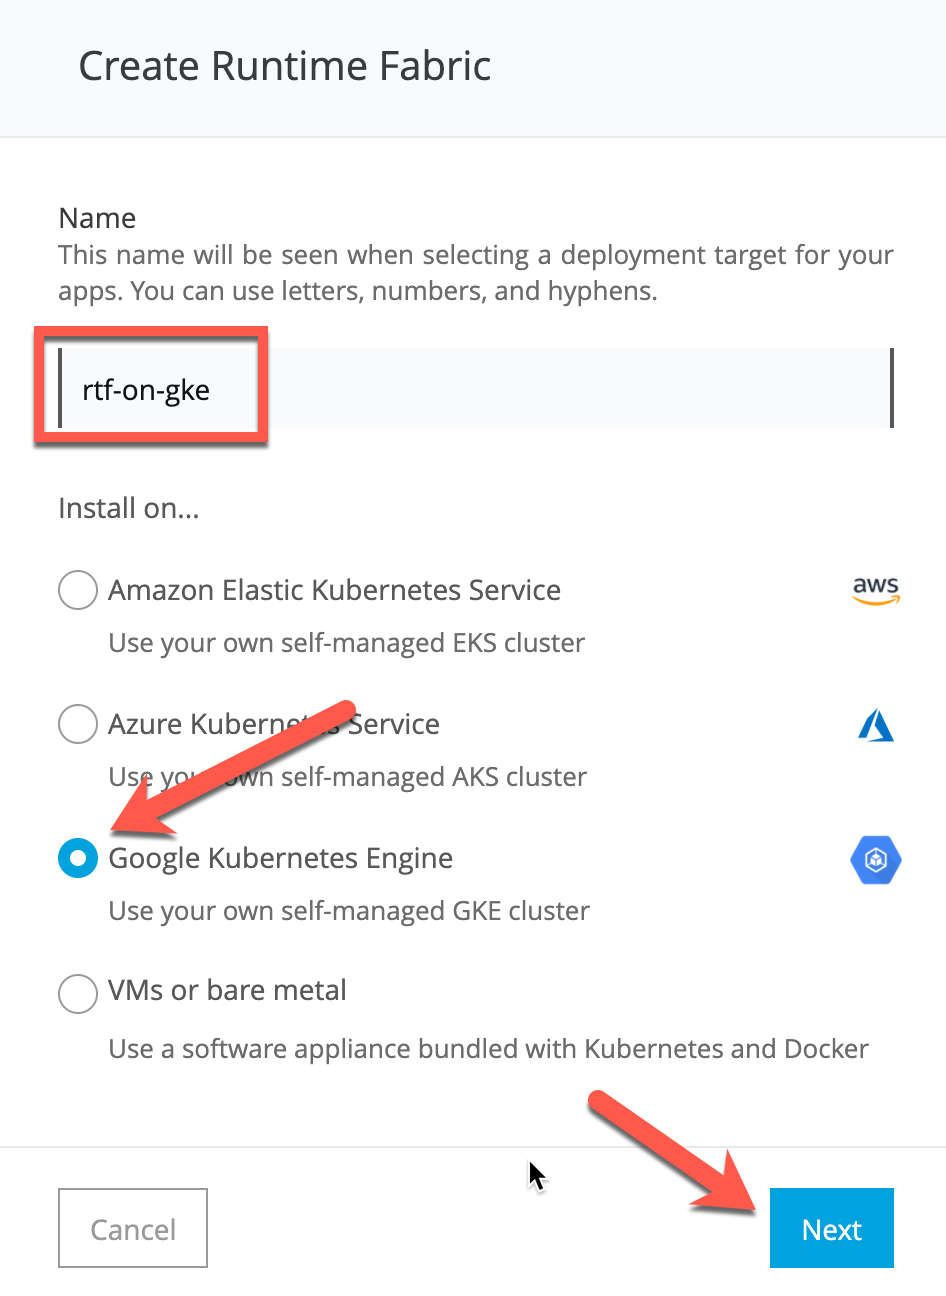
- On left hand menu, click Runtime Fabrics and then click Create Runtime Fabric.
- Enter name rtf-on-gke and select Google Kubernetes Engine. Click Next
- Click Accept on Support responsibility pop-up. We are now ready to install RTF. Click the Copy icon to copy the activation code to your clipboard.

Install RTF
- Switch back to the Google Cloud Shell. Using the activation code, run the following command:
./rtfctl validate <activation_data>- The validate option verified that: The Kubernetes environment is running. All required components exist. All required services are available. The rtfctl command outputs any incompatibilities with the Kubernetes environment.
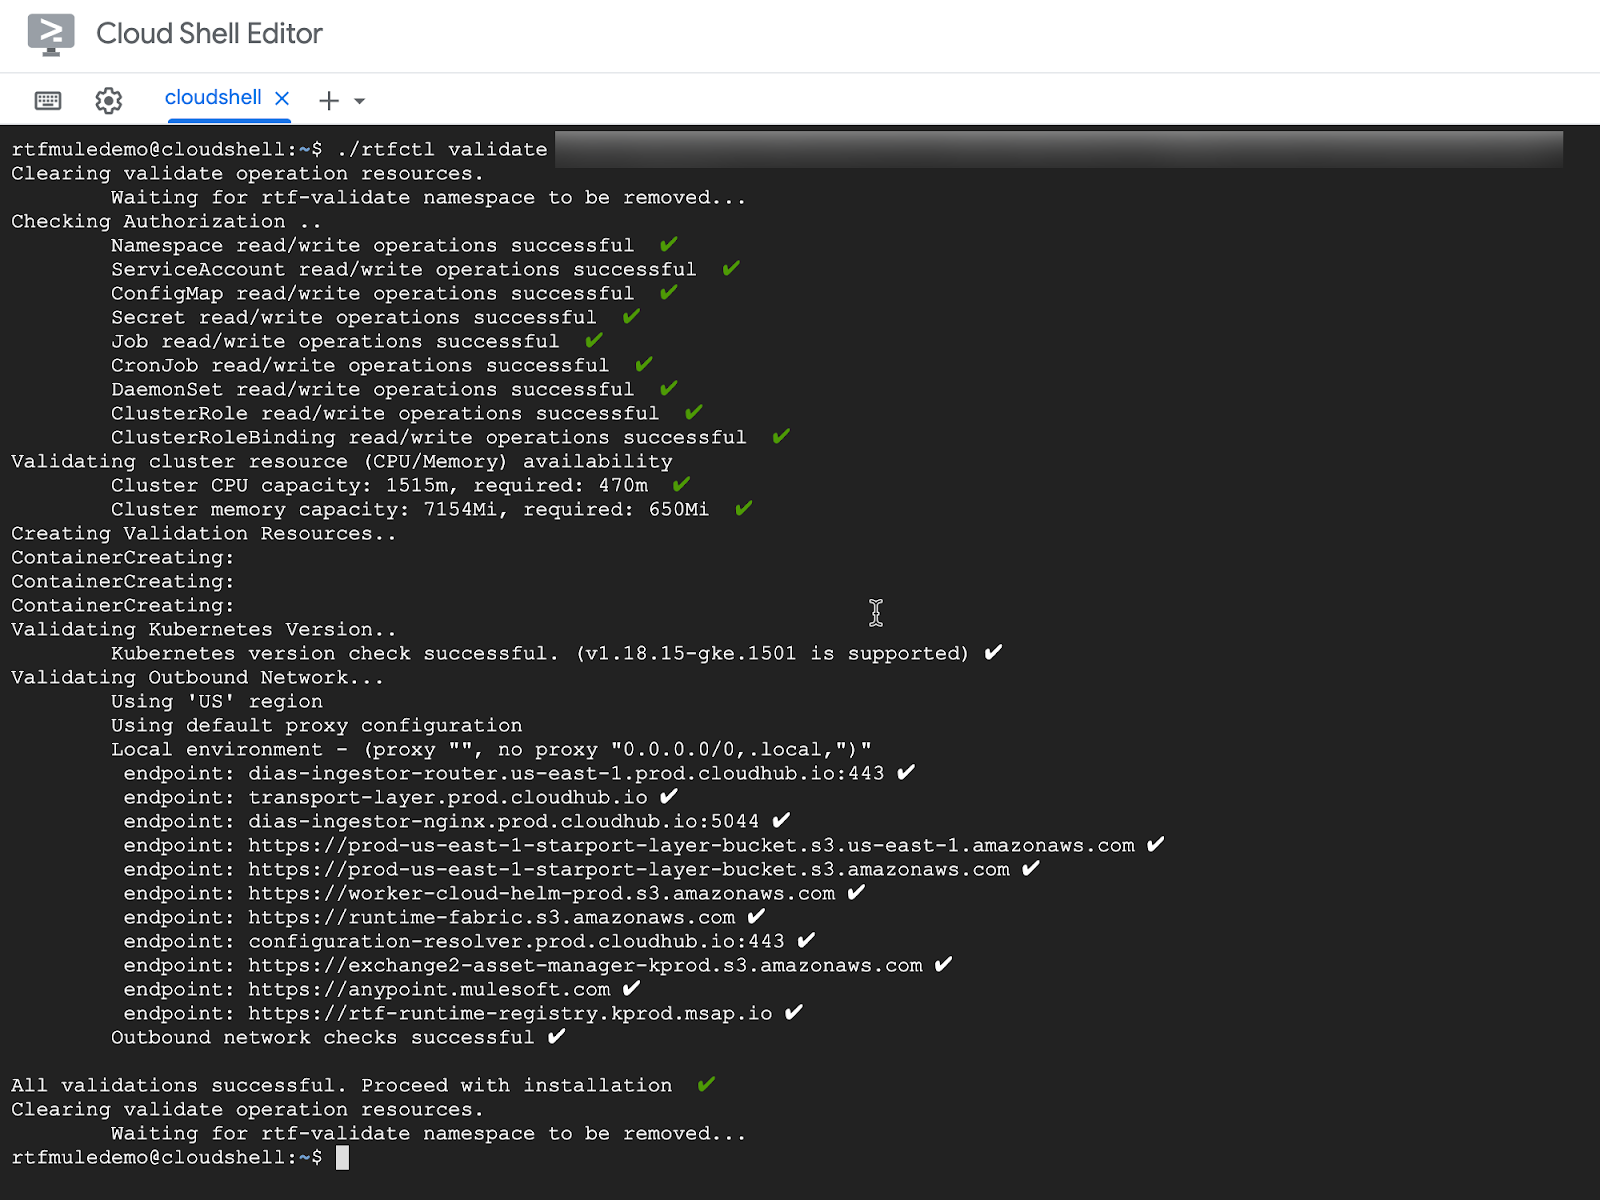
- If validate is successful, we are now ready to install RTF. Using the activation code, run the following command to install RTF:
./rtfctl install <activation_data>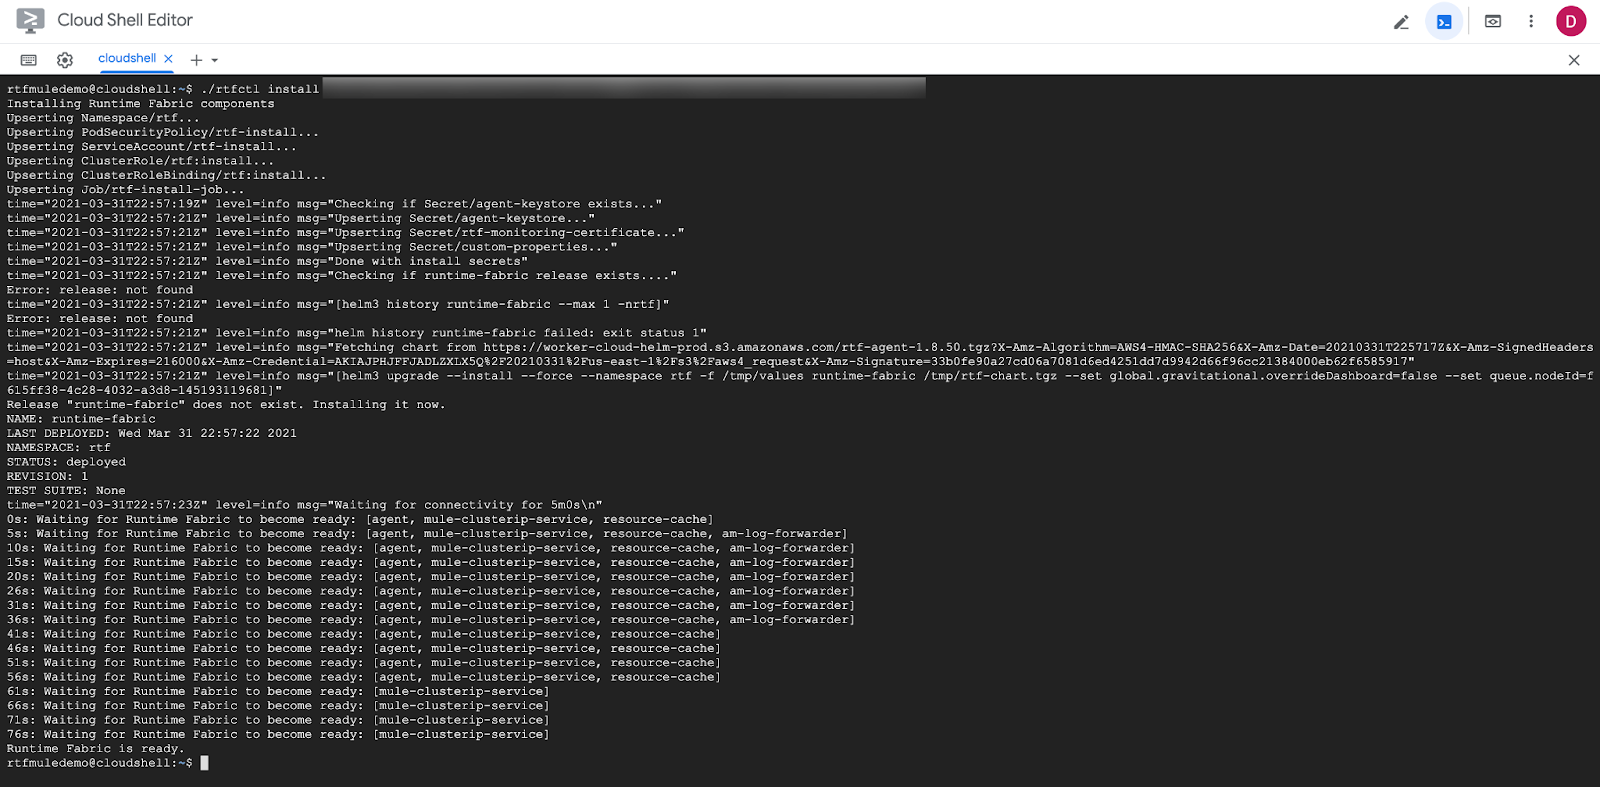
If everything went well, you will see Runtime Fabric is ready and the installation exists without errors. At this point, validate the installation with these steps:
- Verify that rtf namespace has been created and all pods are running:
kubectl get pods -n rtf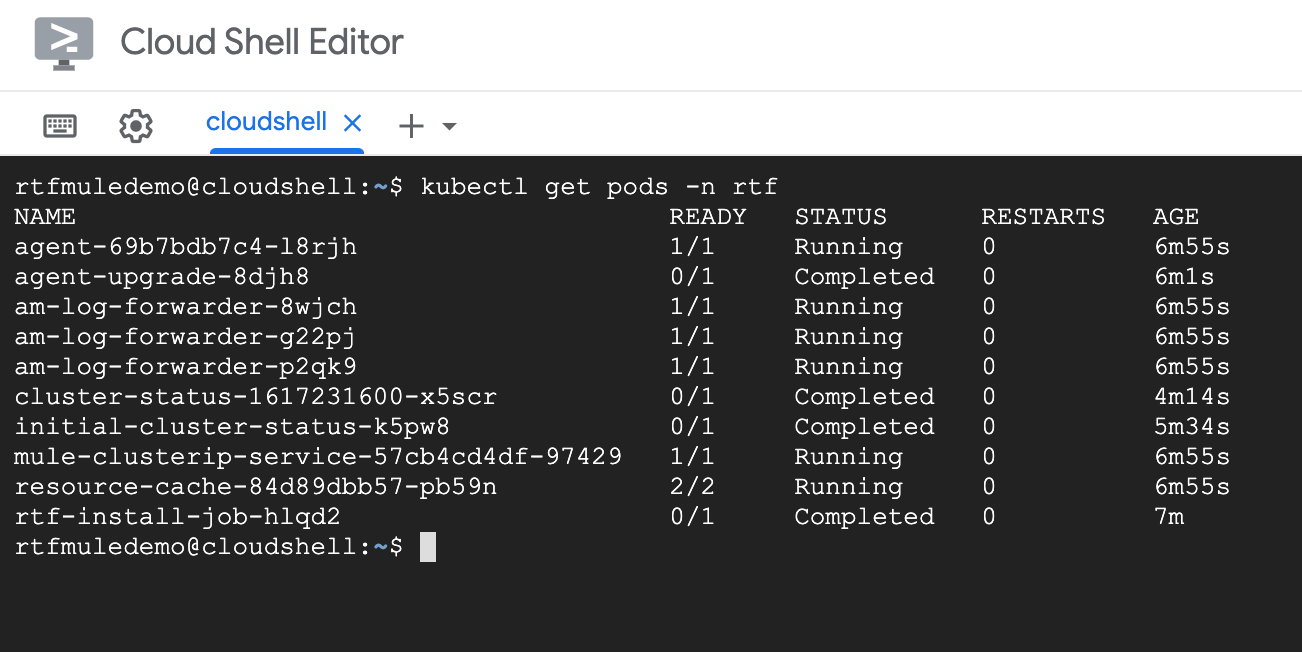
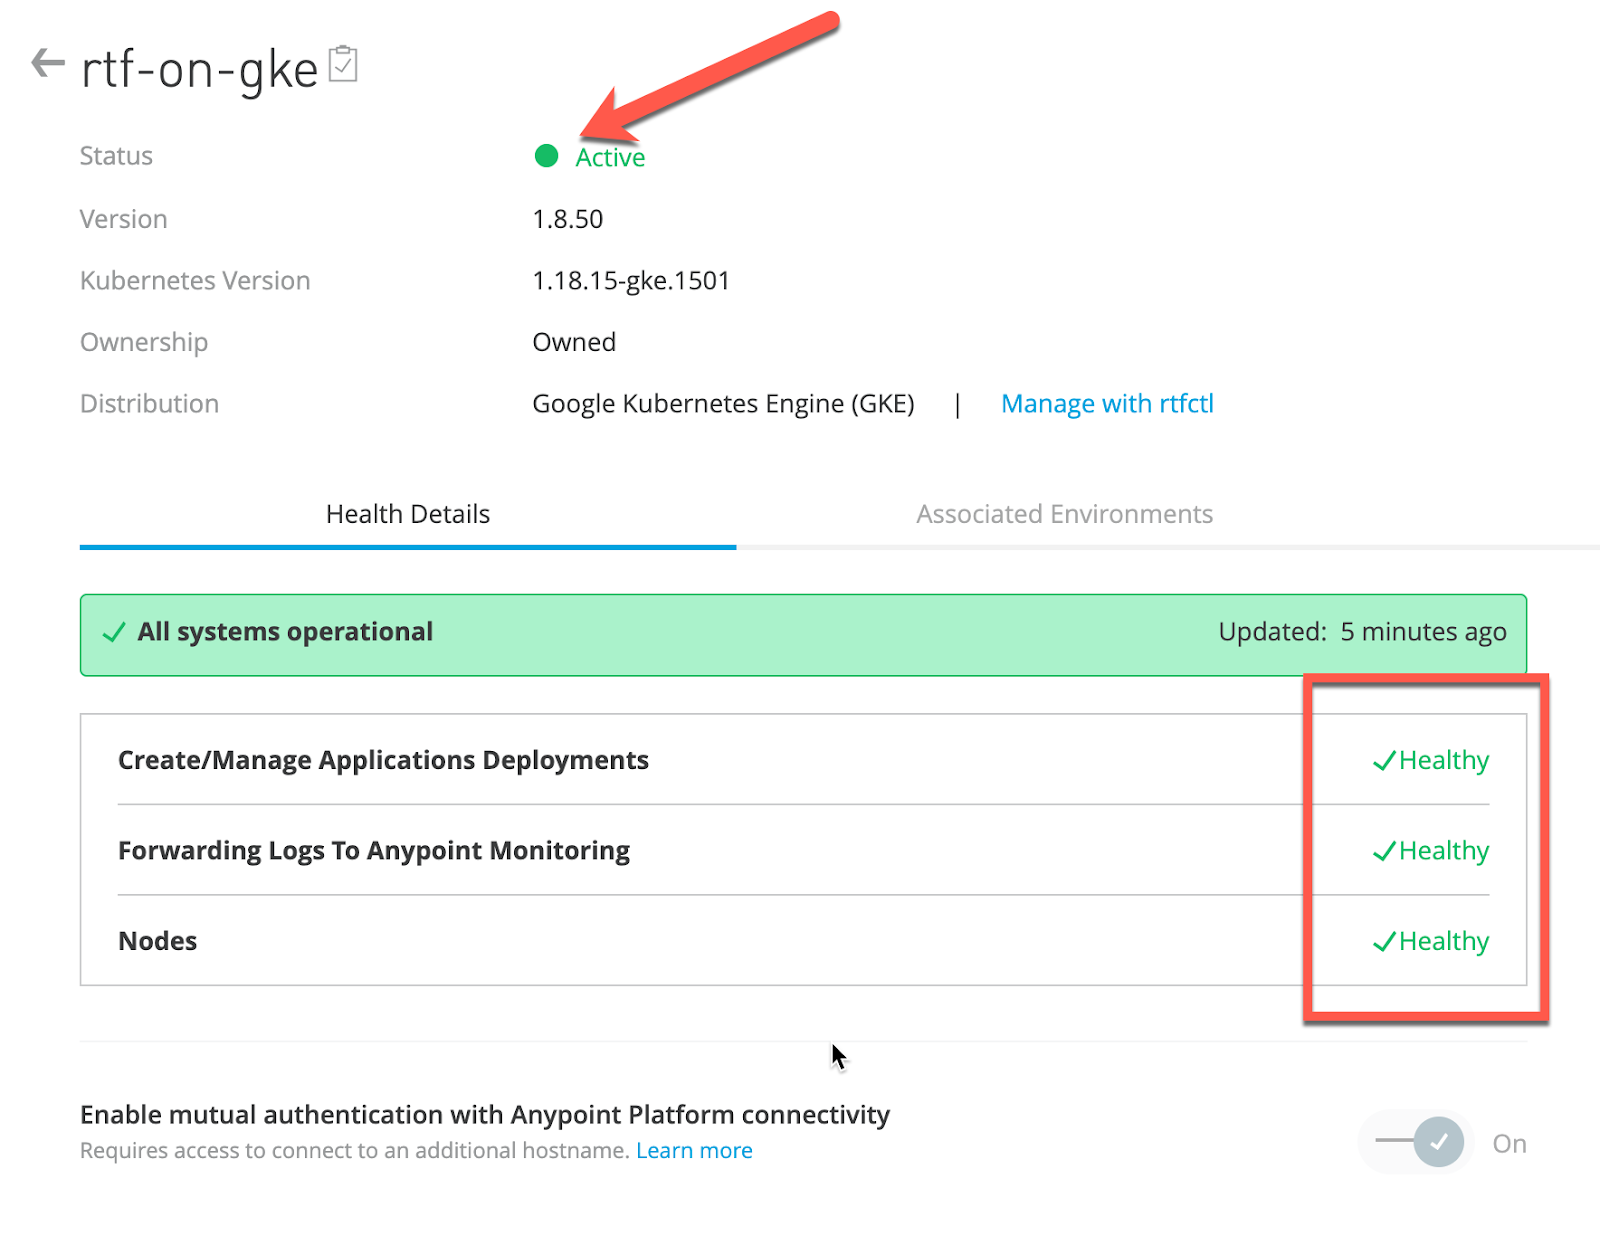
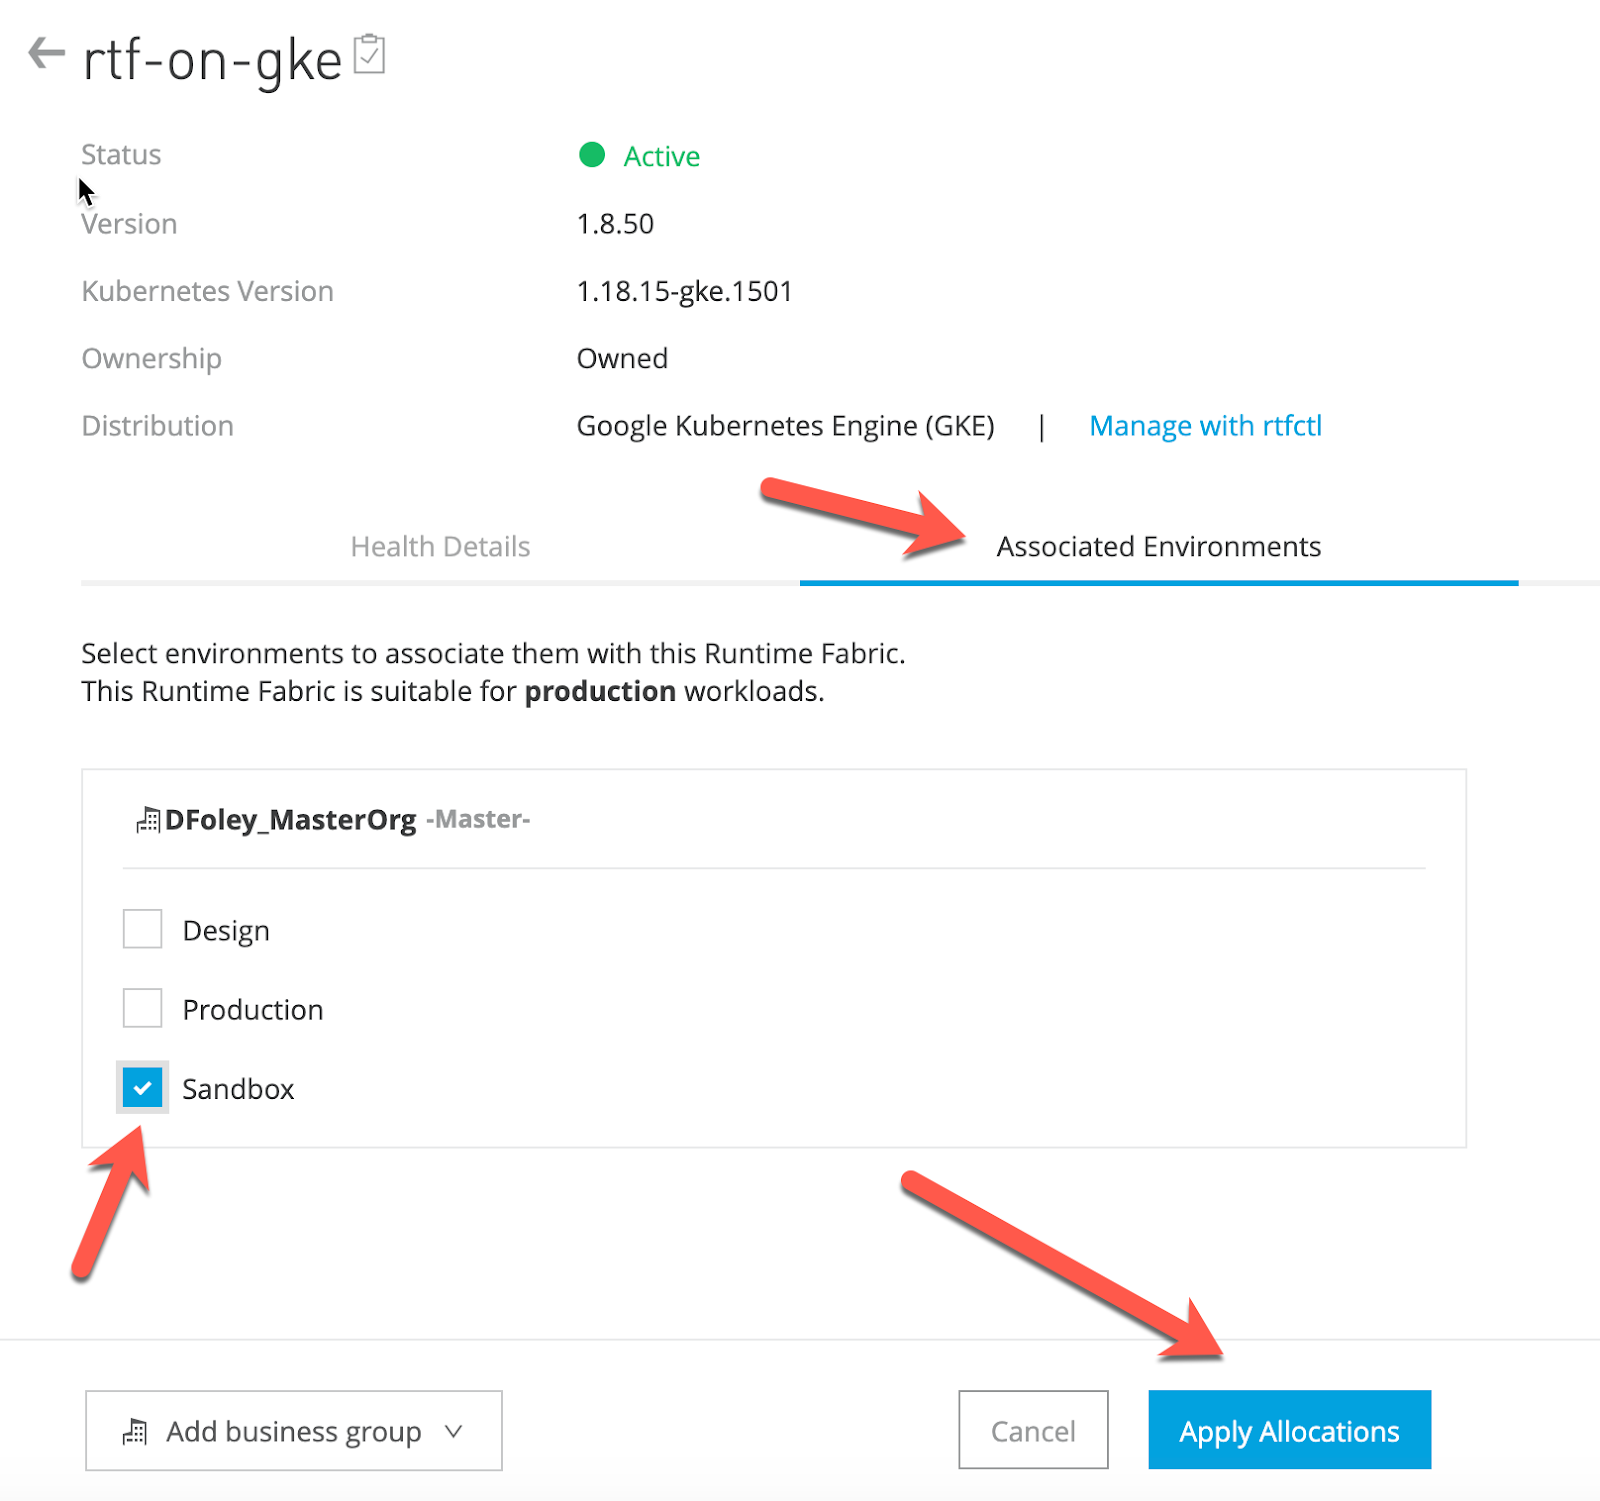
- Switch back to Anypoint Platform. First, make sure the status is Green and everything is healthy.
- Next, click Associated Environments and select your environment. In our example, we are selecting Sandbox. Click Apply Allocations
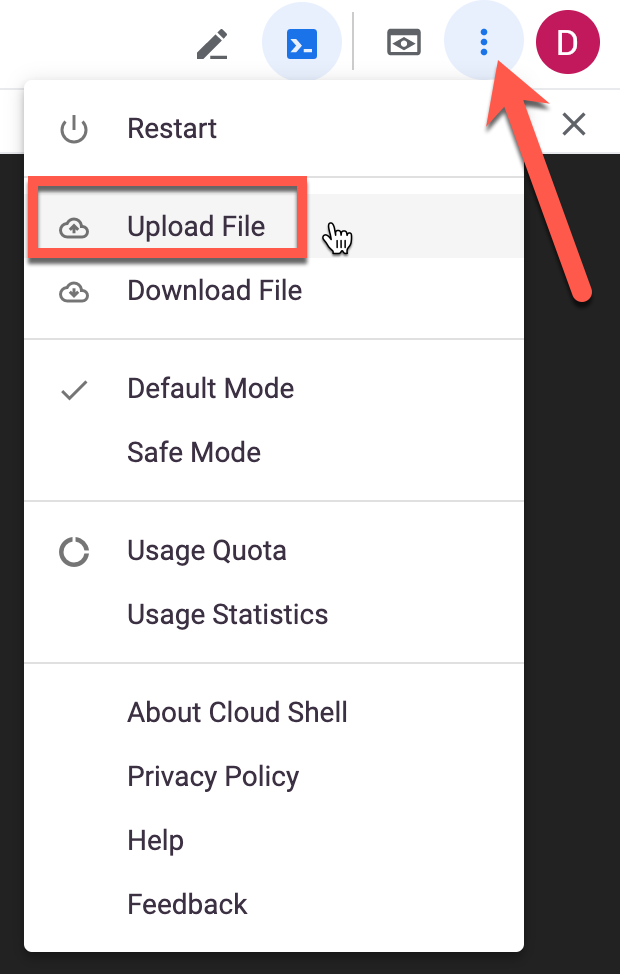
- Switch back to Cloud Shell. Now we need to update RTF with a valid MuleSoft license key.
- From the Cloud Shell three-dotted more menu, select Upload file and upload your MuleSoft provided license file. In our example it is named license.lic
- We will need to convert the MuleSoft provided license file to Base64 encoded. Use the following command in Google Cloud Shell:
base64 -w0 license.licOn macOS:
cat license.lic | base64- Update RTF with the MuleSoft license key using the following command:
./rtfctl apply mule-license <BASE64_ENCODED_STRING>- To verify the MuleSoft license key has been applied correct, run:
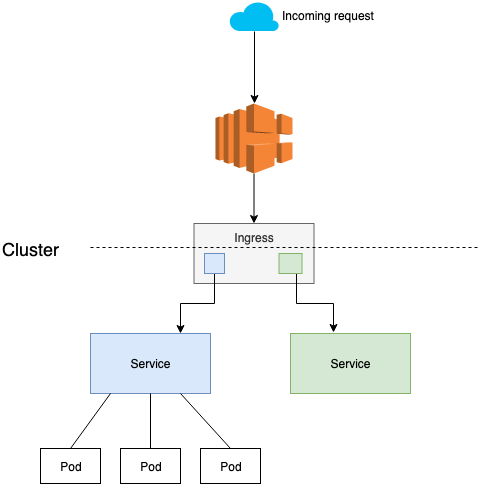
./rtfctl get mule-licenseOne of the most popular Ingress controllers being used is Nginx. At a high level, the architecture diagram looks like this:
- Run the following command to create all necessary resources for the ingress controller (still in Google Cloud Shell):
kubectl apply -f https://raw.githubusercontent.com/kubernetes/ingress-nginx/controller-v0.40.2/deploy/static/provider/cloud/deploy.yaml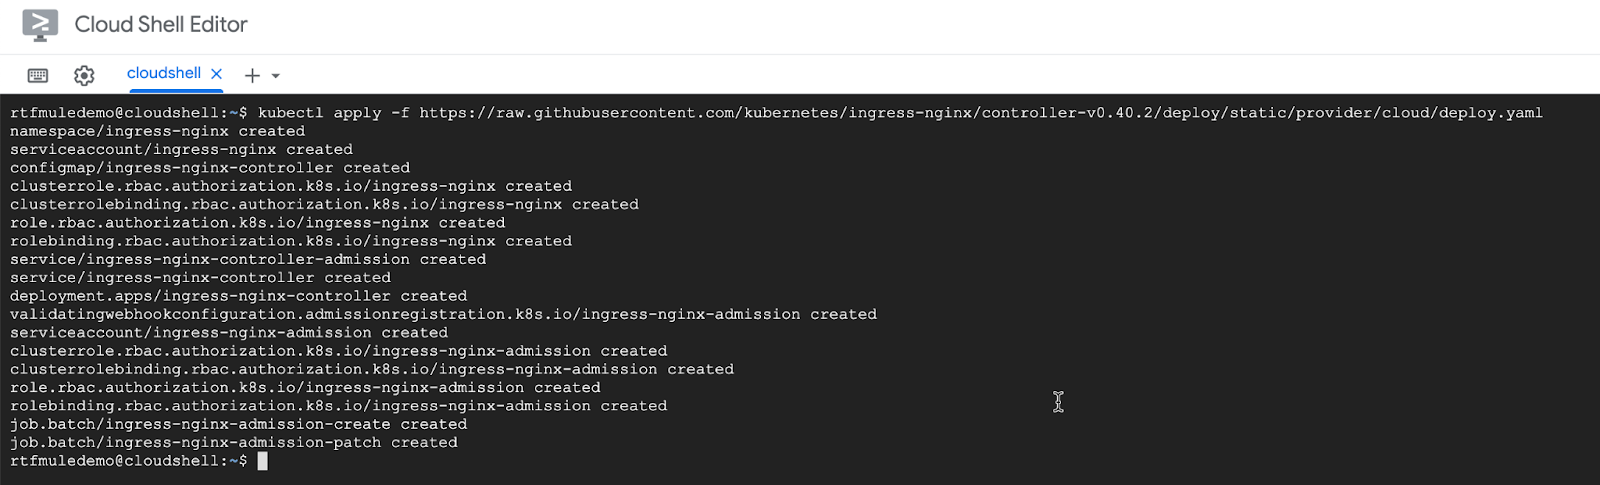
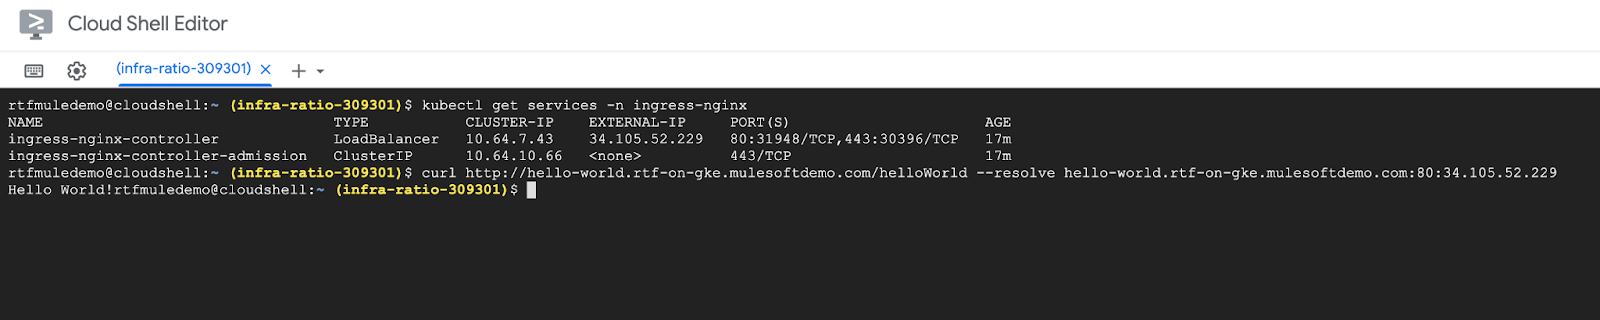
- Now run the following command to get the URL/IP address of your load balancer:
kubectl get services -n ingress-nginx
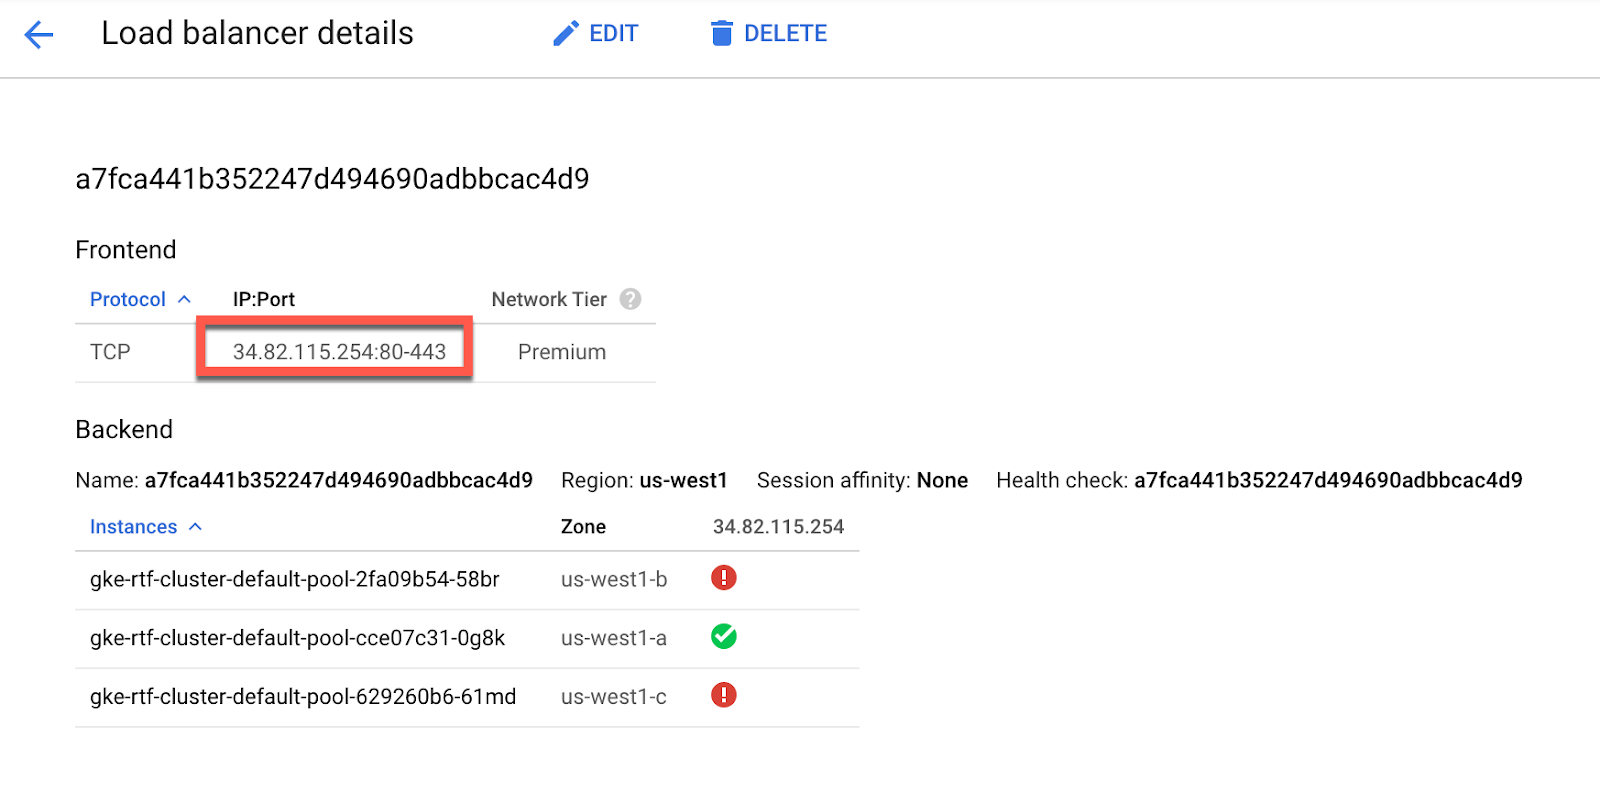
- Once you have an external IP, switch over to Google Console to view the created GCP Load Balancer. In the Search bar, enter Load balancing
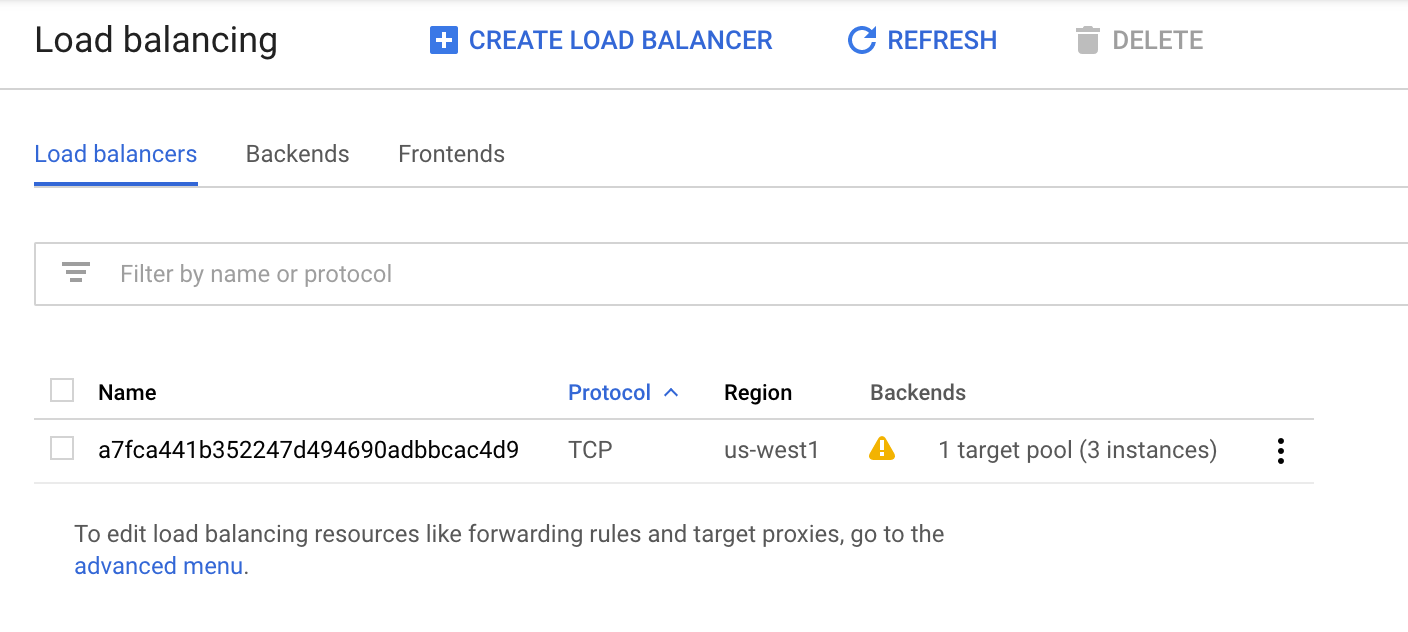
- If you click on the auto generated name, you can view the details including the external IP
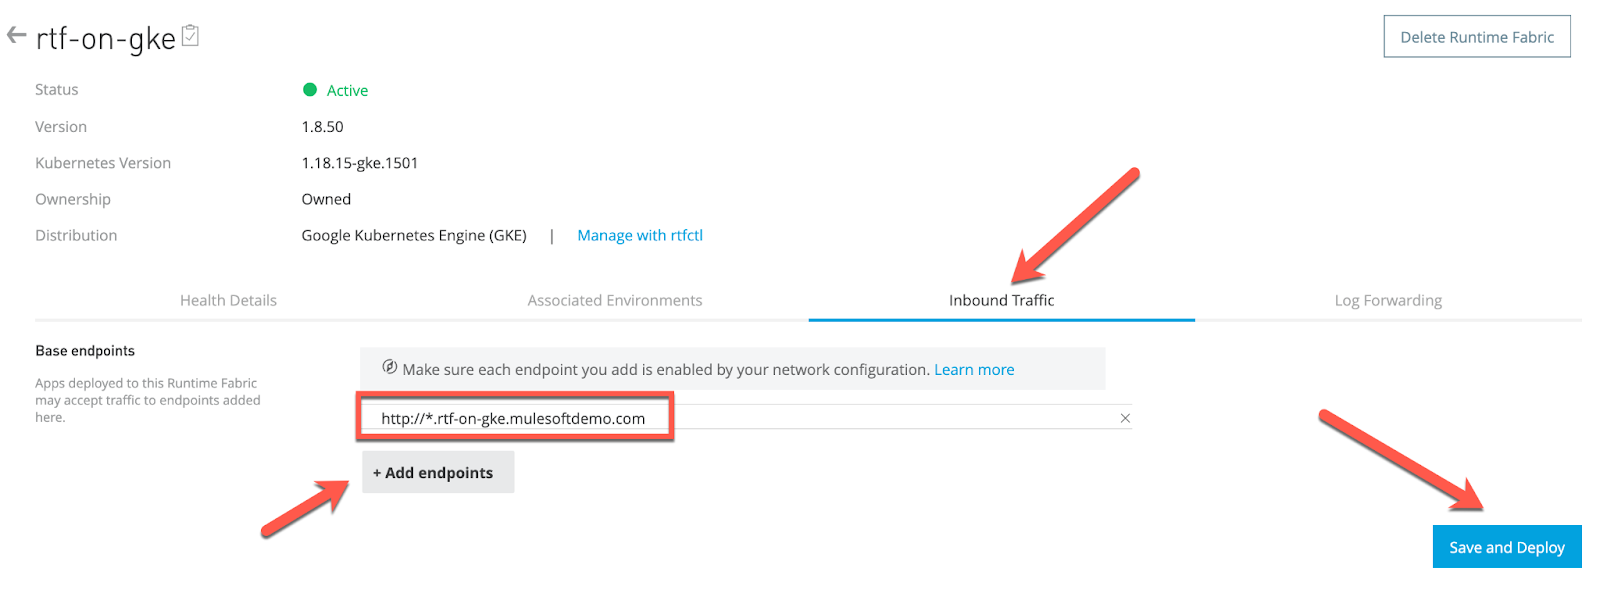
- Switch back to Anypoint Platform. Click Inbound Traffic
- Update Runtime Fabric with a domain that you own or want your application/apis to use. Remember to include protocol while adding the domain(s). By default, application will accept all domains if no domain is defined. For our example we will be using rtf-on-gke.mulesoftdemo.com.
- Click +Add endpoints. Enter http://*.rtf-on-gke.mulesoftdemo.com and click Add Endpoints. Once you have you endpoints added click Save and Deploy
- A hello world app is provided as an example for you to get started quickly.
- In Anypoint Platform, click Applications on the Runtime Manager left hand menu.
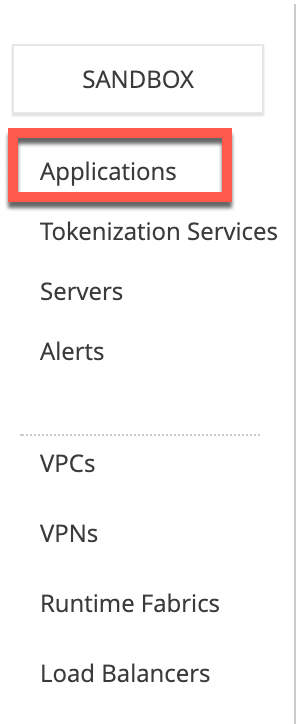
- Click Deploy application
- For Application Name enter hello-world. Select rtf-on-gke from Deployment Target
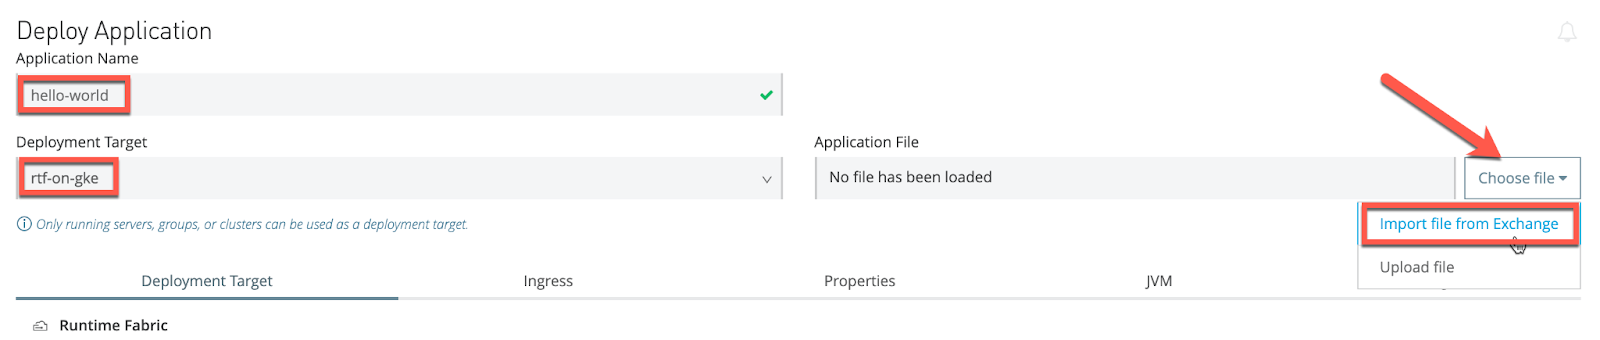
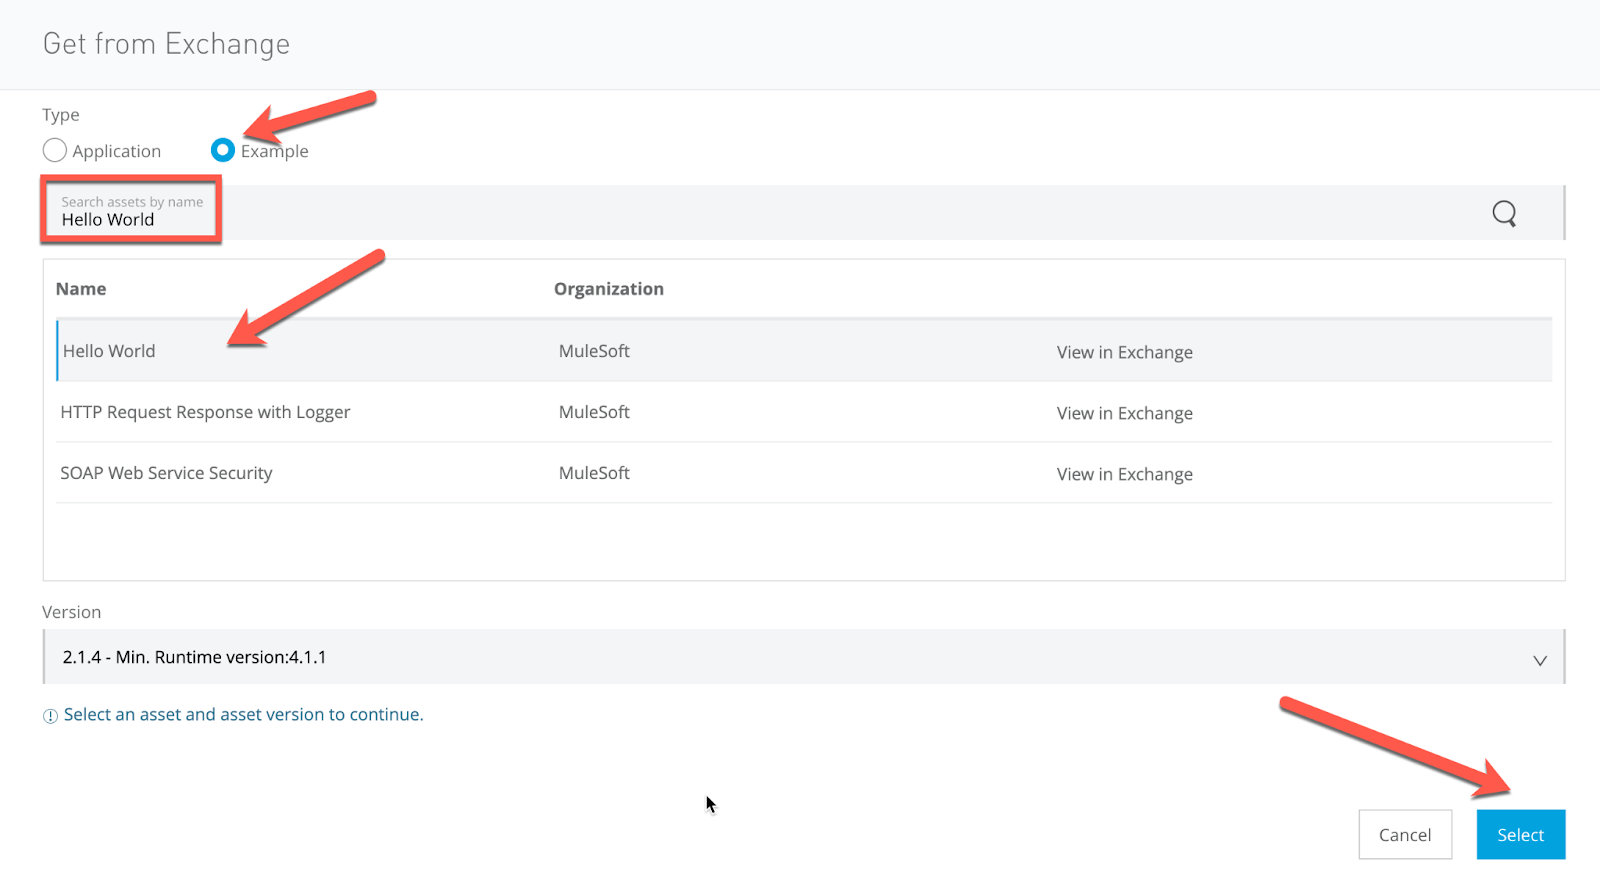
- Click Example. In the search bar, enter Hello World. Select the Hello World example and click select.
- Keep all default settings and click Deploy Application
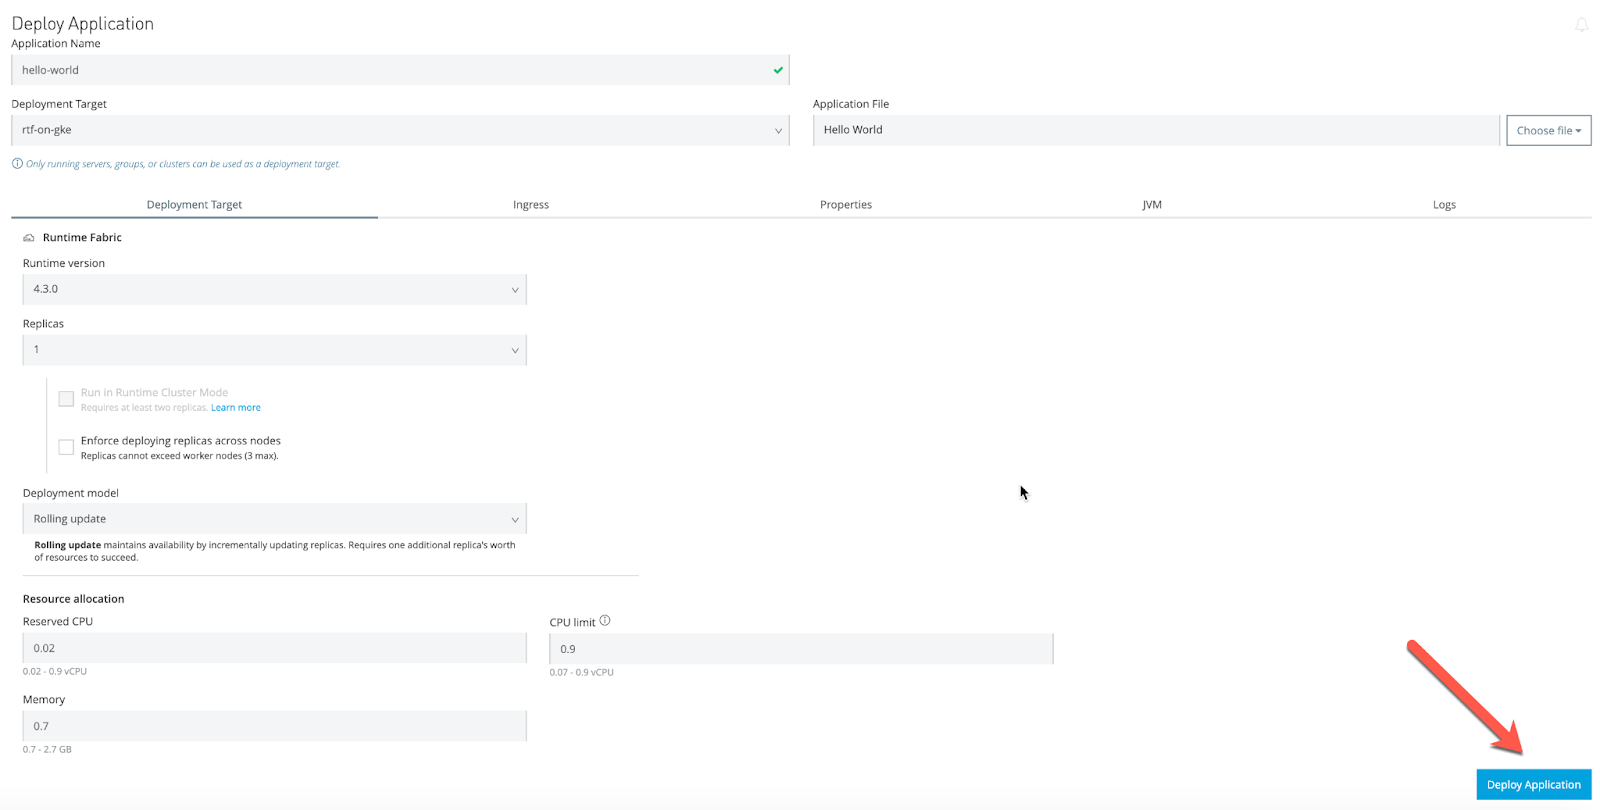
- Once the status changes to Running click the application name hello-world. You should see the Application URL for your application running on RTF.

Access Your Application
- To access your application endpoint we need to either setup a domain address or use local host file. To keep things simple we will use the resolve flag so that we can pass the hostname IP mapping on the command line.
- Return to you Google Cloud Shell.
- If you need to get your external IP execute the following command:
kubectl get services -n ingress-nginx- Copy the EXTERNAL-IP for the ingress-nginx-controller service.
- Issue the following command to hit you application
curl -vv http://hello-world.rtf-on-gke.mulesoftdemo.com/helloWorld --resolve hello-world.rtf-on-gke.mulesoftdemo.com:80:<IP address of ingress controller>